
Jump Start Your Vendor Management Initiative
- Each year, IT organizations spend more money “outsourcing” tasks, activities, applications, functions, and other items.
- The increased spend and associated outsourcing leads to less control, and more risk for IT organizations. Managing this becomes a higher priority for IT, but many IT organizations are ill-equipped to do this proactively.
Our Advice
Critical Insight
- Vendor management is not “plug and play” – each organization’s vendor management initiative (VMI) needs to fit its culture, environment, and goals. There are commonalites among vendor management initiatives, but the key is to adapt vendor management principles to fit your needs, not the other way around.
- All vendors are not of equal importance to an organization. Internal resources are a scarce commodity and should be deployed so that they provide the best return on the organization’s investment. Classifying or segmenting your vendors allows you to focus your efforts on the most important vendors first, allowing your VMI to have the greatest impact possible.
- Having a solid foundation is critical to the VMI’s ongoing success. Whether you will be creating a formal vendor management office or using vendor management techniques, tools, and templates “informally,” starting with the basics is essential. Make sure you understand why the VMI exists and what it hopes to achieve, what is in and out of scope for the VMI, what strengths the VMI can leverage and the obstacles it will have to address, and how it will work with other areas within your organization.
Impact and Result
- Build and implement a vendor management initiative tailored to your environment.
- Create a solid foundation to sustain your vendor management initiative as it evolves and matures.
- Leverage vendor management-specific tools and templates to manage vendors more proactively and improve communication.
- Concentrate your vendor management resources on the right vendors.
- Build a roadmap and project plan for your vendor management journey to ensure you reach your destination.
- Build collaborative relationships with critical vendors.
Jump Start Your Vendor Management Initiative Research & Tools
Start here – read the Executive Brief
Read our concise Executive Brief to find out why you should jump start a vendor management initiative, review Info-Tech’s methodology, and understand the four ways we can support you in completing this project.Besides the small introduction, subscribers and consulting clients within this management domain have access to:
- Jump Start Your Vendor Management Initiative – Phases 1-4
1. Plan
Organize your VMI and document internal processes, relationships, roles, and responsibilities. The main outcomes from this phase are organizational documents, a baseline VMI maturity level, and a desired future state for the VMI.
- Jump Start Your Vendor Management Initiative – Phase 1: Plan
- Jump – Phase 1 Tools and Templates Compendium
2. Build
Configure and create the tools and templates that will help you run the VMI. The main outcomes from this phase are a clear understanding of which vendors are important to you, the tools to manage the vendor relationships, and an implementation plan.
- Jump Start Your Vendor Management Initiative – Phase 2: Build
- Jump – Phase 2 Tools and Templates Compendium
- Jump – Phase 2 Vendor Classification Tool
- Jump – Phase 2 Vendor Risk Assessment Tool
3. Run
Begin operating the VMI. The main outcomes from this phase are guidance and the steps required to implement your VMI.
- Jump Start Your Vendor Management Initiative – Phase 3: Run
4. Review
Identify what the VMI should stop doing, start doing, and continue doing as it improves and matures. The main outcomes from this phase are ways to advance the VMI and maintain internal alignment.
- Jump Start Your Vendor Management Initiative – Phase 4: Review
Infographic
Workshop: Jump Start Your Vendor Management Initiative
Workshops offer an easy way to accelerate your project. If you are unable to do the project yourself, and a Guided Implementation isn't enough, we offer low-cost delivery of our project workshops. We take you through every phase of your project and ensure that you have a roadmap in place to complete your project successfully.
1 Plan
The Purpose
Getting Organized
Key Benefits Achieved
Defined Roles and Goals for the VMI
Activities
1.1 Mission Statement and Goals
1.2 Scope
1.3 Strengths and Obstacles
1.4 Roles and Responsibilities – OIC Chart
1.5 Process Mapping
1.6 Vendor Inventory Tool (Overview)
Outputs
Completed Mission Statement and Goals
List of Items In Scope and Out of Scope for the VMI
List of Strengths and Obstacles for the VMI
Completed OIC Chart
Sample Process Map for One Process
Begun Using Vendor Inventory Tool
2 Plan/Build/Run
The Purpose
Build VMI Tools and Templates
Key Benefits Achieved
Configured Tools and Templates for the VMI Based on Its Roles and Goals
Activities
2.1 Maturity Assessment
2.2 Structure and Job Descriptions
2.3 Attributes of a Valuable Vendor
2.4 Classification Model
2.5 Risk Assessment Tool
2.6 Scorecards and Feedback
2.7 Business Alignment Meeting Agenda
Outputs
Completed Maturity Assessment.
Sample Job Descriptions and Phrases.
List of Attributes of a Valuable Vendor.
Configured Classification Model.
Configured Risk Assessment Tool.
Configured Scorecard and Feedback Questions.
Configured Business Alignment Meeting Agenda.
3 Build/Run
The Purpose
Continue Building VMI Tools and Templates
Key Benefits Achieved
Configured Tools and Templates for the VMI Based on Its Roles and Goals
Activities
3.1 Relationship Alignment Document
3.2 Vendor Orientation
3.3 Policies and Procedures
3.4 3-Year Roadmap
3.5 90-Day Plan
3.6 Quick Wins
3.7 Reports
3.8 Kickoff Meeting
Outputs
Relationship Alignment Document Sample and Checklist
Vendor Orientation Checklist
Policies and Procedures Checklist
Completed 3-Year Roadmap
Completed 90-Day Plan
List of Quick Wins
List of Reports
4 Review
The Purpose
Review the Past 12 Months of VMI Operations and Improve
Key Benefits Achieved
Keeping the VMI Aligned With the Organization’s Goals and Ensuring the VMI Is Leveraging Leading Practices
Activities
4.1 Develop/Improve Vendor Relationships.
4.2 Assess Compliance.
4.3 Incorporate Leading Practices.
4.4 Leverage Lessons Learned.
4.5 Maintain Internal Alignment.
4.6 Update Governances.
Outputs
Further reading
Jump Start Your Vendor Management Initiative
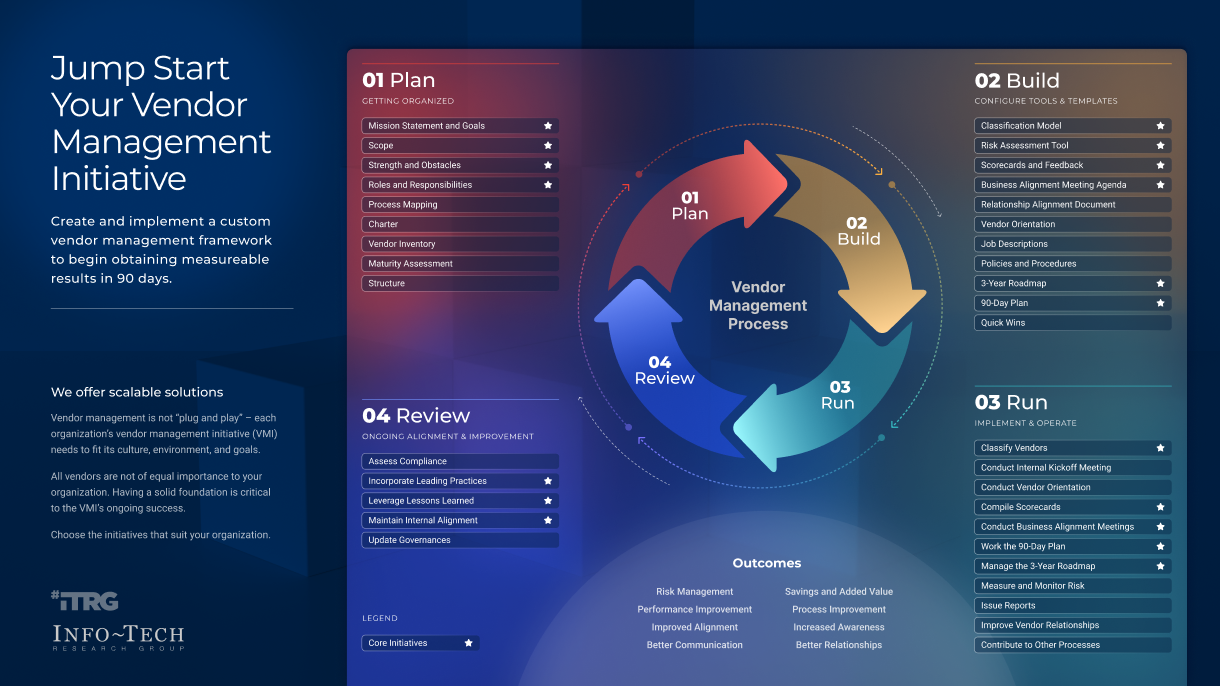
Create and implement a vendor management framework to begin obtaining measurable results in 90 days.
EXECUTIVE BRIEF
Analyst Perspective
What is vendor management?
When you read the phrase “vendor management,” what comes to mind? This isn’t a rhetorical question. Take your time … I’ll wait.
Unfortunately, those words conjure up a lot of different meanings, and much of that depends on whom you ask. Those who work in the vendor management field will provide a variety of answers. To complicate matters, those who are vendor management “outsiders” will have a totally different view of what vendor management is. Why is this important? Because we need a common definition to communicate more effectively, even if the definition is broad.
Let’s start creating a working definition that is not circular. Vendor management is not simply managing vendors. That expression basically reorders the words and does nothing to advance our cause; it only adds to the existing confusion surrounding the concept.
Vendor management is best thought of as a spectrum or continuum with many points rather than a specific discipline like accounting or finance. There are many functions and activities that fall under the umbrella term of vendor management: some of them will be part of your vendor management initiative (VMI), some will not, and some will exist in your organization but be outside the VMI. This is the unique part of vendor management – the part that makes it fun, but also the part that leads to the confusion. For example, accounts payable sits within the accounting department almost exclusively, but contract management can sit within or outside the VMI. The beauty of vendor management is its flexibility; your VMI can be created to meet your specific needs and goals while leveraging common vendor management principles.
Every conversation around vendor management needs to begin with “What do you mean by that?” Only then can we home in on the scope and nature of what people are discussing. “Managing vendors” is too narrow because it often ignores many of the reasons organizations create VMIs in the first place: to reduce costs, to improve performance, to improve processes, to improve relationships, to improve communication, and to manage risk better.
Vendor management is a strategic initiative that takes the big picture into account … navigating the cradle to grave lifecycle to get the most out of your interactions and relationships with your vendors. It is flexible and customizable; it is not plug and play or overly prescriptive. Tools, principles, templates, and concepts are adapted rather than adopted as is. Ultimately, you define what vendor management is for your organization.
We look forward to helping you on your vendor management journey no matter what it looks like. But first, let’s have a conversation about how you want to define vendor management in your environment.

Phil Bode
Principal Research Director, Vendor Management
Info-Tech Research Group
Executive Summary
Your Challenge
Each year, IT organizations “outsource” tasks, activities, functions, and other items. During 2021:
- Spend on as-a-service providers increased 38% over 2020.*
- Spend on managed service providers increased 16% over 2020.*
- IT service providers increased their merger and acquisition numbers by 47% over 2020.*
*Source: Information Services Group, Inc., 2022.
This leads to more spend, less control, and more risk for IT organizations. Managing this becomes a higher priority for IT, but many IT organizations are ill-equipped to do this proactively.Common Obstacles
As new contracts are negotiated and existing contracts are renegotiated or renewed, there is a perception that the contracts will yield certain results, output, performance, solutions, or outcomes. The hope is that these will provide a measurable expected value to IT and the organization. Oftentimes, much of the expected value is never realized. Many organizations don’t have a VMI to help:
- Ensure at least the expected value is achieved.
- Improve on the expected value through performance management.
- Significantly increase the expected value through a proactive VMI.
Info-Tech’s Approach
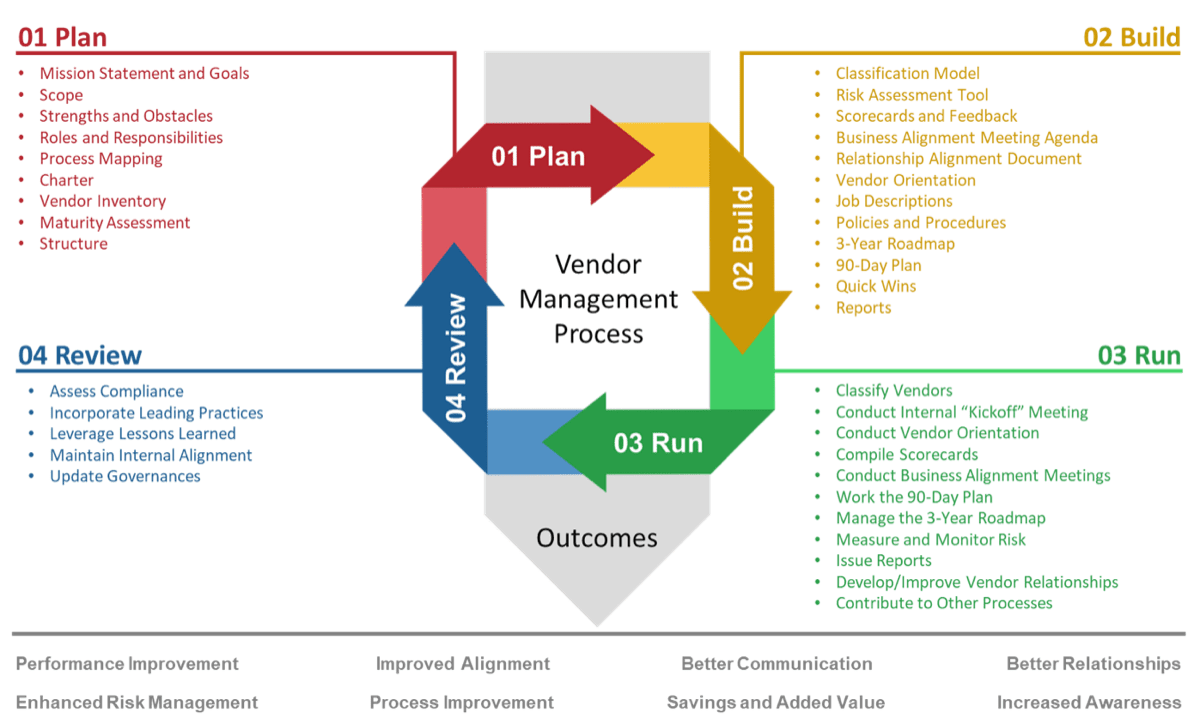
Vendor management is a proactive, cross-functional lifecycle. It can be broken down into four phases:
- Plan
- Build
- Run
- Review
The Info-Tech process addresses all four phases and provides a step-by-step approach to configure and operate your VMI. The content in this blueprint helps you quickly establish your VMI and set a solid foundation for its growth and maturity.
Info-Tech Insight
Vendor management is not a one-size-fits-all initiative. It must be configured:
- For your environment, culture, and goals.
- To leverage the strengths of your organization and personnel.
- To focus your energy and resources on your critical vendors.
Executive Summary
Your Challenge
Spend on managed service providers and as-a-service providers continues to increase. In addition, IT services vendors continue to be active in the mergers and acquisitions arena. This increases the need for a VMI to help with the changing IT vendor landscape. In 2021, there was increases of:
38%
Spend on As-a-Service Providers
16%
Spend on Managed Services Providers
47%
IT Services Merger & Acquisition Growth (Transactions)
Source: Information Services Group, Inc., 2022.
Executive Summary
Common Obstacles
When organizations execute, renew, or renegotiate a contract, there is an “expected value” associated with that contract. Without a robust VMI, most of the expected value will never be realized. With a robust VMI, the realized value significantly exceeds the expected value during the contract term.
A contract’s realized value with and without a vendor management initiative
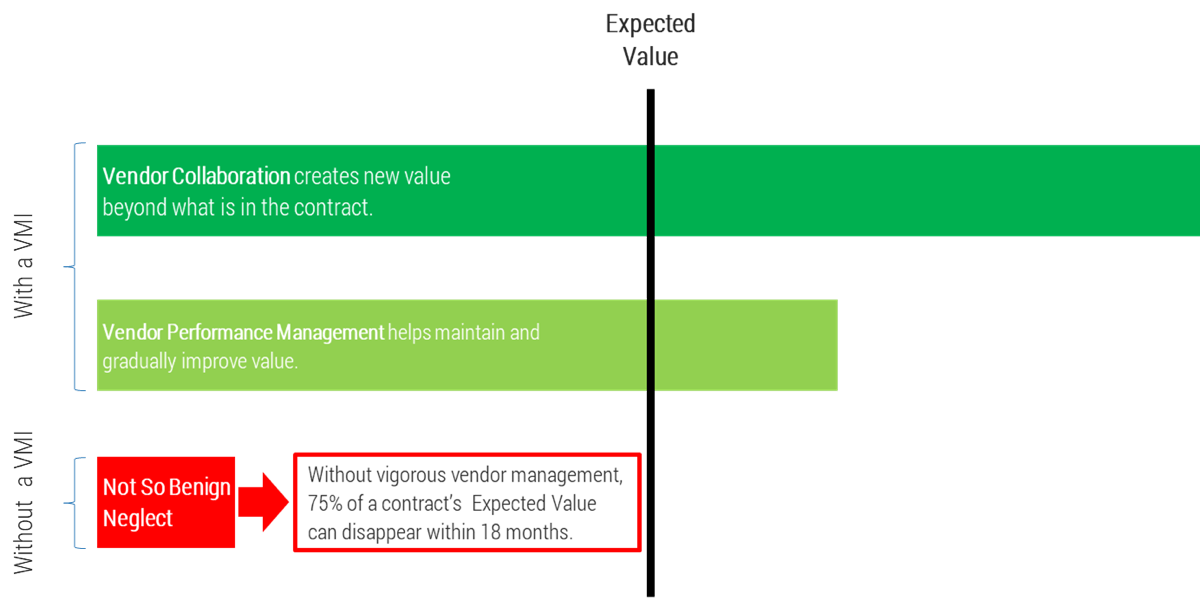
Source: Based on findings from Geller & Company, 2003.
Executive Summary
Info-Tech’s Approach
A sound, cyclical approach to vendor management will help you create a VMI that meets your needs and stays in alignment with your organization as they both change (i.e. mature and grow).
Info-Tech’s Methodology for Creating and Operating Your VMI
| Phase 1: Plan | Phase 2: Build | Phase 3: Run | Phase 4: Review | |
|---|---|---|---|---|
Phase Steps |
1.1 Mission Statement and Goals 1.2 Scope 1.3 Strengths and Obstacles 1.4 Roles and Responsibilities 1.5 Process Mapping 1.6 Charter 1.7 Vendor Inventory 1.8 Maturity Assessment 1.9 Structure |
2.1 Classification Model |
3.1 Classify Vendors |
4.1 Assess Compliance |
Phase Outcomes |
This phase helps you organize your VMI and document internal processes, relationships, roles, and responsibilities. The main outcomes from this phase are organizational documents, a baseline VMI maturity level, and a desired future state for the VMI. | This phase helps you configure and create the tools and templates that will help you run the VMI. The main outcomes from this phase are a clear understanding of which vendors are important to you, the tools to manage the vendor relationships, and an implementation plan. | This phase helps you begin operating the VMI. The main outcomes from this phase are guidance and the steps required to implement your VMI. | This phase helps the VMI identify what it should stop doing, start doing, and continue doing as it improves and matures. The main outcomes from this phase are ways to advance the VMI and maintain internal alignment. |
Insight Summary
Insight 1
Vendor management is not “plug and play” – each organization’s vendor management initiative (VMI) needs to fit its culture, environment, and goals. While there are commonalities and leading practices associated with vendor management, your initiative won’t look exactly like another organization’s. The key is to adapt vendor management principles to fit your needs.
Insight 2
All vendors are not of equal importance to your organization. Internal resources are a scarce commodity and should be deployed so that they provide the best return on the organization’s investment. Classifying or segmenting your vendors allows you to focus your efforts on the most important vendors first, allowing your VMI to have the greatest impact possible.
Insight 3
Having a solid foundation is critical to the VMI’s ongoing success. Whether you will be creating a formal vendor management office or using vendor management techniques, tools, and templates “informally,” starting with the basics is essential. Make sure you understand why the VMI exists and what it hopes to achieve, what is in and out of scope for the VMI, what strengths the VMI can leverage and the obstacles it will have to address, and how it will work with other areas within your organization.
Blueprint Deliverables
The four phases of creating and running a vendor management initiative are supported with configurable tools, templates, and checklists to help you stay aligned internally and achieve your goals.
VMI Tools and Templates
Build a solid foundation for your VMI and configure tools and templates to help you manage your vendor relationships.
Key Deliverables:
- Jump – Phase 1 Tools and Templates Compendium
- Jump – Phase 2 Tools and Templates Compendium
- Jump – Phase 2 Vendor Classification Tool
- Jump – Phase 2 Vendor Risk Assessment Tool
A suite of tools and templates to help you create and implement your vendor management initiative.
Blueprint benefits
IT Benefits
- Identify and manage risk proactively.
- Reduce costs and maximize value.
- Increase visibility with your critical vendors.
- Improve vendor performance.
- Create a collaborative environment with key vendors.
- Segment vendors to allocate resources more effectively and more efficiently.
Business Benefits
- Improve vendor accountability.
- Increase collaboration between departments.
- Improve working relationships with your vendors.
- Create a feedback loop to address vendor or customer issues before they get out of hand or are more costly to resolve.
- Increase access to meaningful data and information regarding important vendors.
Establish Baseline Metrics
Baseline metrics will be improved through:
Using the Maturity Assessment and 90-Day Plan tools, track how well you are able to achieve your goals and objectives:
- Did you meet the targeted maturity level for each maturity category as determined by the point system?
- Did you finish each activity in the 90-Day Plan completely and on time?
| 1-Year Maturity Roadmap(by Category) | Target Maturity (Total Points) | Actual Maturity (Total Points) |
|---|---|---|
| Contracts | 12 | 12 |
| Risk | 8 | 7 |
| Vendor Selection | 9 | 9 |
| Vendor Relationships | 21 | 21 |
| VMI Operations | 24 | 16 |
| 90-Day Plan (by Activity) | Activity Completed |
|---|---|
| Finalize mission and goals; gain executive approval | Yes |
| Finalize OIC chart; gain buy-in from other departments | Yes |
| Classify top 40 vendors by spend | Yes |
| Create initial scorecard | Yes |
| Develop the business alignment meeting agenda | Yes |
| Conduct two business alignment meetings | No |
| Update job descriptions | Yes |
| Map two VMI processes | No |
Info-Tech offers various levels of support to best suit your needs
DIY Toolkit
“Our team has already made this critical project a priority, and we have the time and capability, but some guidance along the way would be helpful.”
Guided Implementation
“Our team knows that we need to fix a process, but we need assistance to determine where to focus. Some check-ins along the way would help keep us on track.”
Workshop
“We need to hit the ground running and get this project kicked off immediately. Our team has the ability to take this over once we get a framework and strategy in place.”
Consulting
“Our team does not have the time or the knowledge to take this project on. We need assistance through the entirety of this project.”
Diagnostics and consistent frameworks used throughout all four options
Guided Implementation
What does a typical GI on this topic look like?
| Phase 1 | Phases 2 & 3 | Phase 4 | |
|---|---|---|---|
Call #1: Mission statement and goals, scope, and strengths and obstacles. |
Call #5: Classification model. |
Call #9: Policies and procedures and reports. |
Call #12: Assess compliance, incorporate leading practices, leverage lessons learned, maintain internal alignment, and update governances. |
Call #2: Roles and responsibilities and process mapping. |
Call #6: Risk assessment. |
Call #10: 3-year roadmap. |
|
Call #3: Charter and vendor inventory. |
Call #7: Scorecards and feedback and business alignment meetings. |
Call #11: 90-day plan and quick wins. |
|
Call #4: Maturity assessment and VMI structure. |
Call #8: Relationship alignment document, vendor orientation, and job descriptions. |
||
Workshop Overview
Contact your account representative for more information.
workshops@infotech.com 1-888-670-8889
| Day 1 | Day 2 | Day 3 | Day 4 | |
|---|---|---|---|---|
| Plan | Plan/Build/Run | Build/Run | Review | |
Activities |
1.1 Mission Statement and Goals 1.2 Scope 1.3 Strengths and Obstacles 1.4 Roles and Responsibilities 1.5 Process Mapping 1.6 Charter 1.7 Vendor Inventory 1.8 Maturity Assessment 1.9 Structure |
2.1 Classification Model |
3.1 Classify Vendors |
4.1 Assess Compliance |
Deliverables |
|
|
|
Phase 1: Plan
Get Organized
1.1 Mission Statement and Goals
1.2 Scope
1.3 Strengths and Obstacles
1.4 Roles and Responsibilities
1.5 Process Mapping
1.6 Charter
1.7 Vendor Inventory
1.8 Maturity Assessment
1.9 Structure
| Phase 1 | Phase 2 | Phase 3 | Phase 4 |
|---|---|---|---|
| 1.1 Mission Statement and Goals 1.2 Scope 1.3 Strengths and Obstacles 1.4 Roles and Responsibilities 1.5 Process Mapping 1.6 Charter 1.7 Vendor Inventory 1.8 Maturity Assessment 1.9 Structure |
2.1 Classification Model |
3.1 Classify Vendors |
4.1 Assess Compliance |
This phase will walk you through the following activities:
Organize your VMI and document internal processes, relationships, roles, and responsibilities. The main outcomes from this phase are organizational documents, a baseline VMI maturity level, and a desired future state for the VMI.
This phase involves the following participants:
- VMI team
- Applicable stakeholders and executives
- Procurement/Sourcing
- IT
- Others as needed
Jump Start Your Vendor Management Initiative
Phase 1: Plan
Get organized.
Phase 1: Plan focuses on getting organized. Foundational elements (mission statement, goals, scope, strengths and obstacles, roles and responsibilities, and process mapping) will help you define your VMI. These and the other elements of this Phase will follow you throughout the process of standing up your VMI and running it.
Spending time up front to ensure that everyone is on the same page will help avoid headaches down the road. The tendency is to skimp (or even skip) on these steps to get to “the good stuff.” To a certain extent, the process provided here is like building a house. You wouldn’t start building your dream home without having a solid blueprint. The same is true with vendor management. Leveraging vendor management tools and techniques without the proper foundation may provide some benefit in the short term, but in the long term it will ultimately be a house of cards waiting to collapse.
Step 1.1: Mission statement and goals
Identify why the VMI exists and what it will achieve.
Whether you are starting your vendor management journey or are already down the path, it is important to know why the vendor management initiative exists and what it hopes to achieve. The easiest way to document this is with a written declaration in the form of a mission statement and goals. Although this is the easiest way to proceed, it is far from easy.
The mission statement should identify at a high level the nature of the services provided by the VMI, who it will serve, and some of the expected outcomes or achievements. The mission statement should be no longer than one or two sentences.
The complement to the mission statement is the list of goals for the VMI. Your goals should not be a reassertion of your mission statement in bullet format. At this stage it may not be possible to make them SMART (Specific, Measurable, Achievable/Attainable, Relevant, Time-Bound/Time-Based), but consider making them as SMART as possible. Without some of the SMART parameters attached, your goals are more like dreams and wishes. At a minimum, you should be able to determine the level of success achieved for each of the VMI goals.
Although the VMI’s mission statement will stay static over time (other than for significant changes to the VMI or organization as a whole), the goals should be re-evaluated periodically using a SMART filter and adjusted as needed.
1.1.1: Mission statement and goals
20-40 minutes
- Meet with the participants and use a brainstorming activity to list on a whiteboard or flip chart the reasons why the VMI will exist.
- Review external mission statements for inspiration.
- Review internal mission statements from other areas to ensure consistency.
- Draft and document your mission statement in the Phase 1 Tools and Templates Compendium, Tab 1.1 Mission Statement and Goals.
- Continue brainstorming and identify the high-level goals for the VMI.
- Review the list of goals and make them as SMART (Specific, Measurable, Achievable/Attainable, Relevant, Time-Bound/Time-Based) as possible.
- Document your goals in the Phase 1 Tools and Templates Compendium, Tab 1.1 Mission Statement and Goals.
- Obtain sign-off on the mission statement and goals from stakeholders and executives as required.
Input
- Brainstorming results
- Mission statements from other internal and external sources
Output
- Completed mission statement and goals
Materials
- Whiteboard/Flip Charts
- Jump – Phase 1 Tools and Templates Compendium, Tab 1.1 Mission Statement and Goals
Participants
- VMI team
- Applicable stakeholders and executives (as needed)
Step 1.2: Scope
Determine what is in scope and out of scope for the VMI
Regardless of where your VMI resides or how it operates, it will be working with other areas within your organization. Some of the activities performed by the VMI will be new and not currently handled by other groups or individuals internally; at the same time, some of the activities performed by the VMI may be currently handled by other groups or individuals internally. In addition, executives, stakeholders, and other internal personnel may have expectations or make assumptions about the VMI. As a result, there can be a lot of confusion about what the VMI does and doesn’t do, and the answers cannot always be found in the VMI’s mission statement and goals.
One component of helping others understand the VMI landscape is formalizing the VMI scope. The scope will define boundaries for the VMI. The intent is not to fence itself off and keep others out but provide guidance on where the VMI’s territory begins and ends. Ultimately, this will help clarify the VMI’s roles and responsibilities, improve workflow, and reduce errant assumptions.
When drafting your VMI scoping document, make sure you look at both sides of the equation (similar to what you would do when following best practices for a statement of work): Identify what is in scope and what is out of scope. Be specific when describing the individual components of the VMI scope, and make sure executives and stakeholders are on board with the final version.
1.2.1: Scope
20-40 minutes
- Meet with the participants and use a brainstorming activity to list on a whiteboard or flip chart the activities and functions in scope and out of scope for the VMI.
- Be specific to avoid ambiguity and improve clarity.
- Go back and forth between in scope and out of scope as needed; it is not necessary to list all of the in-scope items and then turn your attention to the out-of-scope items.
- Review the lists to make sure there is enough specificity. An item may be in scope or out of scope but not both.
- Use the Phase 1 Tools and Templates Compendium, Tab 1.2 Scope, to document the results.
- Obtain sign-off on the scope from stakeholders and executives as required.
Input
- Brainstorming
- Mission statement and goals
Output
- Completed list of items in and out of scope for the VMI
Materials
- Whiteboard/Flip Charts
- Jump – Phase 1 Tools and Templates Compendium, Tab 1.2 Scope
Participants
- VMI team
- Applicable stakeholders and executives (as needed)
Step 1.3: Strengths and obstacles
Pinpoint the VMI’s strengths and obstacles.
A SWOT analysis (strengths, weaknesses, opportunities, and threats) is a valuable tool, but it is overkill for your VMI at this point. However, using a modified and simplified form of this tool (strengths and obstacles) will yield significant results and benefit the VMI as it grows and matures.
Your output will be two lists: the strengths associated with the VMI and the obstacles facing the VMI. For example, strengths could include items such as smart people working within the VMI and executive support. Obstacles could include items such as limited headcount and training required for VMI staff.
The goals are 1) to harness the strengths to help the VMI be successful and 2) to understand the impact of the obstacles and plan accordingly. The output can also be used to enlighten executives and stakeholders about the challenges associated with their directives or requests (e.g. human bandwidth may not be sufficient to accomplish some of the vendor management activities and there is a moratorium on hiring until the next budget year).
For each strength identified, determine how you will or can leverage it when things are going well or when the VMI is in a bind. For each obstacle, list the potential impact on the VMI (e.g. scope, growth rate, and number of vendors that can actively be part of the VMI).
As you do your brainstorming, be as specific as possible and validate your lists with stakeholders and executives as needed.
1.3.1: Strengths and obstacles
20-40 minutes
- Meet with the participants and use a brainstorming activity to list on a whiteboard or flip chart the VMI’s strengths and obstacles.
- Be specific to avoid ambiguity and improve clarity.
- Go back and forth between strengths and obstacles as needed; it is not necessary to list all of the strengths and then turn your attention to the obstacles.
- It is possible for an item to be a strength and an obstacle; when this happens, add details to distinguish the situations.
- Review the lists to make sure there is enough specificity.
- Determine how you will leverage each strength and how you will manage each obstacle.
- Use the Phase 1 Tools and Templates Compendium, Tab 1.3 Strengths and Obstacles, to document the results.
- Obtain sign-off on the strengths and obstacles from stakeholders and executives as required.
Download the Info-Tech Jump – Phase 1 Tools and Templates Compendium
Input
- Brainstorming
- Mission statement and goals
- Scope
Output
- Completed list of items impacting the VMI’s ability to be successful: strengths the VMI can leverage and obstacles the VMI must manage
Materials
- Whiteboard/Flip Charts
- Jump – Phase 1 Tools and Templates Compendium, Tab 1.3 Strengths and Obstacles
Participants
- VMI team
- Applicable stakeholders and executives (as needed)
Step 1.4: Roles and responsibilities
Obtain consensus on who is responsible for what.
One crucial success factor for VMIs is gaining and maintaining internal alignment. There are many moving parts to an organization, and a VMI must be clear on the various roles and responsibilities related to the relevant processes. Some of this information can be found in the VMI’s scope, referenced in Step 1.2, but additional information is required to avoid stepping on each other’s toes since many of the processes require internal departments to work together. (For example, obtaining requirements for a request for proposal takes more than one person or one department to complete this process.) While it is not necessary to get too granular, it is imperative that you have a clear understanding of how the VMI activities will fit within the larger vendor management lifecycle (which is comprised of many sub processes) and who will be doing what.
As we have learned through our workshops and guided implementations, a traditional RACI* or RASCI* chart does not work well for this purpose. These charts are not intuitive, and they lack the specificity required to be effective. For vendor management purposes, a higher-level view and a slightly different approach provide much better results.
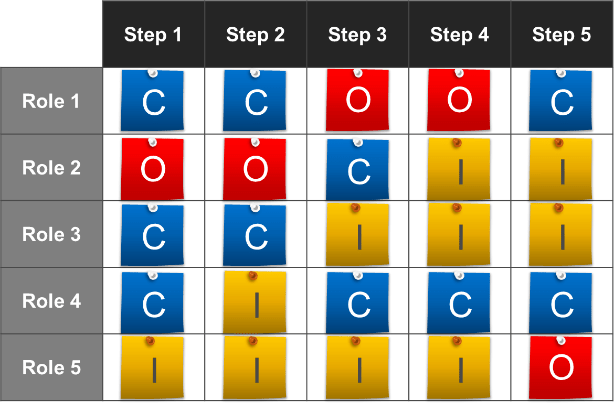
This step will lead your through the creation of an OIC* chart to determine vendor management lifecycle roles and responsibilities. Afterward, you’ll be able to say, “Oh, I see clearly who is involved in each part of the process and what their role is.”
*RACI – Responsible, Accountable, Consulted, Informed
*RASCI – Responsible, Accountable, Support, Consulted, Informed
*OIC – Owner, Informed, Contributor
Step 1.4: Roles and responsibilities (cont.)
Obtain consensus on who is responsible for what.
To start, define the vendor management lifecycle steps or process applicable to your VMI. Next, determine who participates in the vendor management lifecycle. There is no need to get too granular – think along the lines of departments, subdepartments, divisions, agencies, or however you categorize internal operational units. Avoid naming individuals other than by title; this typically happens when a person oversees a large group (e.g. the CIO [chief information officer] or the CPO [chief procurement officer]). Be thorough, but the chart can get out of hand quickly. For each role and step of the lifecycle, ask whether the entry is necessary – does it add value to the clarity of understanding the responsibilities associated with the vendor management lifecycle? Consider two examples, one for roles and one for lifecycle steps: 1) Is IT sufficient or do you need IT Operations and IT Development? 2) Is “negotiate contract documents” sufficient or do you need “negotiate the contract” and “negotiate the renewal”? The answer will always depend on your culture and environment, but be wary of creating a spreadsheet that requires an 85-inch monitor to view it in its entirety.
After defining the roles (departments, divisions, agencies) and the vendor management lifecycle steps or process, assign one of three letters to each box in your chart:
- O – Owner – who owns the process; they may also contribute to it.
- I – Informed – who is informed about the progress or results of the process.
- C – Contributor – who contributes or works on the process; it can be tangible or intangible contributions.
This activity can be started by the VMI or done as a group with representatives from each of the named roles. If the VMI starts the activity, the resulting chart should be validated by the each of the named roles.
1.4.1: Roles and responsibilities
1-6 hours
- Meet with the participants and configure the OIC Chart in the Jump – Phase 1 Tools and Templates Compendium, Tab 1.4 OIC Chart.
- Review the steps or activities across the top of the chart and modify as needed.
- Review the roles listed along the left side of the chart and modify as needed.
- For each activity or step across the top of the chart, assign each role a letter – O for owner of that activity or step; I for informed; or C for contributor. Use only one letter per cell.
- Work your way across the chart. Every cell should have an entry or be left blank if it is not applicable.
- Review the results and validate that every activity or step has an O assigned to it; there must be an owner for every activity or step.
- Obtain sign-off on the OIC chart from stakeholders and executives as required.
Download the Info-Tech Jump – Phase 1 Tools and Templates Compendium
Input
- A list of activities or steps to complete a project, starting with requirements gathering and ending with ongoing risk management
- A list of internal areas (departments, divisions, agencies, etc.) and stakeholders that contribute to completing a project
Output
- Completed OCI chart indicating roles and responsibilities for the VMI and other internal areas
Materials
- Jump – Phase 1 Tools and Templates Compendium, Tab 1.4 OIC Chart
Participants
- VMI team
- Procurement/Sourcing
- IT
- Representatives from other areas as needed
- Applicable stakeholders and executives as needed
Step 1.5: Process mapping
Diagram the workflow.
Although policies and procedures are important, their nature can make it difficult to grasp how things work at a high level (or even at the detail level). To help bridge the gap, map the applicable processes (determined by how deep and wide you want to go) involving the VMI. To start, look at the OIC chart from Step 1.4. You can expand the breadth and depth of your mapping to include the VMI scope, the 3-year roadmap (see Step 2.9), and the processes driven by the day-to-day work within the VMI.
Various mapping tools can be used. Three common approaches that can be mixed and matched are:
- Traditional flowcharts.
- Swimlane diagrams.
- Work breakdown structures.
Step 1.5: Process mapping (cont.)
Diagram the workflow.
Your goal is not to create an in-depth diagram for every step of the vendor management lifecycle. However, for steps owned by the VMI, the process map should include sufficient details for the owner and the contributors (see Step 1.4) to understand what is required of them to support that step in the lifecycle.
For VMI processes that don’t interact with other departments, follow the same pattern as outlined above for steps owned by the VMI.
Whatever methodology you use to create your process map, make sure it includes enough details so that readers and users can identify the following elements:
- Input:
- What are the inputs?
- Where do the inputs originate or come from?
- Process:
- Who is involved/required for this step?
- What happens to the inputs in this step?
- What additional materials, tools, or resources are used or required during this step?
- Output:
- What are the outputs?
- Where do the outputs go next?
1.5.1: Process Mapping
1-8 hours (or more)
- Meet with the participants and determine which processes you want to map.
- For processes owned by the VMI, map the entire process.
- For processes contributed to by the VMI, map the entire process at a high level and map the VMI portion of the process in greater detail.
- Select the right charts/diagrams for your output.
- Flowchart
- Swimlane diagram
- Modified SIPOC (Supplier, Input, Process, Output, Customer)
- WBS (work breakdown structure)
- Begin mapping the processes either in a tool or using sticky notes. You want to be able to move the steps and associated information easily; most people don’t map the entire process accurately or with sufficient detail the first time through. An iterative approach works best.
- Obtain signoff on the process maps from stakeholders and executives as required. A copy of the final output can be kept in the Jump – Phase 1 Tools and Templates Compendium, Tab 1.5 Process Mapping, if desired.
Download the Info-Tech Jump – Phase 1 Tools and Templates Compendium
Input
- Existing processes (formal, informal, documented, and undocumented)
- OIC chart
Output
- Process maps for processes contributed to or owned by the VMI
Materials
- Sticky Notes
- Flowchart/process mapping software or something similar
- (Optional) Jump – Phase 1 Tools and Templates Compendium, Tab 1.5 Process Mapping
Participants
- VMI team
- Procurement/Sourcing
- IT
- Representatives from other areas as needed
- Applicable stakeholders and executives (as needed)
Step 1.6: Charter
Document how the VMI will operate.
As you continue getting organized by working through steps 1.1-1.5, you may want to document your progress in a charter and add some elements. Basically, a charter is a written document laying out how the VMI will operate within the organization. It clearly states the VMI’s mission, goals, scope, roles and responsibilities, and vendor governance model. In addition, it can include a list of team members and sponsors.
Whether you create a VMI charter will largely depend on:
- Your organization’s culture.
- Your organization’s formality.
- The perceived value of creating a charter.
If you decide to create a VMI charter, this is a good place in the process to create an initial draft. As you continue working through the blueprint and your VMI matures, update the VMI charter as needed.
VMI Charter:
- Purpose
- Sponsors
- Roles
- Responsibilities
- Governance
1.6.1: Charter
1-4 hours
- Meet with the participants and review the template in Jump – Phase 1 Tools and Templates Compendium, Tab 1.6 Charter.
- Determine whether the participants will use this template or add materials to your standard charter template.
- Complete as much of the charter as possible, knowing that some information may not be available until later.
- Return to the charter as needed until it is completed.
- Obtain sign-off on the charter from stakeholders and executives as required.
Download the Info-Tech Jump – Phase 1 Tools and Templates Compendium
Input
- Mission statement and goals
- Scope
- Strengths and obstacles
- OIC chart
- List of stakeholders and executives and their VMI roles and responsibilities
Output
- Completed VMI charter
Materials
- Jump – Phase 1 Tools and Templates Compendium, Tab 1.6 Charter
- Your organization’s standard charter document
Participants
- VMI team
- Applicable stakeholders and executives (as needed)
Step 1.7: Vendor inventory
Compile a list of vendors and relevant vendor information.
As you prepare your VMI for being operational, it’s critical to identify all of your current vendors providing IT products or services to the organization. This can be tricky and may depend on how you view things internally. For example, you may have traditional IT vendors that are managed by IT, and you may have IT vendors that are managed by other internal departments (shadow IT or out-in-the-open IT). If it wasn’t determined with the help of stakeholders and executives before now, make sure you establish the purview of the VMI at this point. What types of vendors are included and excluded from the VMI?
You may find that a vendor can be included and excluded based on the product or service they provide. A vendor may provide a service that is managed by IT and a service that is managed/controlled by another department. In this instance, a good working relationship and clearly defined roles and responsibilities between the VMI and the other department will be required. But, it all starts with compiling a list of vendors and validating the VMI’s purview (and any limitations) for the vendors with stakeholders and executives.
Step 1.7: Vendor inventory (cont.)
Compile a list of vendors and relevant vendor information.
At a minimum, the VMI should be able to quickly retrieve key information about each of “its” vendors:
- Vendor Name
- Classification (see Steps 2.1 and 3.1)
- Categories of Service
- Names of Products and Services Provided
- Brief Descriptions of Products and Services Provided
- Annualized Vendor Spend
- Vendor Contacts
- Internal Vendor Relationship Owner
Not all of this information will be available at this point, but you can begin designing or configuring your tool to meet your needs. As your VMI enters Phase 3: Run and continues to mature, you will return to this tool and update the information. For example, the vendor classification category won’t be known until Phase 3, and it can change over time.
1.7.1: Vendor inventory
1-10 hours
Meet with the participants and review the Jump – Phase 1 Tools and Templates Compendium, Tab 1.7 Vendor Inventory. Determine whether the VMI wants to collect and/or monitor additional information and make any necessary modifications to the tool.
Enter the “Annual IT Vendor Spend” amount in the appropriate cell toward the top of the spreadsheet. This is for IT spend for vendor-related activities within the VMI’s scope; include shadow IT spend and “non-shadow” IT spend if those vendors will be included in the VMI’s scope.
Populate the data fields for your top 50 vendors by annual spend; you may need multiple entries for the same vendor depending on the nature of the products and services they provide.
Ignore the “Classification” column for now; you will return to this later when classification information is available.
Ignore the “Percentage of IT Budget” column as well; it uses a formula to calculate this information.
Input
- Data from various internal and external sources such as accounts payable, contracts, and vendor websites
Output
- List of vendors with critical information required to manage relationships with key vendors
Materials
- Jump – Phase 1 Tools and Templates Compendium, Tab 1.7 Vendor Inventory
Participants
- VMI team (directly)
- Other internal and external personnel (indirectly)
Download the Info-Tech Jump – Phase 1 Tools and Templates Compendium
Step 1.8: Maturity assessment
Establish a VMI maturity baseline and set an ideal future state.
Knowing where you are and where you want to go are essential elements for any journey in the physical world, and the same holds true for your VMI journey. Start by assessing your current-state VMI maturity. This will provide you with a baseline to measure progress against. Next, using the same criteria, determine the level of VMI maturity you would like to achieve one year in the future. This will be your future-state VMI maturity. Lastly, identify the gaps and plot your course.
The maturity assessment provides three main benefits:
- Focus – you’ll know what is important to you moving forward.
- 3-Year Roadmap (discussed more fully in Step 2.9) – you’ll have additional input for your short-term and long-term roadmap (1, 2, and 3 years out).
- Quantifiable Improvement – you’ll be able to measure your progress and make midcourse corrections when necessary.
Step 1.8: Maturity assessment (cont.)
Establish a VMI maturity baseline and set an ideal future state.
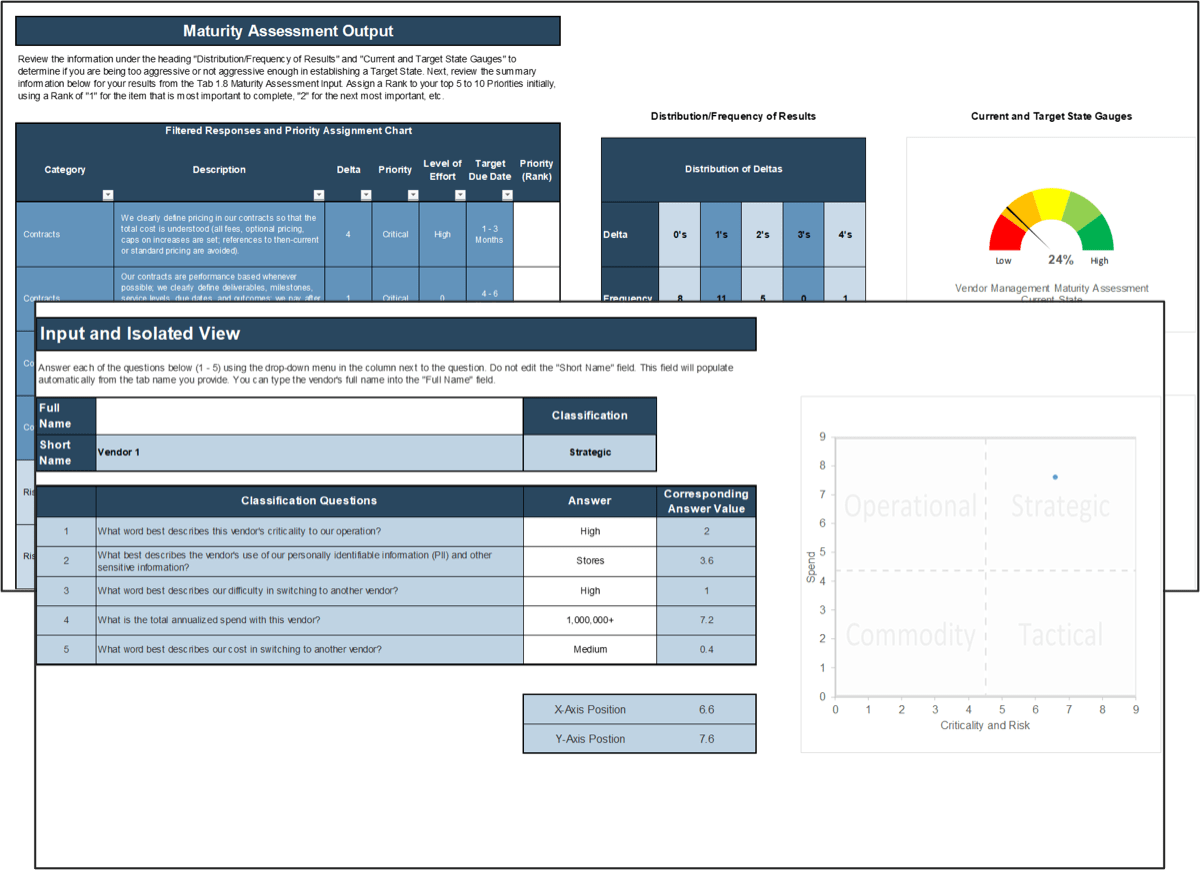
The Info-Tech VMI Maturity Assessment tool evaluates your maturity across several criteria across multiple categories. Once completed, the assessment will specify:
- A current-state score by category and overall.
- A target-state score by category and overall.
- A quantifiable gap for each criterion.
- A priority assignment for each criterion.
- A level of effort required by criterion to get from the current state to the target state.
- A target due date by criterion for achieving the target state.
- A rank order for each criterion (note: limit your ranking to your top 7 or 9).
Many organizations will be tempted to mature too quickly. Resource constraints and other items from Step 1.3 (Strengths and Obstacles) will impact how quickly you can mature. Being aggressive is fine, but it must be tempered with a dose of reality. Otherwise, morale, perception, and results can suffer.
1.8.1: Maturity assessment
45-90 minutes
- Meet with the participants and use Jump – Phase 1 Tools and Templates Compendium, Tab 1.8 Maturity Assessment Input, to complete the first part of this activity. Provide the required information indicated below.
- Review each statement in column B and enter a value in the “Current” column using the drop-down menus based on how much you disagree or agree (0-4) with the statement. This establishes a baseline maturity.
- Repeat this process for the “Future” column using a target date of one year from now to achieve this level. This is your desired maturity.
- Enter information regarding priority, level of effort, and target due date in the applicable columns using the drop-down menus. (Priority levels are critical, high, medium, low, and maintain; Levels of Effort are high, medium, and low; Target Due Dates are broken into timelines: 1-3 months, 4-6 months, 7-9 months, and 10-12 months.)
- Review the information on Jump – Phase 1 Tools and Templates Compendium, Tab 1.8 Maturity Assessment Output; use the Distribution Tables to help you rank your top priorities. Enter a unique number into the Priority (Rank) column. Limit your ranking to the top 7 to 9 activities to provide focus.
Input
- Knowledge of current VMI practices and desired future states
Output
- VMI maturity baseline
- Desired VMI target maturity state (in one year)
- Prioritized areas to improve and due dates
- Graphs and tables to identify maturity deltas and track progress
Materials
- Jump – Phase 1 Tools and Templates Compendium, Tab 1.8 Maturity Assessment Input
- Jump – Phase 1 Tools and Templates Compendium, Tab 1.8 Maturity Assessment Output
Participants
- VMI team
- Applicable stakeholders and executives (as needed)
Step 1.9: Structure
Determine the VMI’s organizational and reporting structure.
There are two parts to the VMI structure:
- Organization Structure. Who owns the VMI – where does it fit on the organization chart?
- Reporting Structure. What is the reporting structure within the VMI – what are the job functions, titles, and solid and dotted lines of accountability?
VMI Organization Structure
The decision regarding who owns the VMI can follow one of two paths:
- The decision has already been made by the board of directors, executives, senior leadership, or stakeholders; OR
- The decision has not been made, and options will be reviewed and evaluated before it is implemented.
Many organizations overlook the importance of this decision. The VMI’s position on the organization chart can aid or hinder its success. Whether the decision has already been made or not, this is the perfect time to evaluate the decision or options based on the following question: Why is the VMI being created and how will it operate? Review the documents you created during Steps 1.1-1.8 and other factors to answer this question.
Step 1.9: Structure (cont.)
Determine the VMI’s organizational and reporting structure.
Based on your work product from Steps 1.1-1.8 and other factors, select where the VMI will be best located from the following areas/offices or their equivalent:
- Chief Compliance Officer (CCO)
- Chief Information Officer (CIO)
- Chief Financial Officer (CFO)
- Chief Procurement Officer (CPO)
- Chief Operating Officer (COO)
- Other area
Without the proper support and placement in the organization chart, the VMI can fail. It is important for the VMI to find a suitable home with a direct connection to one of the sponsors identified above and for the VMI lead to have significant stature (aka title) within the organization. For example, if the VMI lead is a “manager” level who is four reporting layers away from the chief officer/sponsor, the VMI will have an image issue within and outside of the sponsor’s organization (as well as within the vendor community). While this is not to say that the VMI lead should be a vice president* or senior director, our experience and research indicate that the VMI and the VMI lead will be taken more seriously when the VMI lead is at least a director level reporting directly to a CXO.
*For purposes of the example above, the reporting structure hierarchy used is manager, senior manager, director, senior director, vice president, CXO.
Step 1.9: Structure (cont.)
Determine the VMI’s organizational and reporting structure.
VMI Reporting Structure
As previously mentioned, the VMI reporting structure describes and identifies the job functions, titles, and lines of accountability. Whether you have a formal vendor management office or you are leveraging the principles of vendor management informally, your VMI reporting structure design will involve some solid lines and some dotted lines. In this instance, the dotted lines represent part-time participation or people/areas that will assist the VMI in some capacity. For example, if the VMI sits within IT, a dotted line to Procurement will show that a good working relationship is required for both parties to succeed; or a dotted line to Christina in Legal will indicate that Christina will be helping the VMI with legal issues.
There is no one-size-fits-all reporting structure for VMIs, and your approach must leverage the materials from Steps 1.1-1.8, your culture, and your needs. By way of example, your VMI may include some or all of the following functions:
- Contract Management
- Relationship Management
- Financial Management
- Asset Management
- Performance Management
- Sourcing/Procurement
- Risk Management
Step 1.9: Structure (cont.)
Determine the VMI’s organizational and reporting structure.
Once you’ve identified the functional groups, you can assign titles, responsibilities, and reporting relationships. A good diagram goes a long way to helping others understand your organization. Traditional organization charts work well with VMIs, but a target diagram allows for rapid absorption of the dotted-line relationships. Review the two examples below and determine an approach that works best for you.
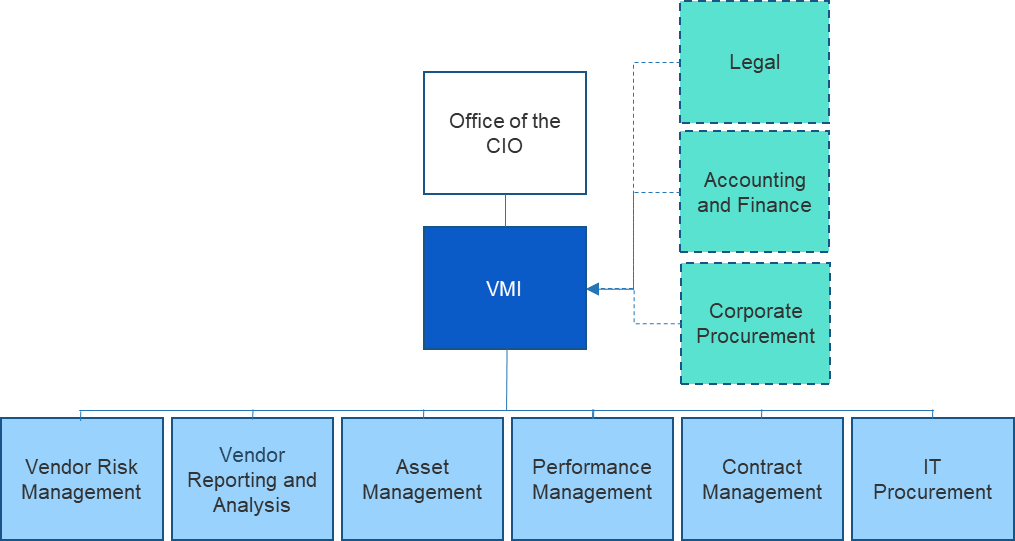 |
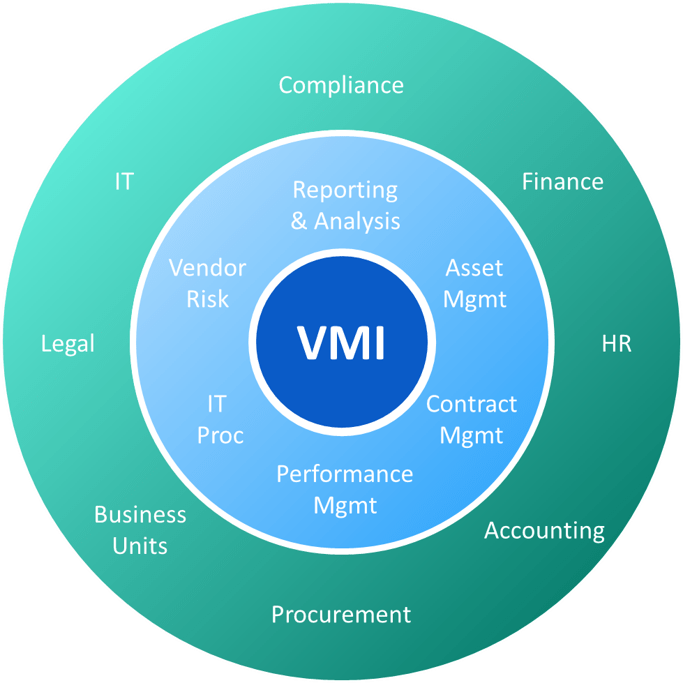 |
1.9.1: Structure
15-60 minutes
- Meet with the participants and review decisions that have been made or options that are available regarding the VMI’s placement in the organization chart.
- Common options include the Chief Information Officer (CIO), Chief Financial Officer (CFO), or Chief Procurement Officer (CPO).
- Less common but viable options include the Chief Compliance Officer (CCO), Chief Operating Officer (COO), or another area.
- Brainstorm and determine the job functions and titles
- Define the reporting structure within the VMI.
- Identify the “dotted line” relationships between the VMI and other internal areas.
- Using flowchart, org. chart, or other similar software, reduce your results to a graphic representation that indicates where the VMI resides, its reporting structure, and its dotted-line relationships.
- Obtain sign-off on the structure from stakeholders and executives as required. A copy of the final output can be kept in the Jump – Phase 1 Tools and Templates Compendium, Tab 1.9 Structure, if desired.
Input
- Mission statement and goals
- Scope
- Maturity assessment results (current and target state)
- Existing org. charts
- Brainstorming
Output
- Completed org. chart with job titles and reporting structure
Materials
- Whiteboard/flip chart
- Sticky notes
- Flowchart/org. chart software or something similar
- (Optional) Jump – Phase 1 Tools and Templates Compendium, Tab 1.9 Structure
Participants
- VMI team
- VMI sponsor
- Stakeholders and executives
Phase 2: Build
Create and Configure Tools, Templates, and Processes
| Phase 1 | Phase 2 | Phase 3 | Phase 4 |
|---|---|---|---|
| 1.1 Mission Statement and Goals 1.2 Scope 1.3 Strengths and Obstacles 1.4 Roles and Responsibilities 1.5 Process Mapping 1.6 Charter 1.7 Vendor Inventory 1.8 Maturity Assessment 1.9 Structure | 2.1 Classification Model | 3.1 Classify Vendors | 4.1 Assess Compliance |
This phase will walk you through the following activities:
Configure and create the tools and templates that will help you run the VMI. The main outcomes from this phase are a clear understanding of which vendors are important to you, the tools to manage the vendor relationships, and an implementation plan.
This phase involves the following participants:
- VMI team
- Applicable stakeholders and executives
- Human Resources
- Legal
- Others as needed
Jump Start Your Vendor Management Initiative
Phase 2: Build
Create and configure tools, templates, and processes.
Phase 2: Build focuses on creating and configuring the tools and templates that will help you run your VMI. Vendor management is not a plug-and-play environment, and unless noted otherwise, the tools and templates included with this blueprint require your input and thought. The tools and templates must work in concert with your culture, values, and goals. That will require teamwork, insights, contemplation, and deliberation.
During this Phase, you’ll leverage the various templates and tools included with this blueprint and adapt them for your specific needs and use. In some instances, you’ll be starting with mostly a blank slate; while in others, only a small modification may be required to make it fit your circumstances. However, it is possible that a document or spreadsheet may need heavy customization to fit your situation. As you create your VMI, use the included materials for inspiration and guidance purposes rather than as absolute dictates.
Step 2.1: Classification model
Configure the COST Vendor Classification Tool.
One of the functions of a VMI is to allocate the appropriate level of vendor management resources to each vendor since not all vendors are of equal importance to your organization. While some people may be able intuitively to sort their vendors into vendor management categories, a more objective, consistent, and reliable model works best. Info-Tech’s COST model helps you assign your vendors to the appropriate vendor management category so that you can focus your vendor management resources where they will do the most good.
COST is an acronym for Commodity, Operational, Strategic, and Tactical. Your vendors will occupy one of these vendor management categories, and each category helps you determine the nature of the resources allocated to that vendor, the characteristics of the relationship desired by the VMI, and the governance level used.
The easiest way to think of the COST model is as a 2x2 matrix or graph. The model should be configured for your environment so that the criteria used for determining a vendor’s classification align with what is important to you and your organization. However, at this point in your VMI’s maturation, a simple approach works best. The Classification Model included with this blueprint requires minimal configuration to get you started and that is discussed on the activity slide associated with this Step 2.1.
| ↑ Speed ↑ |
Operational | Strategic |
|---|---|---|
| Commodity | Tactical | |
| →→→ Criticality and Risk to the Organization |
||
Step 2.1: Classification model (cont.)
Configure the COST Vendor Classification Tool.
Common Characteristics by Vendor Management Category
| Operational | Strategic |
|---|---|
|
|
| Commodity | Tactical |
|
|
Source: Compiled in part from Stephen Guth, “Vendor Relationship Management Getting What You Paid for (And More)”
2.1.1: Classification Model
15-30 minutes
- Meet with the participants to configure the spend ranges in Jump – Phase 2 Vendor Classification Tool, Tab 1. Configuration, for your environment.
- Sort the data from Jump – Phase 1 Tools and Templates Compendium, Tab 1.7 Vendor Inventory, by spend; if you used multiple line items for a vendor in the Vendor Inventory tab, you will have to aggregate the spend data for this activity.
- Update cells F14-J14 in the Classification Model based on your actual data.
- Cell F14 – set the boundary at a point between the spend for your 10th and 11th ranked vendors. For example, if the 10th vendor by spend is $1,009,850 and the 11th vendor by spend is $980,763, the range for F14 would be $1,000,00+.
- Cell G14 – set the bottom of the range at a point between the spend for your 30th and 31st ranked vendors; the top of the range will be $1 less than the bottom of the range specified in F14.
- Cell H14 – set the bottom of the range slightly below the spend for your 50th ranked vendor; the top of the range will be $1 less than the bottom of the range specified in G14.
- Cells I14 and J14 – divide the remaining range in half and split it between the two cells; for J14 the range will be $0 to $1 less than the bottom range in I14.
- Ignore the other variables at this time.
Download the Info-Tech Jump – Phase 2 Vendor Risk Assessment Tool
Input
- Jump – Phase 1 Tools and Templates Compendium, Tab 1.7 Vendor Inventory
Output
- Configured Vendor Classification Tool
Materials
- Jump – Phase 2 Vendor Classification Tool, Tab 1. Configuration
Participants
- VMI team
Step 2.2: Risk assessment tool
Identify risks to measure, monitor, and report on.
One of the typical drivers of a VMI is risk management. Organizations want to get a better handle on the various risks their vendors pose. Vendor risks originate from many areas: financial, performance, security, legal, and many others. However, security risk is the high-profile risk and the one organizations often focus on almost exclusively, which leaves the organization vulnerable in other areas.
Risk management is a program, not a project – there is no completion date. A proactive approach works best and requires continual monitoring, identification, and assessment. Reacting to risks after they occur can be costly and can have other detrimental effects on the organization. Any risk that adversely affects IT will adversely affect the entire organization.
While the VMI won’t necessarily be quantifying or calculating the risk directly, it generally is the aggregator of risk information across the risk categories, which it then includes in its reporting function. (See Steps 2.12 and 3.8.)
At a minimum, your risk management strategy should involve:
- Identifying the risks you want to measure and monitor.
- Identifying your risk appetite (the amount of risk you are willing to live with).
- Measuring, monitoring, and reporting on the applicable risks.
- Developing and deploying a risk management plan to minimize potential risk impact.
Vendor risk is a fact of life, but you do have options for how you handle it. Be proactive and thoughtful in your approach, and focus your resources on what is important.
2.2.1: Risk assessment tool
30-90 minutes
- Meet with the participants to configure the risk indicators in Jump – Phase 2 Vendor Risk Assessment Tool, Tab 1. Set Parameters, for your environment.
- Review the risk categories and determine which ones you will be measuring and monitoring.
- Review the risk indicators under each risk category and determine whether the indicator is acceptable as written, is acceptable with modifications, should be replaced, or should be deleted.
- Make the necessary changes to the risk indicators; these changes will cascade to each of the vendor tabs. Limit the number of risk indicators to no more than seven per risk category.
- Gain input and approval as needed from sponsors, stakeholders, and executives as required.
Download the Info-Tech Jump – Phase 2 Vendor Risk Assessment Tool
Input
- Scope
- OIC Chart
- Process Maps
- Brainstorming
Output
- Configured Vendor Classification Tool
Materials
- Jump – Phase 2 Vendor Classification Tool, Tab 1. Configuration
Participants
- VMI team
Step 2.3: Scorecards and feedback
Design a two-way feedback loop with your vendors.
A vendor management scorecard is a great tool for measuring, monitoring, and improving relationship alignment. In addition, it is perfect for improving communication between you and the vendor.
Conceptually, a scorecard is similar to a report card you received when you were in school. At the end of a learning cycle, you received feedback on how well you did in each of your classes. For vendor management, the scorecard is also used to provide periodic feedback, but there are some different nuances and some additional benefits and objectives when compared to a report card.
Although scorecards can be used in a variety of ways, the main focus here will be on vendor management scorecards – contract management, project management, and other types of scorecards will not be included in the materials covered in this Step 2.3 or in Step 3.4.
| Category 1 | Score | ||
|---|---|---|---|
| Vendor | Objective A | 4 | ↓ |
| Objective B | 3 | ↓ | |
| Objective C | 5 | ↑ | |
| Objective D | 4 | ! |
Step 2.3: Scorecards and feedback (cont.)
Design a two-way feedback loop with your vendors.
Anatomy
The Info-Tech Scorecard includes five areas:
- Measurement Categories. Measurement categories help organize the scorecard. Limit the number of measurement categories to three to five; this allows the parties to stay focused on what’s important. Too many measurement categories make it difficult for the vendor to understand the expectations.
- Criteria. The criteria describe what is being measured. Create criteria with sufficient detail to allow the reviewers to fully understand what is being measured and to evaluate it. Criteria can be objective or subjective. Use three to five criteria per measurement category.
- Measurement Category Weights. Not all of your measurement categories may be of equal importance to you; this area allows you to give greater weight to a measurement category when compiling the overall score.
- Rating. Reviewers will be asked to assign a score to each criteria using a 1 to 5 scale.
- Comments. A good scorecard will include a place for reviewers to provide additional information regarding the rating or other items that are relevant to the scorecard.
An overall score is calculated based on the rating for each criteria and the measurement category weights.
Step 2.3: Scorecards and feedback (cont.)
Design a two-way feedback loop with your vendors.
Goals and Objectives
Scorecards can be used for a variety of reasons. Some of the common ones are listed below:
- Improve vendor performance.
- Convey expectations to the vendor.
- Identify and recognize top vendors.
- Increase alignment between the parties.
- Improve communication with the vendor.
- Compare vendors across the same criteria.
- Measure items not included in contract metrics.
- Identify vendors for “strategic alliance” consideration.
- Help the organization achieve specific goals and objectives.
- Identify and resolve issues before they impact performance or the relationship.
Identifying your scorecard drivers first will help you craft a suitable scorecard.
Step 2.3: Scorecards and feedback (cont.)
Design a two-way feedback loop with your vendors.
Info-Tech recommends starting with simple scorecards to allow you and the vendors to acclimate to the new process and information. As you build your scorecards, keep in mind that internal personnel will be scoring the vendors and the vendors will be reviewing the scorecard. Make your scorecard easy for your personnel to fill out and composed of meaningful content to drive the vendor in the right direction. You can always make the scorecard more complex in the future.
Our recommendation of five categories is provided below. Choose three to five categories to help you accomplish your scorecard goals and objectives:
- Timeliness – responses, resolutions, fixes, submissions, completions, milestones, deliverables, invoices, etc.
- Cost – total cost of ownership, value, price stability, price increases/decreases, pricing models, etc.
- Quality – accuracy, completeness, mean time to failure, bugs, number of failures, etc.
- Personnel – skilled, experienced, knowledgeable, certified, friendly, trustworthy, flexible, accommodating, etc.
- Risk – adequate contractual protections, security breaches, lawsuits, finances, audit findings, etc.
Some criteria may be applicable in more than one category. The categories above should cover at least 80% of the items that are important to your organization. The general criteria listed for each category is not an exhaustive list, but most things break down into time, money, quality, people, and risk issues.
Step 2.3: Scorecards and feedback (cont.)
Design a two-way feedback loop with your vendors.
Additional Considerations
- Even a good rating system can be confusing. Make sure you provide some examples or a way for reviewers to discern the differences between 1, 2, 3, 4, and 5. Don’t assume your “Rating Key” will be intuitive.
- When assigning weights, don’t go lower than 10% for any measurement category. If the weight is too low, it won’t be relevant enough to have an impact on the total score. If it doesn’t “move the needle,” don’t include it.
- Final sign-off on the scorecard template should occur outside of the VMI. The heavy lifting can be done by the VMI to create it, but the scorecard is for the benefit of the organization overall and those impacted by the vendors specifically. You may end up playing arbiter or referee, but the scorecard is not the exclusive property of the VMI. Try to reach consensus on your final template whenever possible.
- You should notice improved ratings and total scores over time for your vendors. One explanation for this is the Pygmalion Effect: “The Pygmalion [E]ffect describes situations where someone’s high expectations improves our behavior and therefore our performance in a given area. It suggests that we do better when more is expected of us.”* Convey your expectations and let the vendors’ competitive juices take over.
- While you’re creating your scorecard and materials to explain the process to internal personnel, identify those pieces that will help you explain it to your vendors as part of your vendor orientation (see steps 2.6 and 3.4). Leveraging pre-existing materials is a great shortcut.
*Source: The Decision Lab, 2020
Step 2.3: Scorecards and feedback (cont.)
Design a two-way feedback loop with your vendors.
Vendor Feedback
After you’ve built your scorecard, turn your attention to the second half of the equation – feedback from the vendor. A communication loop cannot be successful without the dialogue flowing both ways. While this can happen with just a scorecard, a mechanism specifically geared toward the vendor providing you with feedback improves communication, alignment, and satisfaction.
You may be tempted to create a formal scorecard for the vendor to use. Our recommendation is to avoid that temptation until later in your maturity or development of the VMI. You’ll be implementing a lot of new processes, deploying new tools and templates, and getting people to work together in new ways. Work on those things first.
For now, implement an informal process for obtaining information from the vendor. Start by identifying information that you will find useful, information that will allow you to improve overall, to reduce waste or time, to improve processes, to identify gaps in skills. Incorporate these items into your business alignment meetings (see Steps 2.4 and 3.5). Create three to five good questions to ask the vendor and include these in the business alignment meeting agenda. The goal is to get meaningful feedback, and that starts with asking good questions.
Keep it simple at first. When the time is right, you can build a more formal feedback form or scorecard. Don’t be in a rush though. So long as the informal method works, keep using it.
2.3.1: Scorecards and feedback
30-60 minutes
- Meet with the participants and brainstorm ideas for your scorecard measurement categories:
- What makes a vendor valuable to your organization?
- What differentiates a “good” vendor from a “bad” vendor?
- What items would you like to measure and provide feedback to the vendor to improve performance, the relationship, risk, and other areas?
- Select three, but no more than five, of the following measure categories: timeliness, cost, quality, personnel, and risk.
- Within each measurement category, list two or three criteria that you want to measure and track for your vendors; choose items that are as universal as possible rather than being applicable to one vendor or one vendor type.
- Assign a weight to each measurement category, ensuring that the total weight is 100% for all measurement categories.
- Document your results as you go in Jump – Phase 2 Tools and Templates Compendium, Tab 2.3 Scorecard.
Download the Info-Tech Jump – Phase 2 Tools and Templates Compendium
Input
- Brainstorming
Output
- Configured scorecard template
Materials
- Jump – Phase 2 Tools and Templates Compendium, Tab 2.3 Scorecard
Participants
- VMI team
- Applicable stakeholders and executives (as needed)
2.3.2: Scorecards and feedback
15-30 minutes
- Meet with the participants and brainstorm ideas for feedback to seek from your vendors during your business alignment meetings. During the brainstorming, identify questions to ask the vendor about your organization that will:
- Help you improve the relationship.
- Help you improve your processes or performance.
- Help you improve ongoing communication.
- Help you evaluate your personnel.
- Identify the top five questions you want to include in your business alignment meeting agenda. (Note: you may need to refine the actual questions from the brainstorming activity before they are ready to include in your business alignment meeting agenda.)
- Document both your brainstorming activity and your final results in Jump – Phase 2 Tools and Templates Compendium, Tab 2.3 Feedback. The brainstorming questions can be used in the future as your VMI matures and your feedback transforms from informal to formal. The final results will be used in Steps 2.4 and 3.5.
Download the Info-Tech Jump – Phase 2 Tools and Templates Compendium
Input
- Brainstorming
Output
- Feedback questions to include with the business alignment meeting agenda
Materials
- Jump – Phase 2 Tools and Templates Compendium, Tab 2.3 Feedback
Participants
- VMI team
- Applicable stakeholders and executives (as needed)
Step 2.4: Business alignment meeting agenda
Craft an agenda that meets the needs of the VMI.
A business alignment meeting (BAM) is a great, multi-faceted tool to ensure the customer and the vendor stay focused on what is important to the customer at a high level. BAMs are not traditional “operational” meetings where the parties get into the details of the contracts, deal with installation problems, address project management issues, or discuss specific cost overruns. The main focus of the BAM is the scorecard (see Step 2.3), but other topics are discussed and other purposes are served. For example, you can use the BAM to develop the relationship with the vendor’s leadership team so that if escalation is ever needed, your organization is more than just a name on a spreadsheet or customer list; you can learn about innovations the vendor is working on (without the meeting turning into a sales call); you can address high-level performance trends and request corrective action as needed; you can clarify your expectations; you can educate the vendor about your industry, culture, and organization; and you can learn more about the vendor.
As you build your BAM agenda, someone in your organization may say, “Oh, that’s just a quarterly business review (QBR) or top-to-top meeting.” However, in most instances, an existing QBR or top-to-top meeting is not the same as a BAM. Using the term QBR or top-to-top meeting instead of BAM can lead to confusion internally. The VMI may say to the business unit, Procurement, or another department, “We’re going to start running some QBRs for our strategic vendors.” The typical response is, “There’s no need to do that. We already run QBRs/top-to-top meetings with our important vendors.” This may be accompanied by an invitation to join their meeting, where you may be an afterthought, have no influence, and get five minutes at the end to talk about your agenda items. Keep your BAM separate so that it meets your needs.
Step 2.4: Business alignment meeting agenda (cont.)
Craft an agenda that meets the needs of the VMI.
As previously noted, using the term BAM more accurately depicts the nature of the VMI meeting and prevents confusion internally with other meetings already occurring. In addition, hosting the BAM yourself rather than piggybacking onto another meeting ensures that the VMI’s needs are met. The VMI will set and control the BAM agenda and determine the invite list for internal personnel and vendor personnel. As you may have figured out by now, having the right customer and vendor personnel attend will be essential.
BAMs are conducted at the vendor level … not the contract level. As a result, the frequency of the BAMs will depend on the vendor’s classification category (see Steps 2.1 and 3.1). General frequency guidelines are provided below, but they can be modified to meet your goals:
- Commodity Vendors – Not applicable
- Operational Vendors – Biannually or annually
- Strategic Vendors – Quarterly
- Tactical Vendors – Quarterly or biannually
BAMs can help you achieve some additional benefits not previously mentioned:
- Foster a collaborative relationship with the vendor.
- Avoid erroneous assumptions by the parties.
- Capture and provide a record of the relationship (and other items) over time.
Step 2.4: Business alignment meeting agenda (cont.)
Craft an agenda that meets the needs of the VMI.
As with any meeting, building the proper agenda will be one of the keys to an effective and efficient meeting. A high-level BAM agenda with sample topics is set out below:
BAM Agenda
- Opening Remarks
- Welcome and introductions
- Review of previous minutes
- Active Discussion
- Review of open issues
- Scorecard and feedback
- Current status of projects to ensure situational awareness by the vendor
- Roadmap/strategy/future projects
- Accomplishments
- Closing Remarks
- Reinforce positives (good behavior, results, and performance, value added, and expectations exceeded)
- Recap
- Adjourn
2.4.1: Business alignment meeting agenda
20-45 minutes
- Meet with the participants and review the sample agenda in Jump – Phase 2 Tools and Templates Compendium, Tab 2.4 BAM Agenda.
- Using the sample agenda as inspiration and brainstorming activities as needed, create a BAM agenda tailored to your needs.
- Select the items from the sample agenda applicable to your situation.
- Add any items required based on your brainstorming.
- Add the feedback questions identified during Activity 2.3.2 and documented in Jump – Phase 2 Tools and Templates Compendium, Tab 2.3 Feedback.
- Gain input and approval from sponsors, stakeholders, and executives as required or appropriate.
- Document the final BAM agenda in Jump – Phase 2 Tools and Templates Compendium, Tab 2.4 BAM Agenda.
Download the Info-Tech Jump – Phase 2 Tools and Templates Compendium
Input
- Brainstorming
- Jump – Phase 2 Tools and Templates Compendium, Tab 2.3 Feedback
Output
- Configured BAM agenda
Materials
- Jump – Phase 2 Tools and Templates Compendium, Tab 2.4 BAM Agenda
Participants
- VMI team
- Applicable stakeholders and executives (as needed)
Step 2.5: Relationship alignment document
Draft a document to convey important VMI information to your vendors.
Throughout this blueprint, alignment is mentioned directly (e.g. business alignment meetings [Steps 2.4 and 3.5]) or indirectly implied. Ensuring you and your vendors are on the same page, have clear and transparent communication, and understand each other’s expectations is critical to fostering strong relationships. One component of gaining and maintaining alignment with your vendors is the relationship alignment document (RAD). Depending upon the scope of your VMI and what your organization already has in place, your RAD will fill in the gaps on various topics.
Early in the VMI’s maturation, the easiest approach is to develop a short document (i.e. 1 page) or a pamphlet (i.e. the classic trifold) describing the rules of engagement when doing business with your organization. The RAD can convey expectations, policies, guidelines, and other items. The scope of the document will depend on 1) what you believe is important for the vendors to understand, and 2) any other similar information already provided to the vendors.
The first step to drafting a RAD is to identify what information vendors need to know to stay on your good side. For example, you may want vendors to know about your gift policy (e.g. employees may not accept gifts from vendors above a nominal value such as a pen or mousepad). Next, compare your list of what vendors need to know and determine if the content is covered in other vendor-facing documents such as a vendor code of conduct or your website’s vendor portal. Lastly, create your RAD to bridge the gap between what you want and what is already in place. In some instances, you may want to include items from other documents to reemphasize them with the vendor community.
Info-Tech Insight
The RAD can be used with all vendors regardless of classification category. It can be sent directly to the vendors or given to them during vendor orientation (see Step 3.3)
2.5.1: Relationship alignment document
1-4 hours
- Meet with the participants and review the RAD sample and checklist in Jump – Phase 2 Tools and Templates Compendium, Tab 2.5 Relationship Alignment Doc.
- Determine:
- Whether you will create one RAD for all vendors or one RAD for strategic vendors and another RAD for tactical and operational vendors; whether you will create a RAD for commodity vendors.
- The concepts you want to include in your RAD(s).
- The format for your RAD(s) – traditional, pamphlet, or other.
- Whether signoff or acknowledgement will be required by the vendors.
- Draft your RAD(s) and work with other internal areas such as Marketing to create a consistent brand for the RADS and Legal to ensure consistent use and preservation of trademarks or other intellectual property rights and other legal issues.
- Review other vendor-facing documents (e.g. supplier code of conduct, onsite safety and security protocols) for consistencies between them and the RAD(s).
- Obtain signoff on the RAD(s) from stakeholders, sponsors, executives, Legal, Marketing, and others as needed.
Download the Info-Tech Jump – Phase 2 Tools and Templates Compendium
Input
- Brainstorming
- Vendor-facing documents, policies, and procedures
Output
- Completed relationship alignment document(s)
Materials
- Jump – Phase 2 Tools and Templates Compendium, Tab 2.5 Relationship Alignment Doc
Participants
- VMI team
- Marketing, as needed
- Legal, as needed
Step 2.6: Vendor orientation
Create a VMI awareness process to build bridges with your vendors.
Your organization is unique. It may have many similarities with other organizations, but your culture, risk tolerance, mission, vision, and goals, finances, employees, and “customers” (those that depend on you) make it different. The same is true of your VMI. It may have similar principles, objectives, and processes to other organizations’ VMIs, but yours is still unique. As a result, your vendors may not fully understand your organization and what vendor management means to you.
Vendor orientation is another means to helping you gain and maintain alignment with your important vendors, educate them on what is important to you, and provide closure when/if the relationship with the vendor ends. Vendor orientation is comprised of three components, each with a different function:
- Orientation
- Reorientation
- Debrief
Vendor orientation focuses on the vendor management pieces of the puzzle (e.g. the scorecard process) rather than the operational pieces (e.g. setting up a new vendor in the system to ensure invoices are processed smoothly).
Step 2.6: Vendor orientation (cont.)
Create a VMI awareness process to build bridges with your vendors.
Orientation
Orientation is conceptually similar to new hire orientation for employees at your organization. Generally conducted as a meeting, orientation provides your vendors with the information they need to be successful when working with your organization. Sadly, this is often overlooked by customers; it can take months or years for vendors to figure it out by themselves. By controlling the narrative and condensing the timeline, vendor relationships and performance improve more rapidly.
A partial list of topics for orientation is set out below:
- Your organization’s structure
- Your organization’s culture
- Your relationship expectations
- Your governances (VMI and other)
- Their vendor classification designation (commodity, operational, strategic, or tactical)
- The scorecard process
- Business alignment meetings
- Relationship alignment documents
In short, this is the first step toward building (or continuing to build) a robust, collaborative, mutually beneficial relationship with your important vendors.
Step 2.6: Vendor orientation (cont.)
Create a VMI awareness process to build bridges with your vendors.
Reorientation
Reorientation is either identical or similar to orientation, depending upon the circumstances. Reorientation occurs for a number of reasons, and each reason will impact the nature and detail of the reorientation content. Reorientation occurs whenever:
- There is a significant change in the vendor’s products or services.
- The vendor has been through a merger, acquisition, or divestiture.
- A significant contract renewal/renegotiation has recently occurred.
- Sufficient time has passed from orientation; commonly 2 to 3 years.
- The vendor has been placed in a “performance improvement plan” or “relationship improvement plan” protocol.
- Significant turnover has occurred within your organization (executives, key stakeholders, and/or VMI personnel).
- Substantial turnover has occurred at the vendor at the executive or account management level.
- The vendor has changed vendor classification categories after the most current classification.
As the name implies, the goal is to refamiliarize the vendor with your current VMI situation, governances, protocols, and expectations. The drivers for reorientation will help you determine its scope, scale, and frequency.
Step 2.6: Vendor orientation (cont.)
Create a VMI awareness process to build bridges with your vendors.
Debrief
To continue the analogy from orientation, debrief is similar to an exit interview for an employee when their employment is terminated. In this case, debrief occurs when the vendor is no longer an active vendor with your organization – all contracts have terminated or expired, and no new business with the vendor is anticipated within the next three months.
Similar to orientation and reorientation, debrief activities will be based on the vendor’s classification category within the COST model. Strategic vendors don’t go away very often; usually, they transition to operational or tactical vendors first. However, if a strategic vendor is no longer providing products or services to you, dig a little deeper into their experiences and allocate extra time for the debrief meeting.
The debrief should provide you with feedback on the vendor’s experience with your organization and their participation in your VMI. In addition, it can provide closure for both parties since the relationship is ending. Be careful that the debrief does not turn into a finger-pointing meeting or therapy session for the vendor. It should be professional and productive; if it is going off the rails, terminate the meeting before more damage can occur.
End the debrief on a high note if possible. Thank the vendor, highlight its key contributions, and single out any personnel who went above and beyond. You never know when you will be doing business with this vendor again – don’t burn bridges!
Step 2.6: Vendor orientation (cont.)
Create a VMI awareness process to build bridges with your vendors.
- As you create your vendor orientation materials, focus on the message you want to convey.
- For orientation and reorientation:
- What is important to you that vendors need to know?
- What will help the vendors understand more about your organization … your VMI?
- What and how are you different from other organizations overall … in your “industry”?
- What will help them understand your expectations?
- What will help them be more successful?
- What will help you build the relationship?
- For debrief:
- What information or feedback do you want to obtain?
- What information or feedback to you want to give?
- The level of detail you provide strategic vendors during orientation and reorientation may be different from the information you provide tactical and operational vendors. Commodity vendors are not typically involved in the vendor orientation process. The orientation meetings can be conducted on a one-to-one basis for strategic vendors and a one-to-many basis for operational and tactical vendors; reorientation and debrief are best conducted on a one-to-one basis. Lastly, face-to-face or video meetings work best for vendor orientation; voice-only meetings, recorded videos, or distributing only written materials seldom hit their mark or achieve the desired results.
2.6.1: Vendor orientation
1 to several hours
- Meet with the participants and review the Phase Tools and Templates Compendium, Tab 2.6 Vendor Orientation.
- Use the orientation checklist to identify the materials you want to create for your orientation meetings.
- Use the reorientation checklist to identify the materials you want to create for your reorientation meetings.
- The selections can be made by classification category (i.e. different items can apply to strategic, operational, and tactical vendors).
- Create the materials and seek input and/or approval from sponsors, stakeholders, and executives as needed.
- Use the debrief section of the tool to create an agenda, list the questions you want to ask vendors, and list information you want to provide to vendors. The agenda, questions, and information can be segregated by classification category.
Download the Info-Tech Jump – Phase 2 Tools and Templates Compendium
Input
- Brainstorming
Output
- Agendas and materials for orientation, reorientation, and debrief
Materials
- Phase Tools and Templates Compendium, Tab 2.6 Vendor Orientation
Participants
- VMI team
Step 2.7: Job descriptions
Ensure new and existing job descriptions are up to date.
Based on your work product from Steps 1.1-1.9, it’s time to start drafting new or modifying existing job descriptions applicable to the VMI team members. Some of the VMI personnel may be dedicated full-time to the VMI, while others may be supporting the VMI on a part-time basis. At a minimum, create or modify your job descriptions based on the categories set out below. Remember to get the internal experts involved so that you stay true to your environment and culture.
01 Title
This should align overall with what the person will be doing and what the person will be responsible for. Your hands may be tied with respect to titles, but try to make them intuitively descriptive if possible.
02 Duties
This is the main portion of the job description. List the duties, responsibilities, tasks, activities, and results expected. Again, there may be some limitations imposed by your organization, but be as thorough as possible.
03 Qualifications
This tends to be a gray area for many organizations, with the qualifications, certifications, and experience desired expressed in “ranges” so that good candidates are not eliminated from consideration unnecessarily.
2.7.1: Job descriptions
1 to several hours
- Meet with the participants and review the VMI structure from Step 1.9.
- List the positions that require new job descriptions.
- List the positions that require updated job descriptions.
- Review the other Phase 1 work product and list the responsibilities, tasks, and functions that need to be incorporated into the new and updated job descriptions.
- Review the sample VMI job descriptions and sample VMI job description language in Jump – Phase 2 Tools and Templates Compendium, Tab 2.7 Job Descriptions, and identify language and concepts you want to include in the new and revised job descriptions.
- Using your template, draft the new job descriptions and modify the existing job descriptions to synchronize with the VMI structure. Work with other internal areas such as Human Resources to ensure cultural fit and compliance.
- Obtain input and signoff on the job descriptions from stakeholders, sponsors, executives, Human Resources, and others as needed.
- Document your final job descriptions in Jump – Phase 2 Tools and Templates Compendium, Tab 2.7 Job Descriptions.
Download the Info-Tech Jump – Phase 2 Tools and Templates Compendium
Input
- Brainstorming
- Existing job descriptions
- Work product from Phase 1
Output
- Job descriptions for new positions
- Updated job descriptions for existing positions
Materials
- Jump – Phase 2 Tools and Templates Compendium, Tab 2.7 Job Descriptions
Participants
- VMI team
- Human Resources (as needed)
- Applicable stakeholders and executives (as needed)
Step 2.8: Policies and procedures
Prepare policies and procedures for VMI functions.
Policies and procedures are often thought of as boring documents that are 1) tedious to create, 2) seldom read after creation, and 3) only used to punish people when they do something “wrong.” However, when done well, these documents:
- Communicate expectations.
- Capture institutional knowledge.
- Provide guidance for decision making.
- Help workers avoid errors and minimize risk.
- Ensure regulatory and organizational compliance.
- List the steps required to achieve consistent results.
Definitions of Policies and Procedures
Policies and procedures are essential, but they are often confused with each other. A policy is a rule, guideline, or framework for making decisions. For example, in the vendor management space, you may want a policy indicating your organization’s view on gifts from vendors. A procedure is a set of instructions for completing a task or activity. For example, staying in the vendor management space, you may want a procedure to outline the process for classifying vendors.
Step 2.8: Policies and procedures (cont.)
Prepare policies and procedures for VMI functions.
Start With Your Policy/Procedure Template or Create One for Consistency
When creating policies and procedures, follow your template. If you don’t have one (or want to see if anything is missing from your template) the following list of potential components for your governance documents is provided.* Not every concept is required. Use your judgment and err on the side of caution when drafting; balance readability and helpfulness against over documenting and over complicating.
- Descriptive Title
- Policy Number
- Brief Overview
- Purpose
- Scope
- The Policy or Procedure
- Definitions
- Revision Date
- History
- Related Documents
- Keywords
Step 2.8: Policies and procedures (cont.)
Prepare policies and procedures for VMI functions.
Although they are not ever going to be compared to page-turning novels, policies and procedures can be improved by following a few basic principles. By following the guidelines set out below, your VMI policies and procedures will contribute to the effectiveness of your initiative.*
- Use short sentences.
- Organize topics logically.
- Use white space liberally.
- Use mandatory language.
- Use gender-neutral terms.
- Write with an active voice.
- Avoid jargon when possible.
- Use a consistent “voice” and tone.
- Use pictures or diagrams when they will help.
- Write in the same tense throughout the document.
- Use icons and colors to designate specific elements.
- Make sure links to other policies and procedures work.
- Define all acronyms and jargon (when it must be used).
- Avoid a numbering scheme with more than three levels.
*Adapted in part from smartsheet.com
Info-Tech Insight
Drafting policies and procedures is an iterative process that requires feedback from the organization’s leadership team.
2.8.1: Policies and procedures
Several hours
- Meet with the participants and review the sample policies and procedures topics in Jump – Phase 2 Tools and Templates Compendium, Tab 2.8 Policies and Procedures.
- Determine:
- The concepts you want to include in your policies and procedures; brainstorm for any additional concepts you want to include.
- The format/template for your policies and procedures.
- Draft your policies and procedures based on the sample topics and your brainstorming activity. Work with other internal areas such as Legal and Human Resources to ensure cultural and environmental fit within your organization.
- Obtain input and signoff on the policies and procedures from stakeholders, sponsors, executives, Legal, Human Resources, and others as needed.
- Document your final policies and procedures in Jump – Phase 2 Tools and Templates Compendium, Tab 2.8 Policies and Procedures.
- Publish your policies and procedures and conduct training sessions or awareness sessions as needed.
Download the Info-Tech Jump – Phase 2 Tools and Templates Compendium
Input
- Existing policies and procedures (if any)
- Existing policies and procedures template (if any)
- Scope
- OIC chart
- Process maps
- Brainstorming
Output
- VMI policies and procedures
Materials
- Jump – Phase 2 Tools and Templates Compendium, Tab 2.8 Policies and Procedures
Participants
- VMI team
- Legal and Human Resources (as needed)
- Applicable stakeholders and executives (as needed)
Step 2.9: 3-year roadmap
Plot your path at a high level.
The VMI exists in many planes concurrently: 1) it operates both tactically and strategically, and 2) it focuses on different timelines or horizons (e.g. the past, the present, and the future). Creating a 3-year roadmap facilitates the VMI’s ability to function effectively across these multiple landscapes.
The VMI roadmap will be influenced by many factors. The work product from Phase 1: Plan, input from executives, stakeholders, and internal clients, and the direction of the organization as a whole are great sources of information as you begin to build your roadmap.
To start, identify what you would like to accomplish in Year 1. This is arguably the easiest year to complete: budgets are set (or you have a good idea what the budget will look like), personnel decisions have been made, resources have been allocated, and other issues impacting the VMI are known with a higher degree of certainty than any other year. This does not mean things won’t change during the first year of the VMI, but expectations are usually lower and the short event horizon makes things more predictable during the Year-1 ramp-up period.
Years 2 and 3 are more tenuous, but the process is the same: identify what you would like to accomplish or roll out in each year. Typically, the VMI maintains the Year 1 plan into subsequent years and adds to the scope or maturity. For example, you may start Year 1 with BAMs and scorecards for three of your strategic vendors; during Year 2, you may increase that to five vendors; and during Year 3, you may increase that to nine vendors. Or, you may not conduct any market research during Year 1, waiting to add it to your roadmap in Year 2 or 3 as you mature.
Breaking things down by year helps you identify what is important and the timing associated with your priorities. A conservative approach is recommended. It is easy to overcommit, but the results can be disastrous and painful.
2.9.1: 3-year roadmap
45-90 minutes
- Meet with the participants and decide how to coordinate Year 1 of your 3-year roadmap with your existing fiscal year or reporting year. Year 1 may be shorter or longer than a calendar year.
- Review the VMI activities listed in Jump – Phase 2 Tools and Templates Compendium, Tab 2.9 3-Year Roadmap. Use brainstorming and your prior work product from Phase 1 and Phase 2 to identify additional items for the roadmap and add them at the bottom of the spreadsheet.
- Starting with the first activity, determine when that activity will begin and put an X in the corresponding column; if the activity is not applicable, leave it blank or insert N/A.
- Go back to the top of the list and add information as needed.
- For any Year-1 or Year-2 activities, add an X in the corresponding columns if the activity will be expanded/continued in subsequent periods (e.g. if a Year 2 activity will continue in Year 3, put an X in Year 3 as well).
- Use the comments column to provide clarifying remarks or additional insights related to your plans or “X’s.” For example, “Scorecards begin in Year 1 with three vendors and will roll out to five vendors in Year 2 and nine vendors in Year 3.”
- Obtain signoff from stakeholders, sponsors, and executives as needed.
Download the Info-Tech Jump – Phase 2 Tools and Templates Compendium
Input
- Phase 1 work product
- Steps 2.1-2.8 work product
- Brainstorming
Output
- High level 3-year roadmap for the VMI
Materials
- Jump – Phase 2 Tools and Templates Compendium, Tab 2.9 3-Year Roadmap
Participants
- VMI team
- Applicable stakeholders and executives (as needed)
Step 2.10: 90-day plan
Pave your short-term path with a series of detailed quarterly plans.
Now that you have prepared a 3-year roadmap, it’s time to take the most significant elements from the first year and create action plans for each three-month period. Your first 90-day plan may be longer or shorter if you want to sync to your fiscal or calendar quarters. Aligning with your fiscal year can make it easier for tracking and reporting purposes; however, the more critical item is to make sure you have a rolling series of four 90-day plans to keep you focused on the important activities and tasks throughout the year. The 90-day plan is a simple project plan that will help you measure, monitor, and report your progress. Use the Info-Tech tool to help you track:
The first 90-day plan will have the greatest level of detail and should be as thorough as possible; the remaining three 90-day plans will each have less detail for now. As you approach the middle of the first 90-day plan, start adding details to the next 90-day plan; toward the end of the first quarter add a high-level 90-day plan to the end of the chain. Continue repeating this cycle each quarter and consult the 3-year roadmap and the leadership team as necessary. |
 |
2.10.1: 90-day plan
45-90 minutes
- Meet with the participants and decide how to coordinate the first 90-day plan with your existing fiscal year or reporting cycles. Your first plan may be shorter or longer than 90 days.
- Looking at the Year 1 section of the 3-year roadmap, identify the activities that will be started during the next 90 days.
- Using the Jump – Phase 2 Tools and Templates Compendium, Tab 2.10 90-Day Plan, enter the following information into the spreadsheet for each activity to be accomplished during the next 90 days:
- Activity description
- Tasks required to complete the activity (be specific and descriptive)
- The people who will be performing each task
- The estimated number of hours required to complete each task
- The start date and due date for each task or the activity
- Validate the tasks are a complete list for each activity and the people performing the tasks have adequate time to complete the tasks by the due date(s).
- Assign a priority to each activity.
Download the Info-Tech Jump – Phase 2 Tools and Templates Compendium
Input
- 3-year roadmap
- Phase 1 work product
- Steps 2.1-2.9 work product
- Brainstorming
Output
- Detailed plan for the VMI for the next quarter or 90 days
Materials
- Jump – Phase 2 Tools and Templates Compendium, Tab 2.10 90-Day Plan
Participants
- VMI team
- Applicable stakeholders and executives (as needed)
Step 2.11: Quick wins
Identify potential short-term successes to gain momentum and show value immediately.
As the final step in the timeline trilogy, you are ready to identify some quick wins for the VMI. Using the first 90-day plan and a brainstorming activity, create a list of things you can do in 15 to 30 days that add value to your initiative and build momentum.
As you evaluate your list of potential candidates, look for things that:
- Are achievable within the stated timeline.
- Don’t require a lot of effort.
- Involve stopping a certain process, activity, or task; this is sometimes known as a “stop doing stupid stuff” approach.
- Will reduce or eliminate inefficiencies; this is sometimes known as the war on waste.
- Have a moderate to high impact or bolster the VMI’s reputation.
As you look for quick wins, you may find that everything you identify does not meet the criteria. That’s ok … don’t force the issue. Return your focus to the 90-day plan and 3-year roadmap, and update those documents if the brainstorming activity associated with this Step 2.11 identified anything new.
2.11.1: Quick wins
15-30 minutes
- Meet with the participants and review the 3-year roadmap and 90-day plan. Determine if any item on either document can be completed:
- Quickly (30 days or less)
- With minimal effort
- To provide or show moderate to high levels of value or provide the VMI with momentum
- Brainstorm to identify any other items that meet the criteria in step 1 above.
- Compile a comprehensive list of these items and select up to five to pursue.
- Document the list in the Jump – Phase 2 Tools and Templates Compendium, Tab 2.11 Quick Wins.
- Manage the quick wins list and share the results with the VMI team and applicable stakeholders and executives.
Download the Info-Tech Jump – Phase 2 Tools and Templates Compendium
Input
- 3-year roadmap
- 90-day plan
- Brainstorming
Output
- A list of activities that require low levels of effort to achieve moderate to high levels of value in a short period
Materials
- Jump – Phase 2 Tools and Templates Compendium, Tab 2.11 Quick Wins
Participants
- VMI team
Step 2.12: Reports
Construct your reports to resonate with your audience.
Issuing reports is a critical piece of the VMI since the VMI is a conduit of information for the organization. It may be aggregating risk data from internal areas, conducting vendor research, compiling performance data, reviewing market intelligence, or obtaining relevant statistics, feedback, comments, facts, and figures from other sources. Holding onto this information minimizes the impact a VMI can have on the organization; however, the VMI’s internal clients, stakeholders, and executives can drown in raw data and ignore it completely if it is not transformed into meaningful, easily-digested information.
Before building a report, think about your intended audience:
- What information are they looking for … what will help them understand the big picture?
- What level of detail is appropriate, keeping in mind the audience may not be like-minded?
- What items are universal to all of the readers and what items are of interest to one or two readers?
- How easy or hard will it be to collect the data … who will be providing it, how time consuming will it be?
- How accurate, valid, and timely will the data be?
- How frequently will each report need to be issued?
Step 2.12: Reports (cont.)
Construct your reports to resonate with your audience.
Use the following guidelines to create reports that will resonate with your audience:
- Value information over data, but sometimes data does have a place in your report.
- Use pictures, graphics, and other representations more than words, but words are often necessary in small, concise doses.
- Segregate your report by user; for example, general information up top, CIO information below that on the right, CFO information to the left of CIO information, etc.
- Send a draft report to the internal audience and seek feedback, keeping in mind you won’t be able to cater to or please everyone.
Step 2.12: Reports (cont.)
Construct your reports to resonate with your audience.
The report’s formatting and content display can make or break your reports.*
- Make the report look inviting and easy to read. Use:
- Short paragraphs and bullet points.
- A simple layout and uncluttered, wide margins.
- Minimal boldface, underline, or italics to attract the readers’ attention.
- High contrast between text and background.
- Charts, graphs, and infographics should be intuitive and tell the story on their own.
- Make it easy to peruse the report for topics of interest.
- Maintain consistent design features.
- Use impactful, meaningful headings and subheadings.
- Include callouts to draw attention to important high-level information.
- Demonstrate the impact of the accomplishments or success stories when appropriate.
- Finish with a simple concise summary when appropriate. Consider adding:
- Key points for the reader to takeaway.
- Action items or requests.
- Plans for next reporting period.
*Sources: Adapted and compiled in part from: designeclectic.com, ahrq.gov, and 60secondmarketer.com.
2.12.1: Reports
15-45 minutes
- Meet with the participants and review the applicable work product from Phases 1 and 2; identify qualitative and quantitative items the VMI measures, monitors, tracks, or aggregates.
- Determine which items will be reported and to whom (by category):
- Internally to personnel within the VMI
- Internally to personnel outside the VMI
- Externally to vendors
- Within each category above, determine your intended audiences/recipients. For example, you may have a different list of recipients for a risk report than you do a scorecard summary report. This will help you identify the number of reports required.
- Create a draft structure for each report based on the audience and the information being conveyed. Determine the frequency of each report and person responsible for creating for each report.
- Document your final choices in Jump – Phase 2 Tools and Templates Compendium, Tab 2.12 Reports.
Download the Info-Tech Jump – Phase 2 Tools and Templates Compendium
Input
- Brainstorming
- Phase 1 work product
- Steps 2.1-2.11 work product
Output
- A list of reports used by the VMI
- For each report:
- The conceptual content
- A list of who will receive or have access
- A creation/distribution frequency
Materials
- Jump – Phase 2 Tools and Templates Compendium, Tab 2.12 Reports
Participants
- VMI team
- Applicable stakeholders and executives (as needed)
Phase 3: Run
Implement Your Processes and Leverage Your Tools and Templates
| Phase 1 | Phase 2 | Phase 3 | Phase 4 |
|---|---|---|---|
| 1.1 Mission Statement and Goals 1.2 Scope 1.3 Strengths and Obstacles 1.4 Roles and Responsibilities 1.5 Process Mapping 1.6 Charter 1.7 Vendor Inventory 1.8 Maturity Assessment 1.9 Structure |
2.1 Classification Model |
3.1 Classify Vendors |
4.1 Assess Compliance |
This phase will walk you through the following activities:
Begin operating the VMI. The main outcomes from this phase are guidance and the steps required to implement your VMI.
This phase involves the following participants:
- VMI team
- Applicable stakeholders and executives
- Others as needed
Jump Start Your Vendor Management Initiative
Phase 3: Run
Implement your processes and leverage your tools and templates.
All of the hard work invested in Phase 1: Plan and Phase 2: Build begins to pay off in Phase 3: Run. It’s time to stand up your VMI and ensure that the proper level of resources is devoted to your vendors and the VMI itself. There’s more hard work ahead, but the foundational elements are in place. This doesn’t mean there won’t be adjustments and modifications along the way, but you are ready to use the tools and templates in the real world; you are ready to begin reaping the fruits of your labor.
Phase 3: Run guides you through the process of collecting data, monitoring trends, issuing reports, and conducting effective meetings to:
- Manage risk better.
- Improve vendor performance.
- Improve vendor relationships.
- Identify areas where the parties can improve.
- Improve communication between the parties.
- Increase the value proposition with your vendors.
Step 3.1: Classify vendors
Begin classifying your top 25 vendors by spend.
Step 3.1 sets the table for many of the subsequent steps in Phase 3: Run. The results of your classification process will determine: which vendors go through the scorecarding process (Step 3.4); which vendors participate in BAMs (Step 3.5); the nature and content of the vendor orientation activities (Step 3.3); which vendors will be part of the risk measurement and monitoring process (Step 3.8); which vendors will be included in the reports issued by the VMI (Step 3.9); and which vendors you will devote relationship-building resources to (Step 3.10).
As you begin classifying your vendors, Info-Tech recommends using an iterative approach initially to validate the results from the classification model you configured in Step 2.1.
- Using the information from the Vendor Inventory tab (Step 1.7), identify your top 25 vendors by spend.
- Run your top 10 vendors by spend through the classification model and review the results.
- If the results are what you expected and do not contain any significant surprises, go to next page.
- If the results are not what you expected or contain significant surprises, look at the configuration page of the tool (Tab 1) and adjust the weights or the spend categories slightly. Be cautious in your evaluation of the results before modifying the configuration page – some legitimate results are unexpected or surprising based on bias. If you modify the weighting, review the new results and repeat your evaluation. If you modify the spend categories, review the answers on the vendor tabs to ensure that the answers are still accurate; review the new results and repeat your evaluation.
Step 3.1: Classify vendors (cont.)
Review your results and adjust the classification tool as needed.
- Run your top 11 through 25 vendors by spend through the classification model and review the results. Identify any unexpected results or surprises. Determine if further configuration makes sense and repeat the process outlined in 2.b, previous page, as necessary. If no further modifications are required, continue to 4, below.
- Share the preliminary results with the leadership team, executives, and stakeholders to obtain their approval or adjustments to the results.
- They may have questions and want to understand the process before approving the results.
- They may request that you move a vendor from one quadrant to another based on your organization’s roadmap, the vendor’s roadmap, or other information not available to you.
- Identify the vendors that will be part of the VMI at this stage – how many and which ones. Based on this number and the VMI’s scope (Step 1.2), make sure you have the resources necessary to accommodate the number of vendors participating in the VMI. Proceed cautiously and gradually increase the number of vendors participating in the VMI.
Step 3.1: Classify vendors (cont.)
Finalize the results and update VMI tools and templates.
- Update the Vendor Inventory tab (Step 1.7) to indicate the current classification status for the top 25 vendors by spend. Once your vendors have been classified, you can sort the Vendor Inventory tab by classification status to see all the vendors in that category at once.
- Review your 3-year roadmap (Step 2.9) and 90-day plans (Step 2.10) to determine if any modifications are needed to the activities and timelines.
Additional classification considerations:
- You should only have a few vendors that fit in the strategic category. As a rough guideline, no more than 5% to 10% of your IT vendors should end up in the strategic category. If you have a large number of vendors, even 5% may be too many. The classification model is an objective start to the classification process, but common sense must prevail over the “math” at the end of the day.
- At this point, there is no need to go beyond the top 25 by spend. Most VMIs starting out can’t handle more than three to five strategic vendors initially. Allow the VMI to run a pilot program with a small sample size, work out any bugs, make adjustments, and then ramp up the VMI’s rollout in waves. Vendors can be added quarterly, biannually, or annually, depending upon the desired goals and available resources.
Step 3.1: Classify vendors (cont.)
Align your vendor strategy to your classification results.
As your VMI matures, additional vendors will be part of the VMI. Review the table below and incorporate the applicable strategies into your deployment of vendor management principles over time. Stay true to your mission, goals, and scope, and remember that not all of your vendors are of equal importance.
| Operational | Strategic |
|---|---|
|
|
Commodity |
Tactical |
|
|
Step 3.1: Classify vendors (cont.)
Be careful when using the word “partner” with your strategic and other vendors.
For decades, vendors have used the term “partner” to refer to the relationship they have with their clients and customers. In many regards, this is often an emotional ploy used by the vendors to get the upper hand. To fully understand the terms “partner” and “partnership” let’s evaluate them through two more-objective, less-cynical lenses.
If you were to talk to your in-house or outside legal counsel, you may be told that partners share in profits and losses, and they have a fiduciary obligation to each other. Unless there is a joint venture between the parties, you are unlikely to have a partnership with a vendor from this perspective.
What about a “business” partnership … one that doesn’t involve sharing profits and losses? What would that look like? Here are some indicators of a business partnership (or preferably a strategic alliance):
- Trust and transparent communication exist.
- You have input into the vendor’s roadmap for products and services.
- The vendor is aligned with your desired outcomes and helps you achieve success.
- You and the vendor are accountable for actions and inactions, with both parties being at risk.
- There is parity in the peer-to-peer relationships between the organizations (e.g. C-Level to C-Level).
- The vendor provides transparency in pricing models and proactively suggests ways for you to reduce costs.
- You and the vendor work together to make each party better, providing constructive feedback on a regular basis.
- The vendor provides innovative suggestions for you to improve your processes, performance, the bottom line, etc.
- Negotiations are not one-sided; they are meaningful and productive, resulting in an equitable distribution of money and risk.
Step 3.1: Classify vendors (cont.)
Understand the implications and how to leverage the words “partner” and “partnership.”
By now you might be thinking, “What’s all the fuss? Why does it matter?” At Info-Tech, we’ve seen firsthand how referring to the vendor as a partner can have the following impact:
- Confidences are disclosed unnecessarily.
- Negotiation opportunities and leverage are lost.
- Vendors no longer have to earn the customer’s business.
- Vendor accountability is missing due to shared responsibilities.
- Competent skilled vendor resources are assigned to other accounts.
- Value erodes over time since contracts are renewed without being competitively sourced.
- One-sided relationships are established, and false assurances are provided at the highest levels within the customer organization.
Proceed with caution when using partner or partnership with your vendors. Understand how your organization benefits from using these terms and mitigate the negatives outlined above by raising awareness internally to ensure people understand the psychology behind the terms. Finally, use the term to your advantage when warranted by referring to the vendor as a partner when you want or need something that the vendor is reluctant to provide. Bottom line: Be strategic in how you refer to vendors and know the risks.
Step 3.2: Conduct internal “kickoff” meeting
Raise awareness about the VMI and its mission, vision, and goals.
To be effective, your VMI needs executive support, a clear vision, appropriate governances and tools, personnel with the right skills, and other items discussed in this blueprint. However, the VMI doesn’t exist in a vacuum … it can’t sit back and be reactive. As part of being proactive, the VMI must be aware of its brand and “market” its services. An effective way to market the VMI is to conduct an internal kickoff meeting. There are at least a couple of ways to do this:
- Host a meeting for stakeholders, executives, and others who will be contributing to the VMI processes (but are not part of the VMI). The meeting can be part of a townhall or standalone meeting; it can be done live or via a recorded video.
- Attend appropriate staff meetings and make your presentation.
With either approach above or one of your choosing, keep in mind the following objectives for your kickoff meeting:
- Make sure you provide a way for those in attendance to ask questions at that time and later. You want to create and foster a communication loop with the people who will be impacted by the VMI or participating with it.
- Raise awareness of your existence and personnel. Tell the VMI’s story by sharing your mission statement, goals, and scope; this will help dispel (or confirm) rumors about the VMI that often lead to confusion and faulty assumptions.
- As you share the VMI’s vision, connect the story to how the VMI will impact the organization and individuals and to how they can help. The VMI tends to be the least autonomous area within an organization; it needs the assistance of others to be successful. Convey an atmosphere of collaboration and appreciation for their help.
Host a kickoff meeting annually to kickoff the new year. Remind people of your story, announce successes from the past year, and indicate what the future year holds. Keep it brief, make it personal for the audience, and help them connect the names of VMI personnel to faces.
Step 3.3: Conduct vendor orientation
Introduce your VMI to your top vendors.
Based on the results from your vendor classification (Step 3.1) and your VMI deployment timeline, identify the vendors who will participate in the initial orientation meetings. Treat the orientation as a formal, required meeting for the vendors to attend. Determine the attendee list for your organization and the vendors, and send out invites. Ideally, you will want the account manager, a sales director or vice president, the “delivery” director or vice president, and an executive from the vendor in the meeting. From the customer side, you may need more than one or two people from the VMI to entice the vendor’s leadership team to attend; you may need attendance from your own leadership team to add weight or credibility to the meeting (unfortunately).
Before going into the meeting, make sure everyone on your side knows their roles and responsibilities, and review the agenda. Control the agenda or the meeting is likely to get out of hand and turn into a sales call.
Conduct orientation meetings even if the participating vendors have been doing business with you for several years. Don’t assume they know all about your organization and your VMI (even if their other clients have a VMI).
Run two or three orientation meetings and then review the “results.” What needs to be modified? What lessons have you learned? Make any necessary adjustments and continue rolling out the orientation meetings.
Early in the VMI’s deployment, reorientation and debrief may not be in play. As time passes, it is important to remember them! Use them when warranted to help with vendor alignment.
Step 3.4: Compile scorecards
Begin scoring your top vendors.
The scorecard process typically is owned and operated by the VMI, but the actual rating of the criteria within the measurement categories is conducted by those with day-to-day interactions with the vendors, those using or impacted by the services and products provided by the vendors, and those with the skills to research other information on the scorecard (e.g. risk). Chances are one person will not be able to complete an entire scorecard by themselves. As a result, the scorecard process is a team sport comprising sub-teams where necessary.
The VMI will compile the scores, calculate the final results, and aggregate all of the comments into one scorecard. There are two common ways to approach this task:
- Send out the scorecard template to those who will be scoring the vendor and ask them to return it when completed, providing them with a due date a few days before you actually need it; you’ll need time to compile, calculate, and aggregate.
- Invite those who will be scoring the vendor to a meeting and let the contributors use that time to score the vendors; make VMI team members available to answer questions and facilitate the process.
Step 3.4: Compile scorecards (cont.)
Gather input from stakeholders and others impacted by the vendors.
Since multiple people will be involved in the scorecarding process or have information to contribute, the VMI will have to work with the reviewers to ensure that the right mix of data is provided. For example:
- If you are tracking lawsuits filed by or against the vendor, one person from Legal may be able to provide that, but they may not be able to evaluate any other criteria on the scorecard.
- If you are tracking salesperson competencies, multiple people from multiple areas may have valuable insights.
- If you are tracking deliverable timeliness, several project managers may want to contribute across several projects.
Where one person is contributing exclusively to limited criteria, make it easy for the person to identify the criteria they are to evaluate. When multiple people from the same functional area will provide insights, they can contribute individually (and the VMI will average their responses) or they can respond collectively after reaching consensus among themselves.
After the VMI has compiled, calculated, and aggregated, share the results with executives, impacted stakeholders, and others who will be attending the BAM for that vendor. Depending upon the comments provided by internal personnel, you may need to create a sanitized version of the scorecard for the vendor.
Make sure your process timeline has a buffer built in. You’ll be sending the final scorecard to the vendor three to five days before the BAM, and you’ll need some time to assemble the results. The scorecarding process can be perceived as a low-priority activity for people outside of the VMI, and other “priorities” will arise for them. Without a timeline buffer, the VMI may find itself behind schedule and unprepared due to things beyond its control.
Step 3.5: Conduct business alignment meetings
Determine which vendors will participate and how long the meetings will last.
At their core, BAMs aren’t that different from any other meeting. The basics of running a meeting still apply, but there are a few nuances that apply to BAMs Set out below are leading practices for conducing your BAMs; adapt them to meet your needs and suit your environment.
Who
Initially, BAMs are conducted with the strategic vendors in your pilot program. Over time, you’ll add vendors until all of your strategic vendors are meeting with you quarterly. After that, roll out the BAMs to those tactical and operational vendors located close to the strategic quadrant in the classification model (Steps 2.1 and 3.1) and as VMI resources allow. It may take several years before you are holding regular BAMs with all of your strategic, tactical, and operational vendors.
Duration
Keep the length of your meetings reasonable. The first few with a vendor may need to be 60 to 90 minutes long. After that, you should be able to trim them to 45 to 60 minutes. The BAM does not have to fill the entire time. When you are done, you are done.
Step 3.5: Conduct business alignment meetings (cont.)
Identify who will be invited and send out invitations.
Invitations
Set up a recurring meeting whenever possible. Changes will be inevitable, but keeping the timeline regular works to your advantage. Also, the vendors included in your initial BAMs won’t change for twelve months. For the first BAM with a vendor, provide adequate notice; four weeks is sufficient in most instances, but calendars will fill up quickly for the main attendees from the vendor. Treat the meeting as significant and make sure your invitation reflects this. A simple meeting request will often be rejected, treated as optional, or ignored completely by the vendor’s leadership team (and maybe yours as well!).
Invitees
Internal invitees should include those with a vested interest in the vendor’s performance and the relationship. In addition, other functional areas may be invited based on need or interest. Be careful the attendee list doesn’t get too big. Based on this, internal BAM attendees often include representatives from IT, Sourcing/Procurement, and the applicable business units. At times, Finance and Legal are included.
From the vendor’s side, strive to have decision makers and key leaders attend. The salesperson/account manager is often included for continuity, but a director or vice president of sales will have more insights and influence. The project manager is not needed at this meeting due to the nature of the meeting and its agenda; however, a director or vice president from the “product or service delivery” area is a good choice. Bottom line: get as high into the vendor’s organization as possible whenever possible; look at the types of contracts you have with that vendor to provide guidance on the type of people to invite.
Step 3.5: Conduct business alignment meetings (cont.)
Prepare for the meetings and maintain control.
Preparation
Send the scorecard and agenda to the vendor five days prior to the BAM. The vendor should provide you with any information you require for the meeting five days prior as well.
Decide who will run the meeting. Some customers like to lead and others let the vendor present. How you craft the agenda and your preferences will dictate who runs the show.
Make sure the vendor knows what materials it should bring to the meeting or have access to. This will relate to the agenda and any specific requests listed under the discussion points. You don’t want the vendor to be caught off guard and unable to discuss a matter of importance to you.
Running the BAM
Regardless of which party leads, make sure you manage the agenda to stay on topic. This is your meeting – not the vendor’s, not IT’s, not Procurement’s or Sourcing’s. Don’t let anyone hijack it.
Make sure someone is taking notes. If you are running this virtually, consider recording the meeting. Check with your legal department first for any concerns, notices, or prohibitions that may impact your recording the session.
As a reminder, this is not a sales call, and this is not a social activity. Innovation discussions are allowed and encouraged, but that can quickly devolve into a sales presentation. People can be friendly toward one another, but the relationship building should not overwhelm the other purposes.
Step 3.5: Conduct business alignment meetings (cont.)
Follow these additional guidelines to maximize your meetings.
More Leading Practices
- Remind everyone that the conversation may include items covered by various confidentiality provisions or agreements.
- Publish the meeting minutes on a timely basis (within 48 hours).
- Focus on the bigger picture by looking at trends over time; get into the details only when warranted.
- Meet internally immediately beforehand to prepare – don’t go in cold; review the agenda and the roles and responsibilities for the attendees.
- Physical meetings are better than virtual meetings, but travel constraints, budgets, and pandemics may not allow for physical meetings.
Final Thoughts
- When performance or the relationship is suffering, be constructive in your feedback and conversations rather than trying to assign blame; lead with the carrot rather than the stick.
- Look for collaborative solutions whenever possible and avoid referencing the contract if possible. Communicate your willingness to help resolve outstanding issues.
- Use inclusive language and avoid language that puts the vendor on the defensive.
- Make sure that your meetings are not focused exclusively on the negative, but don’t paint a rosy picture where one doesn’t exist.
- A vendor that is doing well should be commended. This is an important part of relationship building.
Step 3.6: Work the 90-day plan
Monitor your progress and share your results.
Having a 90-day plan is a good start, but assuming the tasks on the plan will be accomplished magically or without any oversight can lead to failure. While it won’t take a lot of time to work the plan, following a few basic guidelines will help ensure the 90-day plan gets results and wasn’t created in vain.
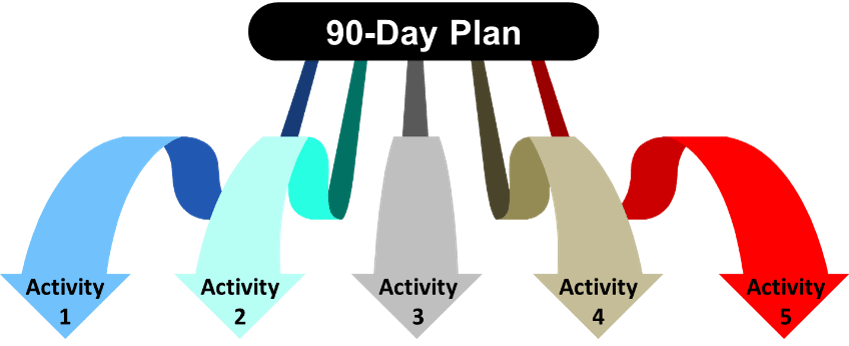
- Measure and track your progress against the initial/current 90-day plan at least weekly; with a short timeline, any delay can have a huge impact.
- If adjustments are needed to any elements of the plan, understand the cause and the impact of those adjustments before making them.
- Make adjustments ONLY when warranted. The temptation will be to push activities and tasks further out on the timeline (or to the next 90-day plan!) when there is any sort of “hiccup” along the way, especially when personnel outside the VMI are involved. Hold true to the timeline whenever possible; once you start slipping, it often becomes a habit.
- Report on progress every week and hold people accountable for their assignments and contributions.
- Take the 90-day plan seriously and treat it as you would any significant project – this is part of the VMI’s branding and image.
Step 3.7: Manage the 3-year roadmap
Keep an eye on the future since it will feed the present.
The 3-year roadmap is a great planning tool, but it is not 100% reliable. There are inherent flaws and challenges. Essentially, the roadmap is a set of three “crystal balls” attempting to tell you what the future holds. The vision for Year 1 may be fairly clear, but for each subsequent year, the crystal ball becomes foggier. In addition, the timeline is constantly changing; before you know it, tomorrow becomes today and Year 2 becomes Year 1.
To help navigate through the roadmap and maximize its potential, follow these principles:
- Manage each year of the roadmap differently.
- Review the Year 1 map each quarter to update your 90-day plans (See steps 2.10 and 3.6).
- Review the Year 2 map every six months to determine if any changes are necessary. As you cycle through this, your vantage point of Year 2 will be 6 months or 12 months away from the beginning of Year 2, and time moves quickly.
- Review the Year 3 map annually, and determine what needs to be added, changed, or deleted. Each time you review Year 3, it will be a “new” Year 3 that needs to be built.
- Analyze the impact on the proposed modifications from two perspectives: 1) What is the impact if a requested modification is made? 2) What is the impact if a requested modification is not made?
- Validate all modifications with leadership and stakeholders before updating the 3-year roadmap to ensure internal alignment.
Step 3.8: Measure and monitor risk
Understand and manage risk levels.
Using the configured Vendor Risk Assessment Tool (Step 2.2), confirm which risks you will be measuring and monitoring and identify the vendors that will be part of the initial risk management process. Generally, organizations start measuring and monitoring risk in two to five risk categories for two or three strategic vendors. Over time, additional risk categories and/or vendors can be added in waves. Resist the temptation to add risk categories or vendors into the mix too quickly. Expanding requires resources inside and outside of the VMI.
The VMI will rely heavily on other areas to provide input or the risk data, and the VMI needs to establish good working relationships with those areas. For example, if legal risk is something being measured and monitored, the VMI will need data from Legal on the number and nature of any lawsuits filed by or against the applicable vendors; the VMI will need data from Legal, Contract Management, or Procurement/Sourcing on the number and nature of any agreed upon deviations from your organization’s preferred contract terms that increase legal risk.
With respect to risk, the VMI’s main role is threefold: 1) take the data obtained from others (or in some instances the VMI may have the data) and turn it into useful information, 2) monitor the risk categories over time and periodically issue reports, and 3) work with other areas to manage the risk.
Step 3.9: Issue reports
Inform internal personnel and vendors about trends, issues, progress, and results.
Issuing the reports created in Step 2.12 is one of the main ways the VMI 1) will communicate with internal and external personnel and 2) track trends and information over time. Even with input from the potential reviewers of the reports, you’ll still want to seek their feedback and input periodically. It may take a few iterations until the reports are hitting their mark. You may find that a metric is no longer required, that a metric is missing completely or it is missing a component, or a formatting change would improve the report’s readability. Once a report has been “finalized,” try not to change it until you are engaged in Phase 4: Review activities. It can be unsettling for the reviewers when reports change constantly.
Whenever possible, find ways to automate the reports. While issuing reports is critical, the function should not consume more time than necessary. Automation can remove some of the manual and repetitive tasks.
Internal reports may need to be kept confidential. An automated dashboard or reporting tool can help lock down who has access to the information. At a minimum, the internal reports should contain a “Confidential” stamp, header, watermark, or other indicator that the materials are sensitive and should not be disclosed outside of your organization without approval.
Reports for vendors may not need to be sent as often as reports are generated or prepared for internal personnel. Establish a cadence by classification model category and stick to it. Letting each vendor choose the frequency will make it more difficult for you to manage. The vendors can choose to ignore the report if they so choose.
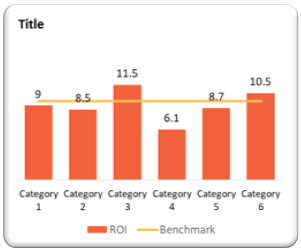
Step 3.10: Develop/improve vendor relationships
Drive better performance through better relationships.
One of the key components of a VMI is relationship management. Good relationships with your vendors provide many benefits for both parties, but they don’t happen by accident. Do not assume the relationship will be good or is good merely because your organization is buying products and services from a vendor.
In many respects, the VMI should mirror a vendor’s sales organization by establishing relationships at multiple levels within the vendor organizations – not just with the salesperson or account manager. Building and maintaining relationships is hard work, but the return on investment makes it worthwhile.
Business relationships are comprised of many components, not all of which have to be present to have a great relationship. However, there are some essential components. Whether you are trying to develop, improve, or maintain a relationship with a vendor, make sure you are conscious of the following:*
- Focus your energies on strategic vendors first and then tactical and operational vendors.
- Be transparent and honest in your communications.
- Continue building trust by being responsive and honoring commitments (timely).
- Create a collaborative environment and build upon common ground.
- Thank the vendor when appropriate.
- Resolve disputes early, avoid the “blame game,” and be objective when there are disagreements.
Step 3.11: Contribute to other processes
Continue assisting others and managing roles and responsibilities outside of the VMI.
The VMI has processes that it owns and processes that it contributes to. Based on the VMI scope (Step 1.2), the OIC chart (Step 1.4), and the process mapping activities (Step 1.5), ensure that the VMI is honoring its contribution commitments. This is often easier said than done though. A number of factors can make it difficult to achieve the balance required to handle VMI processes and contribute to other processes associated with the VMI’s mission and vision. Understanding the issues is half the battle. If you see signs of these common “vampires,” take action quickly to address the situation.
- The VMI’s first focus is often internal, and the tendency is to operate in a bubble. Classifying vendors, running BAMs, coordinating the risk process, and other inward-facing processes can consume all of the VMI’s energy. As a result, there is little time, effort, or let’s be honest, desire to participate in other processes outside of the VMI.
- It is easy for VMI personnel to get dragged into processes and situations that are outside of its scope. This often happens when personnel join the VMI from other internal areas or departments and have good relationships with their former teammates. The relationships make it hard to say “No” when out-of-scope assistance is being requested.
- The VMI may have “part-time” personnel who have responsibilities across internal departments, divisions, agencies, or teams. When the going gets tough and time is at a premium, people gravitate toward the easiest or most comfortable work. That work may not be VMI work.
Phase 4: Review
Keep Your VMI Up to Date and Running Smoothly
| Phase 1 | Phase 2 | Phase 3 | Phase 4 |
|---|---|---|---|
| 1.1 Mission Statement and Goals 1.2 Scope 1.3 Strengths and Obstacles 1.4 Roles and Responsibilities 1.5 Process Mapping 1.6 Charter 1.7 Vendor Inventory 1.8 Maturity Assessment 1.9 Structure | 2.1 Classification Model | 3.1 Classify Vendors | 4.1 Assess Compliance |
This phase will walk you through the following activities:
Identify what the VMI should stop doing, start doing, and continue doing as it improves and matures. The main outcomes from this phase are ways to advance the VMI and maintain internal alignment.
This phase involves the following participants:
- VMI team
- Applicable stakeholders and executives
- Others as needed
Jump Start Your Vendor Management Initiative
Phase 4: Review
Keep your VMI up to date and running smoothly.
As the old adage says, “The only thing constant in life is change.” This is particularly true for your VMI. It will continue to mature; people inside and outside of the VMI will change; resources will expand or contract from year to year; your vendor base will change. As a result, your VMI needs the equivalent of a physical every year. In place of bloodwork, x-rays, and the other paces your physician may put you through, you’ll assess compliance with your policies and procedures, incorporate leading practices, leverage lessons learned, maintain internal alignment, and update governances.
Be thorough in your actions during this Phase to get the most out of it. It requires more than the equivalent of gauging a person’s health by taking their temperature, measuring their blood pressure, and determining their body mass index. Keeping your VMI up to date and running smoothly takes hard work.
Some of the items presented in this Phase require an annual review; others may require quarterly review or timely review (i.e. when things are top of mind and current). For example, collecting lessons learned should happen on a timely basis rather than annually, and classifying your vendors should occur annually rather than every time a new vendor enters the fold.
Ultimately, the goal is to improve over time and stay aligned with other areas internally. This won’t happen by accident. Being proactive in the review of your VMI further reinforces the nature of the VMI itself – proactive vendor management, NOT reactive!
Step 4.1: Assess compliance
Determine what is functionally going well and not going well.
Whether you have a robust set of vendor management-related policies and procedures or they are the bare minimum, gathering data each quarter and conducting an assessment each year will provide valuable feedback. The scope of your assessment should focus on two concepts: 1) are the policies and procedures being followed and 2) are the policies and procedures accurate and relevant. This approach requires parallel thinking, but it will help you understand the complete picture and minimize the amount of time required.
Use the steps listed below (or modify them for your culture) to conduct your assessment:
- Determine the type of assessment – formal or informal.
- Determine the scale of the assessment – which policies and procedures will be reviewed and how many people will be interviewed.
- Determine the compliance levels, and seek feedback on the policies and procedures – what is going well and what can be improved?
- Review the compliance deviations.
- Conduct a root cause analysis for the deviations.
- Create a list of improvements and gain approval.
- Create a plan for minimizing noncompliance in the future.
- Improve/increase education and awareness.
- Clarify/modify policies and procedures.
- Add resources, tools, and people (as necessary and as allowed).
Step 4.2: Incorporate leading practices
Identify and evaluate what external VMIs are doing.
The VMI’s world is constantly shifting and evolving. Some changes will take place slowly, while others will occur quickly. Think about how quickly the cloud environment has changed over the past five years versus the 15 years before that; or think about issues that have popped up and instantly altered the landscape (we’re looking at you COVID-19 and ransomware). As a result, the VMI needs to keep pace, and one of the best ways to do that is to incorporate leading practices.
At a high level, a leading practice is a way of doing something that is better at producing a particular outcome or result or performing a task or activity than other ways of proceeding. The leading practice can be based on methodologies, tools, processes, procedures, and other items. Leading practices change periodically due to innovation, new ways of thinking, research, and other factors. Consequently, a leading practice is to identify and evaluate leading practices each year.
Step 4.2: Incorporate leading practices (cont.)
Update your VMI based on your research.
- A simple approach for incorporating leading practices into your regular review process is set out below:
- Research:
- What other VMIs in your industry are doing.
- What other VMIs outside your industry are doing.
- Vendor management in general.
- Based on your results, list specific leading practices others are doing that would improve your VMI (be specific – e.g. other VMIs are incorporating risk into their classification process).
- Evaluate your list to determine which of these potential changes fit or could be modified to fit your culture and environment.
- Recommend the proposed changes to leadership (with a short business case or explanation/justification, as needed) and gain approval.
Remember: Leading practices or best practices may not be what is best for you. In some instances, you will have to modify them to fit your culture and environment; in other instances, you will elect not to implement them at all (in any form).
Step 4.3: Leverage lessons learned
Tap into the collective wisdom and experience of your team members.
There are many ways to keep your VMI running smoothly, and creating a lessons learned library is a great complement to the other ways covered in this Phase 4: Review. By tapping into the collective wisdom of the team and creating a safe feedback loop, the VMI gains the following benefits:
- Documented institutional wisdom and knowledge normally found only in the team members’ brains.
- The ability for one team member to gain insights and avoid mistakes without having to duplicate the events leading to the insights or mistakes.
- Improved methodologies, tools, processes, procedures, skills, and relationships.
Many of the processes raised in this Phase can be performed annually, but a lessons learned library works best when the information is “deposited” in a timely manner. How you choose to set up your lessons learned process will depend on the tools you select and your culture. You may want to have regular “input” meetings to share the lessons as they are being deposited, or you may require team members to deposit lessons learned on a regular basis (within a week after they happen, monthly, or quarterly). Waiting too long can lead to vague or lost memories and specifics – timeliness of the deposits is a crucial element.
Step 4.3: Leverage lessons learned (cont.)
Create a library to share valuable information across the team.
Lessons learned are not confined to identifying mistakes or dissecting bad outcomes. You want to reinforce good outcomes as well. When an opportunity for a lessons-learned deposit arises, identify the following basic elements:
- A brief description of the situation and outcome.
- What went well (if anything) and why did it go well?
- What didn't go well (if anything) and why didn't it go well?
- What would/could you do differently next time?
- A synopsis of the lesson(s) learned.
Info-Tech Insights
The lessons learned library needs to be maintained. Irrelevant material needs to be culled periodically, and older or duplicate material may need to be archived.
The lessons learned process should be blameless. The goal is to share insightful information … not to reward or punish people based on outcomes or results.
Step 4.4: Maintain internal alignment
Review the plans of other internal areas to stay in sync.
Maintaining internal alignment is essential for the ongoing success of the VMI. Over time, it is easy to lose sight of the fact that the VMI does not operate in a vacuum; it is an integral component of a larger organization whose parts must work well together to function optimally. Focusing annually on the VMI’s alignment within the enterprise helps reduce any breakdowns that could derail the organization.
To ensure internal alignment:
- Review the key components of the applicable materials from Phase 1: Plan and Phase 2: Build with the appropriate members of the leadership team (e.g. executives, sponsors, and stakeholders). Not every item from those Phases and Steps needs to be reviewed, but err on the side of caution for the first set of alignment discussions, and be prepared to review each item. You can gauge the audience’s interest on each topic and move quickly when necessary or dive deeper when needed. Identify potential changes required to maintain alignment.
- Review the strategic plans (e.g. 1-, 3-, and 5- year plans) for various portions of the organization if you have access to them or gather insights if you don’t have access.
- If the VMI is under the IT umbrella, review the strategic plans for IT and its departments.
- Review the strategic plans for the areas the VMI works with (e.g. Procurement, Business Units).
- The organization itself.
- Create and vet a list of modifications to the VMI and obtain approval.
- Develop a plan for making the necessary changes.
Step 4.5: Update governances
Revise your protocols and return to the beginning of cyclical processes.
You’re at the final Step and ready to update governances. This is comprised of two sequential paths.
- First, use the information from Steps 4.1-4.4 to make any required modifications to the items in Phase 1: Plan, Phase 2: Build, and Phase 3: Run. For example, you may need to update your policies and procedures (Step 2.8) based on your findings in Step 4.1; or you may need to update the VMI’s scope (Step 1.2) to ensure internal alignment issues identified in Step 4.4. are accounted for.
- Second, return to Phase 3: Run to perform the activities below; they tend to be performed annually, but use your discretion and perform them on an as-needed basis:
- Reclassify vendors.
- Complete a new maturity assessment.
- Run reorientation sessions for vendors.
- Conduct a kickoff meeting to update internal personnel.
Other activities and tasks (e.g. scorecards and BAMs) may be impacted by the modifications made above, but the nature of their performance follows a shorter cadence. As a result, they are not specifically called out here in this Step 4.5 since they are performed on an ongoing basis. However, don’t overlook them as part of your update.
Summary of Accomplishment
Problem Solved
Vendor management is a broad, often overwhelming, comprehensive spectrum that encompasses many disciplines. By now, you should have a great idea of what vendor management can or will look like in your organization. Focus on the basics first: Why does the VMI exist and what does it hope to achieve? What is its scope? What are the strengths you can leverage, and what obstacles must you manage? How will the VMI work with others? From there, the spectrum of vendor management will begin to clarify and narrow.
Leverage the tools and templates from this blueprint and adapt them to your needs. They will help you concentrate your energies in the right areas and on the right vendors to maximize the return on your organization’s investment in the VMI of time, money, personnel, and other resources. You may have to lead by example internally and with your vendors at first, but they will eventually join you on your path if you stay true to your course.
At the heart of a good VMI is the relationship component. Don’t overlook its value in helping you achieve your vendor management goals. The VMI does not operate in a vacuum, and relationships (internal and external) will be critical.
Lastly, seek continual improvement from the VMI and from your vendors. Both parties should be held accountable, and both parties should work together to get better. Be proactive in your efforts, and you, the VMI, and the organization will be rewarded.
If you would like additional support, have our analysts guide you through other phases as part of an Info-Tech workshop
Contact your account representative for more information
workshops@infotech.com
1-888-670-8889
Related Info-Tech Research
Prepare for Negotiations More Effectively
Don't leave negotiation preparations and outcomes to chance. Learn how to prepare for negotiations more effectively and improve your results.
Understand Common IT Contract Provisions to Negotiate More Effectively
Info-Tech’s guidance and insights will help you navigate the complex process of contract review and identify the key details necessary to maximize the protections for your organization.
Capture and Market the ROI of Your VMO
Calculating the impact or value of a vendor management office (VMO) can be difficult without the right framework and tools. Let Info-Tech’s tools and templates help you account for the contributions made by your VMO.
Bibliography
“Best Practices for Writing Corporate Policies and Procedures.” PowerDMS, 29 Dec. 2020. Accessed 11 January 2022.
Duncan. “Top 10 Tips for Creating Compelling Reports.” Design Eclectic, 11 October 2019. Accessed 29 March 2022.
Eby, Kate. “Master Writing Policies, Procedures, Processes, and Work Instructions.” 1 June 2018, updated 19 July 2021. Accessed 11 January 2022.
“Enterprise Risk Management.” Protiviti, n.d. Accessed 16 Feb. 2017.
Geller & Company. “World-Class Procurement — Increasing Profitability and Quality.” Spend Matters, 2003. Accessed 4 March 2019.
Guth, Stephen. “Vendor Relationship Management Getting What You Paid for (And More).” Citizens, 26 Feb. 2015. Web.
Guth, Stephen. The Vendor Management Office: Unleashing the Power of Strategic Sourcing. Lulu.com, 2007. Print.
“ISG Index 4Q 2021.” Information Services Group, Inc., 2022. Web.
“Six Tips for Making a Quality Report Appealing and Easy To Skim.” AHRQ, Oct. 2019. Accessed 29 March 2022.
Tucker, Davis. “Marketing Reporting: Tips to Create Compelling Reports.” 60 Second Marketer, 28 March 2020. Accessed 29 March 2022.
“Why Do We Perform Better When Someone Has High Expectations of Us?” The Decision Lab, 9 Sept. 2020. Accessed 31 January 2022.