
- Selecting the Wrong Resources: You need ITSM technology and process experts, because this is not just a technology project, but also a process improvement opportunity.
- Over-Reliance on the Vendor to Optimize Your Tool: Yes, the vendor will typically install and set up the tool, but they will not fix your processes for you.
- Not Preparing for Data Migration: Data migration is complex. You need to determine what data to migrate, if any, and how that data will be mapped to the new environment.
- Insufficient IT and End-User Training: A link to the ITSM tool manual is not enough. Staff and users need training on how your processes will be executed in the new tool.
Our Advice
Critical Insight
- Start with the assumption you don’t need to migrate old data.
- ITSM tools are designed to support ITIL best practices.
- Implement your new tool in stages to manage scope.
Impact and Result
- Ability to plan and scope the project to avoid or reduce last-minute chaos.
- Opportunity to review and optimize processes as part of the ITSM tool implementation project.
- Improved project management, and therefore, better cost and effort estimates, by identifying required tasks upfront.
Build an ITSM Tool Implementation Plan Research & Tools
Besides the small introduction, subscribers and consulting clients within this management domain have access to:
1. Build an ITSM Tool Implementation Plan Deck – An implementation guide that walks you through the steps to ensure the tool delivers business value.
There may be hundreds of parameters to define and decisions to make, so identifying the full list of tasks early is critical for the success of the implementation project.
- Build an ITSM Tool Implementation Plan – Phases 1-3
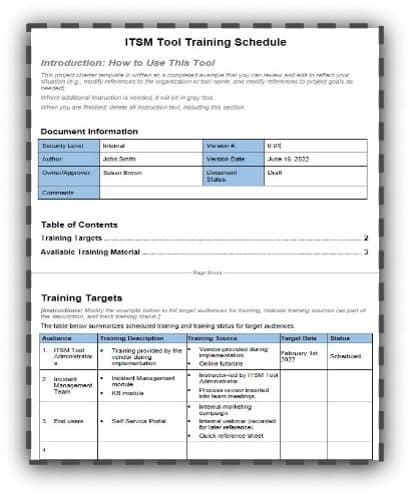
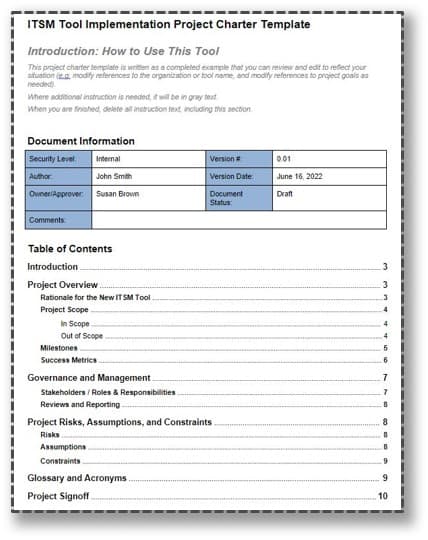
2. ITSM Tool Project Charter Template – A charter to document your project scope, milestones, stakeholders, risks etc. to kick-off and manage your project.
This project charter document summarizes the Project Overview (Description, background, drivers, and objectives), Governance and Management (Project stakeholders/roles, budget, and dependencies), and Risk, Assumptions, and Constraints (Known and potential risks and mitigation strategy).
- ITSM Tool Implementation Project Charter Template
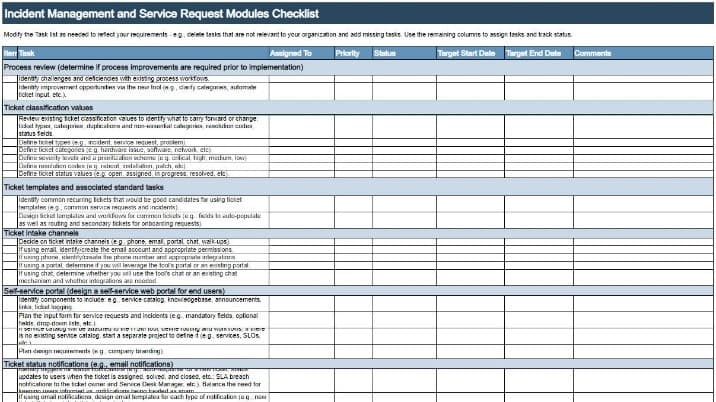
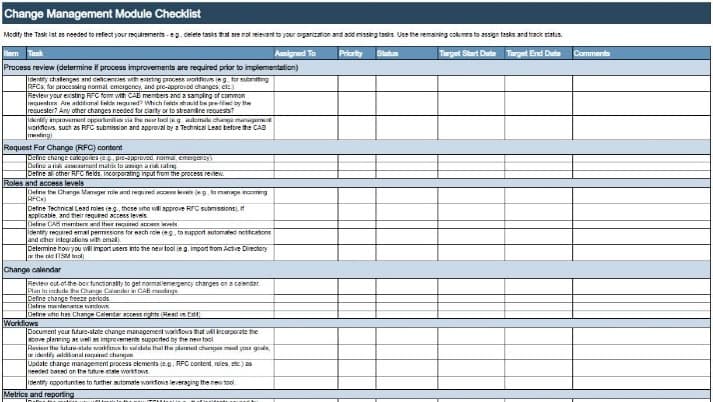
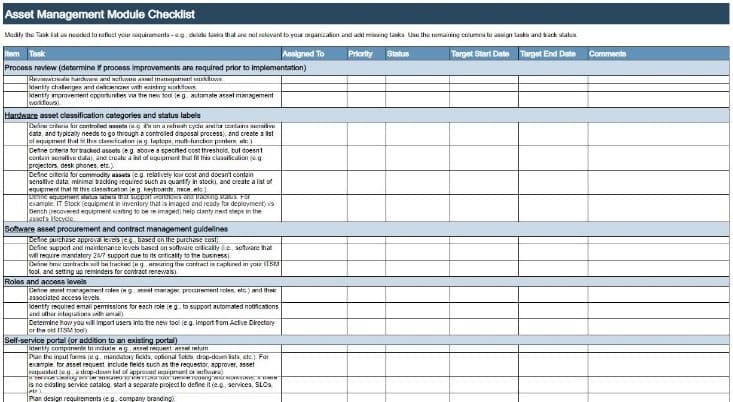
3. ITSM Tool Implementation Checklist – A tool to help identify the most common decisions you will need to make and prepare for your implementation project.
The checklists in this tool identify the most common decisions and preparation you will need to make to support the implementation for the ITSM modules that we recommend are set up first: incident management and service requests; change management; and asset management. Use these checklists as a model to follow for any additional ITSM modules you plan to implement, and refer to Info-Tech's blueprints for each service management topic for additional guidance.
- ITSM Tool Implementation Checklist
4. ITSM Tool Deployment Plan Template – A tool to help prioritize and prepare for tool rollout plan.
This deployment plan documents the strategy and decisions made for making the transition to the new ITSM tool, and the details to execute the cutover to a live environment, including how, when, where.
- ITSM Tool Deployment Plan Template
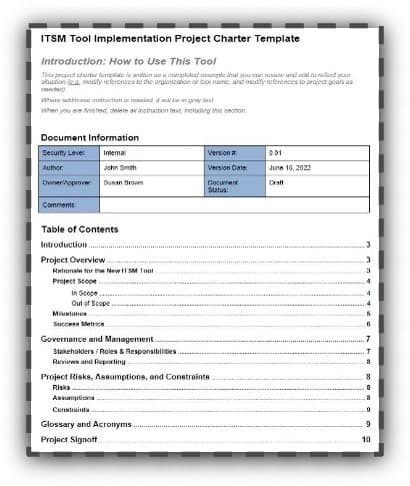
5. ITSM Tool Training Schedule – Use the tool to create your new tool training roadmap.
This template is a guide for creating a training and communication plan as part of the implementation project for your ITSM tool. Use the template to document and plan the communications and training needs prior to deployment of the new tool.
- ITSM Tool Training Schedule
Infographic
Further reading
Build an ITSM Tool Implementation Plan
Plan ahead with a step-by-step approach to ensure the tool delivers business value.
EXECUTIVE BRIEF
Analyst perspective
Take control of the wheel or you might end up in a ditch.

An ITSM tool implementation is a complex project with direct impact on IT’s ability to support the business. With that level of risk, you need to take control early on.
Yes, your vendor will support or execute the technical implementation, but they depend on you to tell them how to configure ITSM parameters and workflows that affect user interface, the ability to manage incidents, and governance over assets and IT changes.
If you leave the configuration completely to the vendor, at best you might get the same setup as in your old tool (and not realize the benefits that leadership is expecting). At worst you end up with default values that don’t fit your process needs, i.e., confusion and not realizing expected benefits.
A successful implementation requires early planning from a wide range of resources including ITSM tool experts (supported by the vendor), process experts, and a project manager to methodically step through the hundreds of parameters you will need to define before implementation.
Frank Trovato
Research Director, Infrastructure and Operations
Info-Tech Research Group
Executive Summary
Your Challenge |
Common Obstacles |
Info-Tech’s Approach |
Leadership has invested significantly in a new ITSM tool and expects to see the benefits they were promised by the vendor and the procurement team. The ITSM project team needs to balance leadership expectations with the direct impact this project will have on IT staff and end users. |
Implementing an ITSM tool is a large project that is often highly complex in part because it requires input from a wide range of stakeholders: IT staff, end users, senior management, and vendors. A new ITSM tool will change how IT staff work and how users are serviced, and change is always difficult. Finally, implementing the new tool requires a migration from an existing tool without a pause in IT service availability. Incidents don’t take a week off while you execute the final product rollout. |
There may be hundreds of parameters to define and decisions to make, so identifying the full list of tasks early is critical to:
|
Info-Tech Insight
As with any large project, a key step is tackling it one bite at a time – but also understanding the size of the whole meal. This is where organizations often fail with ITSM implementations: not understanding upfront the volume of work required for a successful implementation.
Your Challenge
Organizations implementing a new ITSM tool often face these pitfalls:
- Selecting the Wrong Resources: You need ITSM technology and process experts, because this is not just a technology project but also a process improvement opportunity. You will need to configure ITSM parameters and workflows in the new tool – which directly affects processes. Take advantage of that opportunity to fix pain points. For example, if your existing ticket categories are not effective, implement a better categorization scheme rather than just configure the same old, ineffective scheme.
- Over-Reliance on the Vendor to Optimize Your Tool: Yes, the vendor will typically install and set up the tool but they will not fix your processes for you. On installation day, if you are not prepared with the categories, ticket templates, and so on that you wish to configure, your vendor will just go with the default or migrate your old parameters from your old ITSM tool.
- Not Preparing for Data Migration: Data migration is complex. You need to determine what data to migrate, if any, and how that data will be mapped to the new environment. That takes planning and must be defined well before the vendor is ready to implement your tool.
- Insufficient IT and End-User Training: A link to the ITSM tool manual is not enough. Staff and users need training on how your processes will be executed in the new tool.
A survey of implementation challenges for ServiceNow’s customers
26% Resistance to change
43% Lacked a clear roadmap
38% Planning for resources
Source: Acorio, 2019
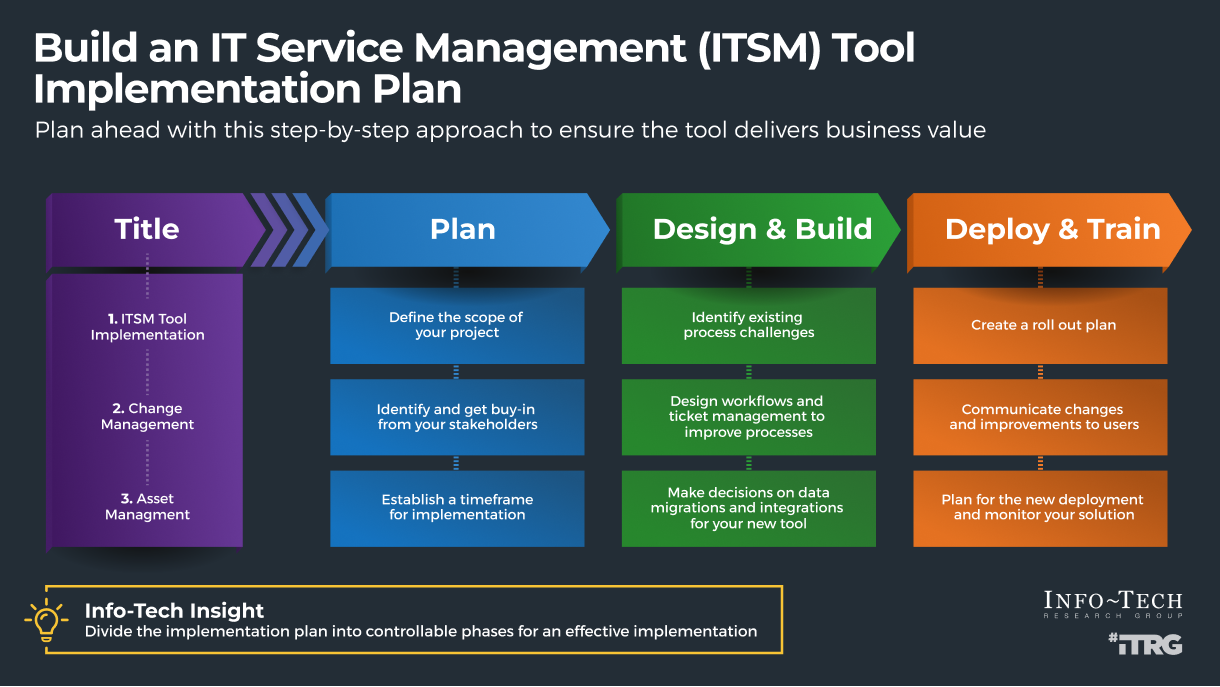
Info-Tech’s approach
Divide the implementation project into controllable phases for an effective implementation.
Plan |
Define the scope of your project, identify and get buy-in from your stakeholders, and establish a timeframe for the implementation. |
|---|---|
Design & Build |
Identify existing process challenges and design workflows and ticket management to improve processes. Make decisions on data migrations and integrations for your new tool. |
Deploy & Train |
Create a rollout plan and communicate changes and improvements to users. Plan for the new tool deployment and monitor your solution. |
STOP: Use this blueprint after you have selected an ITSM solution
Leverage our SoftwareReviews service and related blueprints to assist with ITSM tool selection, and then use this blueprint to plan the implementation.
1. Evaluate solutions |
2. Select and purchase |
3. Implement (use this blueprint) |
|---|---|---|
Use our SoftwareReviews resources to evaluate solutions and vendors based on criteria such as features and customer service. Below are links to our ITSM software reviews: |
Use the following resources to help you make the case for funding and execute the purchase process: |
Your ITSM vendor or systems integrator will lead the technical implementation (e.g. software install and integration). As a result, your implementation plan needs to focus on preparing the information needed for implementation (e.g. ticket categories, workflow requirements) and organizational change management. This blueprint provides a methodology, checklist, and supporting templates to prepare for the implementation. |
Info-Tech’s methodology to build an ITSM Tool Implementation Plan
1. Identify Scope, Stakeholders, and Preliminary Timeline |
2. Prepare to Implement Incident Management and Service Request Modules |
3. Create a Deployment Plan (Communication, Training, Rollout) |
|
|---|---|---|---|
Phase Steps |
1.1 Document define scope 1.2 Define roles and responsibilities 1.3 Identify preliminary timeline |
2.1 Review your existing solution and challenges 2.2 Plan ticket management and workflow implementation 2.3 Plan data migration, knowledgebase setup, and integrations 2.4 Plan the module rollout |
3.1 Create a communication plan (for IT, users, and business leaders) 3.2 Create a training plan 3.3 Plan how you will deploy, monitor, and maintain the solution |
Phase Outcomes |
|
|
|
Insight summary
Start with the assumption you don’t need to migrate old data |
ITSM tools are designed to support ITIL best practices |
Implement your new tool in stages to manage scope |
|---|---|---|
We all love data. We love being able to run reports showing trends, measuring changes over time, and highlighting pain points – but is your data from five years ago relevant to those assessments? Can you get by with just migrating open tickets and perhaps just the last year of critical tickets? Be ruthless in deciding what really needs to be in your active system to support incident matching, troubleshooting, or ongoing reporting. If you can’t make a strong case, don’t waste your time on old data. Remember, you can still save an exported copy or report of your old data if the need arises to search historical records. |
For organizations lacking process maturity, the tool’s default settings will often provide a good starting point. For example, a good ITSM tool will typically already be configured to follow best practices such as:
Within those defaults, you will still need to decide your specific parameters – e.g. what your categories and resolution codes should be – so don’t blindly follow default settings but use them as a starting point. |
Start with the incident management and service requests modules. Those are typically the core of IT service management operations, so that should help realize benefits from the new tool sooner. In addition, incident management and service requests processes will support other ITSM processes such as asset management and problem management. Once those modules are implemented successfully (from a technology and process perspective), then start to implement your next core module (e.g. asset or change management), and continue to build from there. |
Blueprint deliverables
This blueprint includes tools and templates to help you accomplish your goals:
ITSM Tool Implementation Checklist Identify the most common decisions you will need to make and prepare for your implementation project. |
ITSM Tool Project Charter Template Review and edit the template to suit your project requirements |
 |
 |
ITSM Tool Deployment Plan Template Prioritize and prepare tool rollout plan |
 |
ITSM Tool Training Schedule Use the checklist to create your new tool training roadmap |
 |
Blueprint benefits
Benefits for IT |
Benefits for the business |
|---|---|
|
|
Measured value from using this blueprint
Use this guide as an example to calculate your total cost savings from the ITSM tool implementation project.
Phase 1 |
Identify Scope, Stakeholders, and Preliminary Timeline Time, value, and resources saved by using Info-Tech’s methodology to define scope and plan your project |
E.g. 2 FTEs * 6 days * $80,000/year = $4,000/- |
Phase 2 |
Prepare to Implement Incident Management and Service Request Modules Time, value, and resources saved by using Info-Tech’s methodology to build your solution strategy and determine configurations |
E.g. 2 FTEs * 8 days * $80,000/year = $5,400/- |
Phase 3 |
Create a Deployment Plan (Communication, Training, Rollout) Time, value, and resources saved by using Info-Tech’s methodology to establish an effective communications roadmap and deploy tool |
E.g. 2 FTEs * 6 days * $80,000/year = $4,000/- |
Total Savings |
Total Savings |
Phase 1 + Phase 2 + Phase 3 = $13,400 |
Info-Tech offers various levels of support to best suit your needs
| DIY Toolkit | Guided Implementation | Workshop | Consulting |
|---|---|---|---|
| "Our team has already made this critical project a priority, and we have the time and capability, but some guidance along the way would be helpful." | “Our team knows that we need to fix a process, but we need assistance to determine where to focus. Some check-ins along the way would help keep us on track.” | “We need to hit the ground running and get this project kicked off immediately. Our team has the ability to take this over once we get a framework and strategy in place.” | “Our team does not have the time or the knowledge to take this project on. We need assistance through the entirety of this project.” |
Diagnostics and consistent frameworks used throughout all four options
Guided Implementation
| Phase 1 | Phase 2 | Phase 3 |
|---|---|---|
Call #1: Define scope, roles, responsibilities and timeline. |
Call #2: Review your existing solution and challenges. Call #3: Plan ticket management and workflow implementation. Call #4: Plan data migration, knowledgebase setup, and integrations. Call #5: Plan the module rollout. |
Call #6: Create a communication plan. Call #7: Create a training plan. Call #8: Plan how you will deploy, monitor, and maintain the solution. |
A Guided Implementation (GI) is a series of calls with an Info-Tech analyst to help implement our best practices in your organization. A typical GI is between 6 to 8 calls over the course of 3 to 6 months.
Phase 1
Identify Stakeholders, Scope, and Preliminary Timeline
| Phase 1 | Phase 2 | Phase 3 |
|---|---|---|
Identify Stakeholders, Scope, and Preliminary Timeline |
Prepare to Implement Incident Management and Service Request Modules |
Create a Deployment Plan (Communication, Training, Rollout) |
This phase will walk you through the following steps:
- Define scope
- Define roles and responsibilities
- Identify preliminary timeline
Step 1.1
Define scope
Activities
1.1.1 |
Use the Project Charter Template to capture project parameters |
1.1.2 |
Leverage the Implementation Checklist to guide your preparation |
1.1.3 |
Review goals that drove the ITSM tool purchase |
1.1.4 |
Interview ITSM staff to identify current tool challenges and support organizational change management |
1.1.5 |
Identify the modules and features you will plan to implement |
1.1.6 |
Determine if data migration is required |
This step will walk you through the following activities:
- Define the scope of the implementation project
- Establish the future processes and functionalities the tool will support
This step involves the following participants:
- CIO
- IT Director/Manager
- Service Manager
- Project Manager and the project team
Outcomes of this step
- Specifying the implementation project
- Identifying the business units that are needed to support the project
- Defining the ongoing and future service management processes the tool will support
1.1.1 Use the Project Charter Template to capture scope, stakeholders, and timeline as outlined in Phase 1
Follow the instructions in Phase 1 (step 1.1, 1.2, and 1.3) to gather information needed to create a project charter to define project parameters.
Specific subsections are listed below and described in more detail in the remainder of this phase.
- Project Overview: Includes deliverables, scope, milestones, and success metrics.
- Governance and Management: Includes roles, responsibilities, and resource requirements.
- Project Risks, Assumptions, and Constraints: Includes risks and mitigation strategies as well as any assumptions and constraints.
- Project Sign-Off: Includes IT and executive sign-off (if required).
Download the ITSM Tool Implementation Project Charter Template
1.1.2 Leverage the Implementation Checklist to guide your preparation
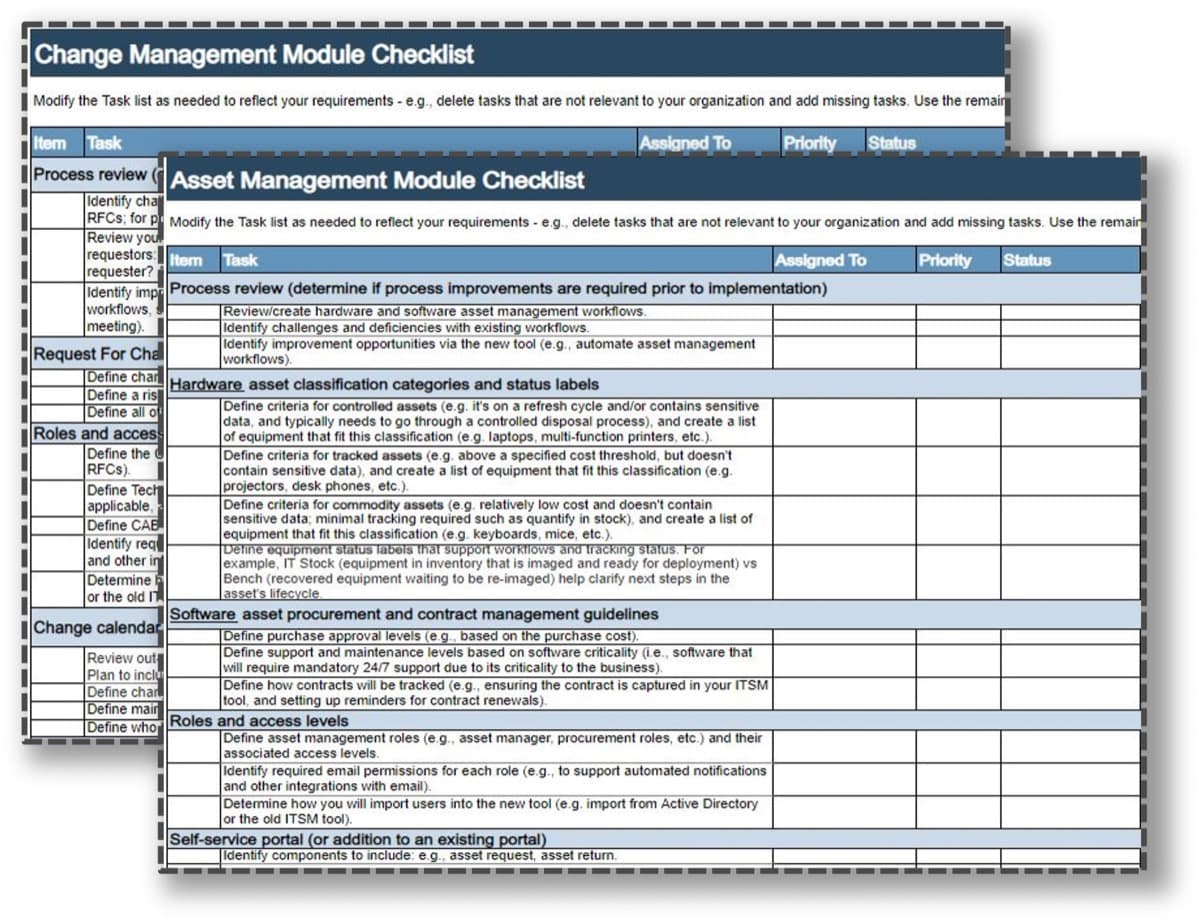
The checklist tabs align to each phase of this blueprint.
- Phase 1 (Tab 1) – Identify Stakeholders, Scope, and Preliminary Timeline
- Phase 2 (Tab 2) – Prepare to Implement Incident Management and Service Request Modules
- Phase 3 (Tabs 3+4) – Prepare to Implement Additional ITSM Modules (e.g. Change Management)
- Phase 4 (deployment section in each tab) – Create a Deployment Plan (Communication, Training, Rollout)

Download the ITSM Tool Implementation Checklist
1.1.3 Review goals that drove the ITSM tool purchase
Identify the triggers for the selection and implementation of your new ITSM tool.
Whether this is your first ITSM tool or a replacement for your old tool, the project was likely triggered by pain points that must be addressed by the new tool to improve your service desk. Having a clear understanding of these pain points throughout the implementation of your new tool will help to prevent them from reoccurring.
Common ITSM pain points include:
- Poor communication with end users on ticket status.
- Lack of SLA automation to escalate issues to the appropriate channels.
- Poor self-service options for end users to perform simple requests on their own.
- Undeveloped knowledgebase for users to find answers to common issues.
- Lack of reporting or mistrust in reporting data.
- Lack of automation, including ticket templates.
- Overcomplicated ticket categories resulting in categories being misused.
- Overconfiguration prevents future upgrades.
- Lack of integration with other tools.
If you haven't already selected an ITSM tool, leverage the IT Service Management Selection Guide to select the right tool.
Download the IT Service Management Selection Guide
1.1.4 Plan to interview staff to support organizational change management
Identify challenges with the existing tool and processes as well as potential objections to the new tool.
Incorporate this feedback in the implementation to drive buy-in and a successful rollout.
Implementing a new ITSM tool will force changes in how IT staff do their work:
- At a minimum, it means learning a new interface.
- It could also mean leveraging features that improve IT operations but could change the process or tasks for the staff.
- Their input on the current tool and process challenges can be critical for the project.
- Solving at least some of their challenges can help bring them onboard to use this tool properly and follow associated process changes.
Info-Tech Insight
Keep management in the loop through every stage of the implementation process. They are the ones who are paying for the software, so they need to be informed throughout implementation and feel that their needs and feedback are being heard to prevent pushback further into the implementation.
1.1.5 Identify the modules and features you will plan to implement
Consider these factors when deciding what modules and features you want to implement:
- Specific ITSM modules based on the recommended order and any unique business requirements
- Key features that drove the tool purchase and address key issues
- High-level process changes needed to address challenges and realize expected benefits from the new ITSM tool (e.g. if a key goal was automated ticket routing based on categories, then the project needs to include developing a good categorization scheme)
Recommended order for implementation:
- Incident Management and Service Request
- Change Management
- Asset Management
This is the core of service management and typically has the highest impact on the organization. Include knowledgebase development as part of this implementation.
A foundational component of service management, it allows organizations to minimize disruptions to IT services when making changes to services and critical systems.
A foundational component of service management, it allows organizations to track their assets’ locations, how they are used, and when changes are made to them.
1.1.6 Determine if data migration is required
If you are switching from a previous ITSM tool, carefully weigh the pros and cons as well as the necessity of migrating historical transactional data before deciding to import it into the new tool.
Importing your old transactional data will allow you to track metrics over time, which can be valuable for data analysis and reporting purposes.
However, ask yourself what the true value of your data is before you import it.
You will not get value out of migrating the old data if:
- You have incomplete or inaccurate data (a high percentage of incidents did not have tickets created in the old system).
- The categorization of your old tickets was not useful or was used inconsistently.
- You plan on changing the ticket categorization in the new system.
“Don’t debate whether you can import your old data until you’ve made sure that you should.”
– Barry Cousins, Practice Lead at Info-Tech Research Group
Info-Tech Insight
If you decide to migrate your data, keep in mind that it can be a complex process and proper time should be budgeted for planning, structuring the data, and importing and testing it.
Step 1.2
Define roles and responsibilities
Activities
1.2.1 |
Key internal roles and responsibilities |
1.2.2 |
Key external roles and responsibilities |
This step involves the following participants:
- CIO
- IT Director/Manager
- Service Manager
- Project Manager and the project team
Outcomes of this step
- Decision on whether to hire professional services for the implementation
- Clearly defined roles and responsibilities for the project
1.2.1 Identify key internal roles and responsibilities
Review the tasks outlined in the Implementation Checklist to help you identify appropriate roles and specific staff that will be needed to execute this project.
Project Role |
Description |
RACI | Assigned To |
|---|---|---|---|
Executive Sponsor |
Liaison with the executive team (the CIO would be a good candidate for this role). Accountable for project completion. Approves resource allocation and funding. |
A, C | Name(s) |
Project Manager |
Manages the project schedule, tasks, and budget. May act as a liaison between executives and the project-level team. |
R | Name(s) |
Product Owner |
Liaison with the vendor. SME for the new tool. Provides input to tool configuration decisions. Manages the tool post-implementation. |
R | Name(s) |
Process Owners |
Define current processes. Provide input to identifying current-state process challenges to address and potential changes as part of the new tool implementation. |
R | Name(s) |
Service Desk Manager |
Provides input to tool configuration decisions. Manages and trains service desk agents to use new tool and processes. |
R | Name(s) |
ITSM Tool Core Users (e.g. Service Desk Technicians) |
Provide input to identifying current-state process challenges to address. Provide input to tool configuration decisions. |
C | Name(s) |
RACI = Responsible, Accountable, Consulted, and Informed
Assign individuals to roles through each step of the implementation project in the governance and management chart in the Project Charter Template.
Download the Project Charter Template
1.2.2 Key external roles and responsibilities
Determine whether you will engage professional services for the implementation.
There are three main ways to implement your ITSM tool |
||
|---|---|---|
Implemented in-house by own staff |
Implemented using a combination of your own staff and your ITSM tool vendor |
Implemented by professional services and your ITSM tool vendor |
DIY Implementation Adopting a DIY implementation approach can save money but could draw out your implementation timeline and increase the likelihood of errors. Carefully consider your integration environment to determine your resourcing capabilities and maturity. |
Vendor Implementation In most cases, your vendor will support or execute the technical implementation based on your requirements. Use this blueprint to help you define those requirements. |
Professional Services Opting for professional services may result in a shorter implementation period and fewer errors but may also deny your IT staff the opportunity to develop the skills necessary to maintain and configure the solution in the future. Clarify the role of the professional services vendor before acquiring their services to make sure your expectations are aligned. For example, are you hiring the vendor for tool installation, tool configuration, or tool customization or for training your end users? |
Step 1.3
Identify preliminary timeline
Activities
1.3.1 |
Identify preliminary internal target dates |
1.3.2 |
Identify target dates for vendor involvement |
This step involves the following participants:
- CIO
- IT Director/Manager
- Service Manager
- Project Manager and the project team
Outcomes of this step
- Specifying the target dates for the implementation project
1.3.1 Identify preliminary internal target dates
Identify high-level start and end dates based on the following:
- Existing process maturity
- Process changes required (to address process issues or to realize targeted benefits from the new tool)
- Data migration requirements (if any)
- Information to prepare for the implementation (review the Checklist Tool)
- Vendor availability to support implementation
- Executive mandates that have established specific milestone dates
Create an initial project schedule:
- Review the remaining phases of this blueprint for more details on the implementation planning steps.
- Review and update the Checklist Tool to suit your implementation goals and requirements.
- Assign task owners and target dates in the Checklist Tool.
Note: This is a preliminary schedule. Monitor progress as well as requirement changes, and adjust the scope or schedule as needed.
Update the columns in the Checklist Tool to plan and keep track of your implementation project.
1.3.2 Identify target dates for vendor involvement
Plan when you'll be ready for the vendor and identify the key points for when the vendor will come in.
Are dates already scheduled for tool installation/configuration/customization?
If yes:
- Clarify vendor expectations for those target dates (i.e. what do you have to have prepared in advance?).
- Determine options to adjust dates if needed.
If no:
- Defer scheduling until you have reviewed and updated the Implementation Checklist. The checklist will help you determine your readiness for vendor involvement.
Consider if the vendor will implement the ITSM tool in one go or if they will help setup the tool in stages. Keep in mind that ITSM implementation projects typically take anywhere from 9 weeks to 16 months and plan accordingly depending on the maturity of your processes and the modules and features you plan to implement.
Use your internal target dates to estimate when you'll be ready for the vendor to set up the tool and implement the setting that you've defined.
Phase 2
Prepare to Implement Incident Management and Service Request Modules
| Phase 1 | Phase 2 | Phase 3 |
|---|---|---|
Identify Stakeholders, Scope, and Preliminary Timeline | Prepare to Implement Incident Management and Service Request Modules | Create a Deployment Plan (Communication, Training, Rollout) |
This phase will walk you through the following steps:
- Review your existing solution and challenges
- Plan ticket management and workflow implementation
- Plan data migration, knowledgebase setup, and integrations
- Plan the module rollout
Additional Info-Tech Research
The Implementation Checklist Tool summarizes what you need to prepare for the implementation. If you need more assistance with developing the underlying ITSM processes, use the tools, templates, and guidance in these blueprints.
Build core elements of service desk operations, including incident management and service request workflows, ticket categorization schemes, and ticket prioritization rules.
Optimize the Service Desk With a Shift-Left Strategy
Implement tools such as an improved knowledgebase and self-service portal to enable lower tier support staff and end users to resolve incidents or fulfill service requests.
Incident and Problem Management
Develop a critical incident management workflow and create standard operating procedures for problem management.
Step 2.1
Review your existing solution and challenges
Activities
2.1.1 |
Configure, don’t customize, your solution to minimize risk |
2.1.2 |
Review your existing process and solution challenges for opportunities for improvement |
This step involves the following participants:
- Service Manager and Service Desk Team
- Project Manager and Core Project Team
- Subject Matter Experts and Tool Administrator, if applicable
2.1.1 Configure your tool, don’t customize it
Your tool may require at least some basic configurations to align with your processes, but in most cases customization of the tool is not recommended.
Configuration |
Customization |
|---|---|
Documentation of configurations is key. Failure to document configurations and the reasons for specific configurations will lead to:
|
Carefully consider whether a customization is necessary.
|
Case Study
Consider the consequences of over-customizing your solution.
INDUSTRY: Education
SOURCE: IT Director
Situation |
Challenge |
Resolution |
|---|---|---|
A few years ago, the service management office at the university decided to switch ITSM tools, from Computer Associates to ServiceNow. They wanted the new tool to behave similarly to what they had previously, so they made a lot of customized code changes to ServiceNow during implementation. |
As a result of the customizations, much of the functionality of the tool was restricted, and the upgrades were not compatible with the solution. The external consultants who performed the customizations and backend work did not document their changes, leaving the service management team without an understanding of why they did what they did. |
The service management team is working with ServiceNow to slowly unravel the custom code to try to get the solution back to having out-of-the-box functionality, with the ability to be upgraded. It has been challenging to do this work without disrupting the functionality of the tool. Over-customization led to the organization paying for features they couldn’t use and spending more time and resources down the road to try to reverse the changes. |
2.1.2 Review your existing process to identify opportunities for improvement
Documenting your existing processes is an effective method for also reviewing those processes and identifying inefficiencies. Take advantage of this project to fix your process issues.
- Document your existing workflows for incident management and service requests.
- Review your workflows to identify opportunities to optimize through process refinement (e.g. clarifying escalation guidelines) or by leveraging features in your new ITSM tool (e.g. improved workflow automation).
- Similarly, review the challenges identified through stakeholder interviews: is there an opportunity address those challenges through process changes or leveraging your new ITSM tool?
- Address those challenge and issues as you execute the tasks outlined in the Implementation Checklist Tool. For example, if inconsistent ticket routing was identified as a challenge due to a vague categorization scheme, that’s a driver to review and update your scheme rather than just carry forward your existing scheme.
Regardless of your existing ITSM maturity, this is an opportunity to review and optimize existing processes. Even the most-mature organizations can typically find an area to improve.
Case Study
Reviewing and defining processes before the implementation can be a project in itself.
INDUSTRY: Defense
SOURCE: Anonymous
Situation | Challenge | Resolution |
|---|---|---|
The organization was switching to a new ITSM tool. To prepare for the implementation, they gathered stakeholders, held steering committee meetings, and broke down key processes, teams, and owners before even meeting with the larger group. They used a software tool called InDesign to visibly map service requests and incidents and determine who owned each process and where the handoffs were. The service catalog also needed to be built out as they were performing certain services that didn’t relate to anything in the catalog. | The goal for the implementation was to have it completed within a year, but it ended up going over, taking 15 to 16 months to complete. Most of the time was spent identifying processes upfront before configuring the tool. There were difficulties defining processes as well as agreeing on who owned a process or service. There were also difficulties agreeing upon who the valid stakeholders were for processes, as groups were siloed. The major obstacles to implementation were therefore people and process, not the product. | New processes were introduced, and boundaries were placed around processes that were being done in the past that weren’t necessary. Once the groups were able to agree upon process owners, the tool configuration and implementation itself did not pose any major difficulties. After the implementation, the tool was continually improved and sharpened to adapt to processes. |
Step 2.2
Plan ticket management and workflow implementation
Activities
2.2.1 |
Define ticket classification values |
2.2.2 |
Define ticket templates for common incident types and service requests |
2.2.3 |
Plan your ticket intake channels |
2.2.4 |
Design a self-service portal |
2.2.5 |
Plan your knowledgebase implementation in the new tool |
2.2.6 |
Design your ticket status notification processes and templates |
2.2.7 |
Identify required user accounts, access levels, and skills/ service groups |
2.2.8 |
Review and update your workflows and escalation rules |
2.2.9 |
Identify desired reporting and relevant metrics to track |
This step involves the following participants:
- Service Manager and Service Desk Team
- Project Manager and Core Project Team
- Subject Matter Experts and Tool Administrator, if applicable
Outcomes of this step
Tool is designed and configured to support service desk processes and organization needs.
Checklist overview
The ITSM Tool Implementation Checklist will help you estimate resources required to support demand, based on your ticket volume.
TAB 2 |
TAB 3 |
TAB 4 |
Incident and Service Modules Checklist |
Change Management Modules |
Asset Management Modules |
 |
 |
 |
How to follow this section:
The following slides contain a table that explains why each task in the module matters and what needs to be considered. Complete the checklist modules referring to this section.
2.2.1 Define ticket classification values
Ticket classification improves reporting, workflow automation, and problem identification.
Review your existing ticket classification values to identify what to carry forward, drop, or change. For example, if your categorization scheme has become too complex, this is your opportunity to fix it; don’t perpetuate ineffective classification in the new tool.
Task |
Why this matters |
Ticket Types (e.g. incident, service request, change) |
In particular, separating incidents from service requests supports appropriate ticket prioritization and resourcing; for example, an incident typically should be prioritized, and service requests can be scheduled. |
Categories (e.g. network, servers) |
An effective categorization scheme can help identify ticket assignment and escalation (e.g. network tickets would be escalated to the network team), and potentially automate ticket routing. |
Resolution Codes |
Indicates how the ticket was resolved (e.g. configuration change). Supports another layer of trends reporting and data to support problem identification. |
Status Values |
Shows what status the ticket is currently in (e.g. if the ticket has been opened or assigned to an agent, if it is in progress or has been resolved). |
2.2.2 Define ticket templates for common incident types and service requests
Ticket templates are the backbone of automation. A common complaint is that tickets take too much time. However, a little planning can reduce the time it takes to create a ticket to less than a minute.
Task | Why this matters |
Identify common recurring tickets that would be good candidates for using ticket templates (e.g. common service requests and incidents). | Some common recurring tickets such as password reset, new laptop, and login requests would be great candidates to create ticket templates for. Building a deck of standard rules to follow for common tickets saves time and reduces the number of tickets generated. |
Design ticket templates and workflows for common tickets (e.g. fields to auto-populate as well as routing and secondary tickets for onboarding requests). | Differentiating between recurring ticket types and building pre-defined templates not just saves time but can also have major impact on how service is delivered as this will also help separate tickets. Creating these templates beforehand will also let you communicate effectively with the users at a time when all hands need to be on deck. |
2.2.3 Plan your ticket intake channels
Consider possible ticket intake channels and evaluate their relevance to your organization.
Task | Why this matters |
Decide on ticket intake channels (e.g. phone, email, portal, walk-ups). | Each standard intake channel serves its own purposes and can be extremely valuable under different circumstances. For example, walk-ins may be inefficient but necessary for critical incidents. |
If using email, identify/create the email account and appropriate permissions. | Email works well if it automatically creates a ticket in your ticketing system, but users often don’t provide enough information in unstructured emails. Use required fields and ticket templates to ensure the ticket is properly categorized. |
If using phone, identify/create the phone number and appropriate integrations. | Maintain the phone for users from other locations and for critical incidents but encourage users who call in to submit a ticket through the portal. |
If using a portal, determine if you will leverage the tool's portal or an existing portal. | The web portal is the most efficient intake method, but ensure it is user friendly before promoting it. |
If using chat, determine whether you will use the tool's chat or an existing chat mechanism and whether integrations are needed. | Another way to improve support experience for your customers is through live chat. This gives your customers an easy way to reach you at the exact moment they have questions or issues they can't fix. |
2.2.4 Design a self-service portal
Map your processes to the tool by defining your ticket input, categories, escalations, and workflows.
Don’t forget about the client-facing side of the solution. It is important to build a self-serve portal that has an easy-to-use interface where the user can easily find the category for the help they’re looking for. It is also necessary to educate the users on where to find the portal or how to access it.
Task | Why this matters |
Identify components to include (e.g. service request, incident, knowledgebase). | Identify the categories you want the users to be able to access in the portal. Finding the right balance of components to include is very important to make it easy for your users to find all the relevant information they are looking for. This could mean fewer tickets. |
Plan the input form for service requests and incidents (e.g. mandatory fields, optional fields, drop-down lists). | Having relevant and specific fields helps to narrow down your user’s issues and provides more information on how to allocate these tasks among the service desk resources and reduce time to further investigate the issues. |
If service catalog will be attached to the ITSM tool, define routing and workflows; if there is no existing service catalog, start a separate project to define it (e.g. services, SLAs). | A centrally defined guide enables a uniform quality in service and clarifies the responsible tier for the ticket. Identify services that will be included in the catalog, and if the information is attached to the ITSM tool, plan for how will the routing and workflows be structured. |
Plan design requirements (e.g. company branding). | Ensure that the portal is aligned with the company’s theme and access format. Work with the vendor to customize the branding on the tool, design requirements, images. |
2.2.5 Plan your knowledgebase (KB) implementation in the new tool
Evaluate how onerous KB migration will be for you. Is this an opportunity to improve how the KB is organized?
Task |
Why this matters |
|---|---|
Define knowledgebase categories and structure. |
Establishing knowledgebase structures or having them separated into categories makes it easy for your clients to find them (e.g. do they align with ticket categories?). |
Identify existing knowledgebase articles to add to the new tool. |
Review existing knowledgebase articles at a high level (e.g. Do you carry forward all existing articles? Take an opportunity to retire old articles?). |
Define knowledgebase article templates. |
Having standardized templates makes it an easy read and will increase its usage (e.g. all knowledgebase articles for recurring incidents will follow the same template). |
Build knowledgebase article creation, usage, and revision workflows. |
Decide how new knowledgebase articles will be built and added to the tool, how it will be accessed and used, and also any steps necessary to update the articles. |
Plan a knowledgebase feedback system. |
For example, include a comments section, like buttons, and who will get notified about feedback. |
2.2.6 Design your ticket status notification processes and templates
Task | Why this matters |
|---|---|
Identify triggers for status notifications. Balance the need for keeping users informed versus notifications being treated as spam. | Identify when and where the users are informed to make sure you are not under or over communicating with them. Status notifications and alerts are a great way to set or reset expectations to your users on the delivery or resolution on their tickets. For example, auto-response for a new ticket, or status updates to users when the ticket is assigned, solved, and closed. |
If using email notifications, design email templates for each type of notification. | Creating notification templates is a great way to provide standardized service to your clients and it saves time when a ticket is raised. For example, email templates for new ticket, ticket updated, or ticket closed. |
Plan how you will enable users to validate the ticket or resolve request without causing the ticket to reopen. | For example, in the ticket solved template, provide a link to close the ticket, and ask the user to reply only if they wish to re-open the ticket (i.e. if it's not resolved). May require consulting with the ITSM tool vendor. |
Decide if customer satisfaction surveys will be sent to end users after their ticket has been closed. | Discuss if this data would be useful to you if captured to improve/modify your service. |
If customer satisfaction surveys will be used, design the survey. | Discuss what data would be useful to you if captured and create survey questionnaires to capture that data from your clients. For example, how many questions, types of questions, whether sent for every ticket or randomly. |
2.2.7 Identify required user accounts, access levels, and skills/service groups
Task | Why this matters |
|---|---|
Define Tier 1, 2, and 3 roles and their associated access levels. | Having pre-established roles for different tiers and teams is a great way to boost accountability and also helps identify training requirements for each tier. For example, knowledgebase training for tier 1 & 2, reporting/analytics for IT manager. |
Identify skill groups or support teams. | Establishing accountability for all the support practices in the service desk is important for the tickets to be effectively distributed among the functional individuals and teams. Identifying the responsibilities of groups help execute shift-left strategy. |
Identify required email permissions for each role. | For example, define which roles get permissions to include status updates or other ticket information in their emails or to support automated notifications and other integrations with email. |
Determine how you will import users into the new tool. | Identify the best way to migrate your users to the new tool whether it be by importing from Active Directory or the old ITSM tool, etc. |
2.2.8 Review and update your workflows and escalation rules
Task | Why this matters |
|---|---|
Document your future-state incident and service request workflows that will incorporate the above planning as well as improvements supported by the new tool. | Document your workflows and review it to make sure it’s accurate and also to help you with communicating process expectations to all the stakeholders. |
Review the future-state workflows. | This helps you validate that the planned changes meet your goals and identify any additional required changes. |
Update ticket classification values, templates, and ticket intake as needed based on the future-state workflows. | Documenting your process might uncover additional requirements for classification, templates, etc. Ensure that the classification templates and related parameters align with the workflows. |
Identify opportunities to further automate workflows by leveraging the new tool. | The process of reviewing the workflows often helps identify manual processes, labor intensive processes, very repetitive processes, etc. These can be opportunities to further automate your processes. |
2.2.9 Identify desired reporting and relevant metrics to track
Documentation of key metrics of service desk performance and end-user satisfaction that you wish to improve through the new solution is key to evaluate the success of your implementation.
Task | Why this matters |
|---|---|
Define the metrics you will track in the new ITSM tool. | It is critical to ensure that your tool will be able to track necessary metrics on KPIs from the start and that this data is accurate and reliable so that reporting will be relevant and meaningful to the business. Whether you use your own tool for tracking metrics or an external tool, ensure that you can get the internal data you need from the ITSM tool. This may include measures of Productivity (e.g. time to respond, time to resolve), Service (e.g. incident backlog, customer satisfaction), and Proactiveness (e.g. number of knowledgebase articles per week). |
Determine what reports you want to generate from data collected through the tool. | It’s not enough to simply set up metrics, you have to actually use the information. Reports should be analyzed regularly and used to manage costs and productivity, improve services, and identify issues. Ensure that your service desk team contributes to the usefulness of reporting by following processes such as creating tickets for every incident and request, categorizing it properly, and closing it after it’s resolved with the proper resolution code. |
Identify the information and metrics to include in the ITSM tool's dashboards. | A dashboard helps drive accountability across the team through greater visibility. Decide what will be reported on the dashboard. For example, average time to resolution, number of open tickets with subtotals for each priority, problem ticket aging. |
Step 2.3
Plan data migration and integrations
Activities
2.3.1 |
Create a data migration and archiving plan |
2.3.2 |
Identify and plan required integrations |
This step involves the following participants:
- Service Manager and Service Desk Team
- Project Manager and Core Project Team
- Subject Matter Experts and Tool Administrator, if applicable
Outcomes of this step
- Decisions made around data migration, integrations, automation, and reporting.
- ITSM Tool Implementation Checklist
2.3.1 Create a data migration and archiving plan
Task | Why this matters |
|---|---|
Document your future-state incident and service request workflows that will incorporate the above planning as well as improvements supported by the new tool. | Document your workflows and review them to make sure they’re accurate and also to help you with communicating process expectations to all the stakeholders. |
Review the future-state workflows. | This helps you validate that the planned changes meet your goals and identify any additional required changes. |
Update ticket classification values, templates, and ticket intake as needed based on the future-state workflows. | Documenting your process might uncover additional requirements for classification, templates, etc. Ensure that the classification templates and related parameters align with the workflows. |
Identify opportunities to further automate workflows leveraging the new tool. | The process of reviewing the workflows often helps identify manual processes, labor-intensive processes, very repetitive processes, etc. These can be opportunities to further automate your processes. |
2.3.2 Identify and plan required integrations
Consider and plan for any necessary integrations with other systems.
A major component of the implementation that should be carefully considered throughout is if and how to integrate your ITSM tool with other applications in the environment.
Task | Why this matters |
|---|---|
Identify the systems you need to integrate with your ITSM tool (e.g. asset discovery tools, reporting systems). | Regardless of whether your solution will be configured and installed on-premises or as a SaaS, you need to consider the underlying technology to determine how you will integrate it with other tools where necessary. Businesses may need to integrate their ITSM tool with other systems including asset management, network monitoring, and reporting systems to make the organization more efficient. |
Determine how data will flow between systems. | Carefully evaluate the purpose of each integration. Clients often want their ITSM tool to be integrated with all of the available data in another application when they only need a subset of that data to be integrated. Consider not only which systems you need to integrate with your ITSM tool but also who the owners of those systems are and which way the data needs to flow. |
Plan the development, configuration, and testing of integrations. | As with other aspects of the implementation, configure and test the integrations before going live with the tool. |
Step 2.4
Plan the module rollout
Activities
2.4.1 |
Repeat the methodology for additional ITSM modules, using the Checklists as a guide |
2.4.2 |
Leverage these blueprints to help you implement change and asset management modules |
This step involves the following participants:
- Service Manager and Service Desk Team
- Project Manager and Core Project Team
- Subject Matter Experts and Tool Administrator, if applicable
Outcomes of this step
Identify and plan for additional modules and features to be implemented
2.4.1 Repeat the methodology for additional ITSM modules, using the Checklists as a guide
The preparation completed in Phase 1 and 2 to this point provide a foundation for additional ITSM modules.
This blueprint starts with the incident management and service request modules as those are typically implemented first since they are the most impactful to day-to-day IT service management.
In addition, the methodology outlined in Phase 1 and 2 to this point provides a model to follow for additional ITSM modules:
- If you did not already account for additional modules in Phase 1, then repeat the steps in Phase 1 to define scope, stakeholders, and timeline.
- The Implementation Checklist Tool provides tabs for Change Management and Asset Management to outline the specific details for those topic areas, but they follow the same high-level steps as Phase 2 (e.g. review existing processes, design relevant workflows).
- If you are planning to implement other modules (e.g. Problem Management), create additional tabs in the Implementation Checklist Tool as needed, using the existing tabs as a base.
2.4.2 Leverage these blueprints to help you implement change and asset management modules
The Implementation Checklist Tool summarizes what you need to prepare for the implementation. If you need more assistance with developing the underlying ITSM processes, use the tools, templates, and guidance in the blueprints below.
Define change management workflows, key roles, and supporting elements such as request-for-change forms based on best practices.
Implement Hardware Asset Management
Create an SOP and associated process workflows to streamline and standardize hardware asset management.
Implement Software Asset Management
Build on a strong hardware asset management program to also properly track and manage software assets. This includes managing software licensing, finding opportunities to reduce costs, and improving your software audit readiness.
Phase 3
Create a Deployment Plan (Communication, Training, Rollout)
| Phase 1 | Phase 2 | Phase 3 |
|---|---|---|
Identify Stakeholders, Scope, and Preliminary Timeline | Prepare to Implement Incident Management and Service Request Modules | Create a Deployment Plan (Communication, Training, Rollout) |
This phase will walk you through the following steps:
- Create a communication plan (for IT, users, and business leaders)
- Create a training plan
- Plan how you will deploy, monitor, and maintain the solution
ITSM Tool Training Schedule |
ITSM Tool Deployment Plan Template |
||
Use the template to document and plan the communications and training needs prior to deployment of the new tool. |
|
Use the deployment plan template to document the strategy and decisions made for making the transition to the new ITSM tool. |
|
Download the ITSM Tool Training Schedule |
Download the ITSM Tool Deployment Plan Template |
Step 3.1
Create a communication plan (for IT, users, and business leaders)
Activities
3.1.1 |
Ensure there is strong communication from management throughout the implementation and deployment |
3.1.2 |
Base your communications timeline on a classic change curve to accommodate natural resistance |
3.1.3 |
Communicate new processes with business leaders and end users to improve positive customer feedback |
This step involves the following participants:
- CIO/IT Director
- IT Manager
- Service Manager
Outcomes of this step
Plan for communicating the change with business executives, service desk agents, and end users.
3.1.1 Ensure there is strong communication from management throughout the implementation and deployment
A common contributing factor for unsuccessful implementation is a lack of communication around training, transitioning, and deploying the new tool.
Common Pitfall:
Organizational communication and change management should have been ongoing and tightly monitored throughout the project. However, cut-over is a time in which critical communication regarding deployment and proper user training can be derailed when last-minute preparations take priority. Not only will general user frustration increase, but unintended process workarounds will emerge, eroding system effectiveness.
Mitigating Actions:
Deliver training for end users that will be engaged in testing. For all other users, deliver training prior to go-live to avoid the risk of training too early (where materials may not be ready or users are likely to forget what was learned). If possible, host quick refresher training a week or two prior to go-live.
Aim to communicate the upcoming go-live. The purpose of communication here is to reiterate expectations, complexities, and ramifications on business going forward. Alleviate performance anxiety by clearly stating that temporary drops in productivity are to be expected and that there will be appropriate assistance throughout the transition period.
Transition: Have the project/program manager remain on the project team for some time after deployment to oversee and assure smooth transition for the organization.
Complete training: Have a clear plan for training those users that were missed in the first round of training as well as a plan for ongoing training for those that require refresher training, for new joiners to your organization, and for any training requirements that result from subsequent upgrades.
3.1.2 Base your communications timeline on a classic change curve
It’s important to communicate the change ahead of the implementation, but also to reinforce that communication after implementation to recover from any resistance that occurs through the implementation itself.
Stages in a typical change curve:
- Change is announced. Some people are skeptical and resistant, but others are enthusiastic. Most people are fence sitters; if they trust senior leadership, they will give the benefit of the doubt and expect change to be good.
- Positive sentiment declines as implementation approaches. Training and other disruptions take people’s time and energy away from their work. Project setbacks and delays take credibility away from project leaders and seem to validate the efforts of saboteurs and skeptics.
- Overall sentiment begins to improve as people adjust and see real progress made. Ideally, early successes or quick wins neutralize saboteurs and convert skeptics. At the very least, people will begin to accept and adapt to new realities.
- If the project is successful and communication is reinforced after implementation, sentiment will peak and level out over time as people move on to other projects.
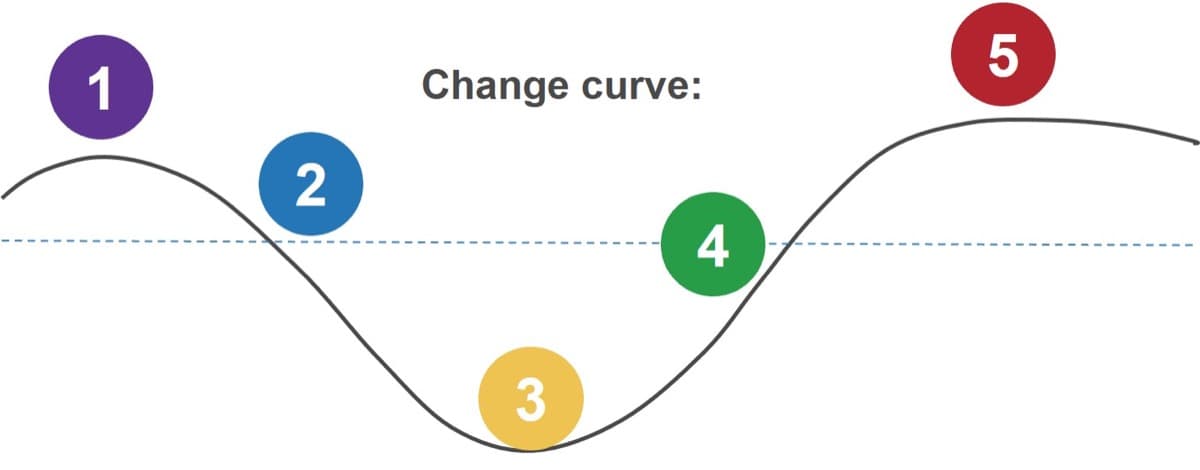
- Honeymoon of “Uninformed Optimism”: Tentative support and enthusiasm for change before people have really felt or understood what it involves.
- Backlash of “Informed Pessimism” (leading to “Valley of Despair”): People realize they’ve overestimated the benefits (or how soon they’ll be achieved) and underestimated the difficulty of change.
- Valley of Despair and beginning of “Hopeful Realism”: Sentiment bottoms out and people begin to accept the difficulty (or inevitability) of change.
- Bounce of “Informed Optimism”: More optimism and support when people begin to see bright spots and early successes.
- Contentment of “Completion”: Change has been successfully adopted and benefits are being realized.
3.1.3 Communicate new processes
- Communicate with business unit leaders and users:
- Focus on the benefits for end users to encourage buy-in for the change.
- Include preliminary instructions with a date for training sessions.
- Teach users how to contact the service desk and submit a ticket.
- Set expectations for IT’s response.
- Record all your training sessions so it can used for recursive training.
- IT must point users toward the new process, but ad hoc requests should still be expected at first. Deal with these politely but encourage all employees to use the new service desk ticketing process, if applicable.
- Continue to adjust communications if processes aren’t being followed to ensure SLAs can be met and improved.
“Communicate with your end users in phase 1 to let them know what will be changing, get feedback and buy-in, and inform them that training will be happening, then ensure you train them once the tool is installed. A lot of times we’ll get our tool set up but people don’t know how to use it."
– Director of ITSM Tools
Info-Tech Insight
If there is a new process for ticket input, consider using a reward system for users who submit a ticket through the proper channel ;(e.g. email or self-serve portal) instead of their old method (e.g. phone). However, if a significant cultural change is required, don’t expect it to happen right away.
Step 3.2
Create a training plan
Activities
3.2.1 |
Target training session(s) to the specific needs of your service desk, service groups, IT managers |
3.3.1 |
Provide training (tool/portal and process changes) |
3.4.1 |
Choose an appropriate training delivery method that will focus on both process and tool |
This step involves the following participants:
- IT Director
- Project Manager
- Service Desk Manager
Outcomes of this step
- Training modules for different users of the tool.
- Assignment of training modules to users and schedule for completion.
3.2.1 Target training session(s) to the specific needs of your service desk and IT staff
Create targeted role-based training programs for your service desk analysts; they care about the portion of the solution they are responsible for, not the functionality that is irrelevant to their job.
Create and execute a role-based training program by conducting training sessions for targeted groups of users, training them on the functions they require to perform their jobs.
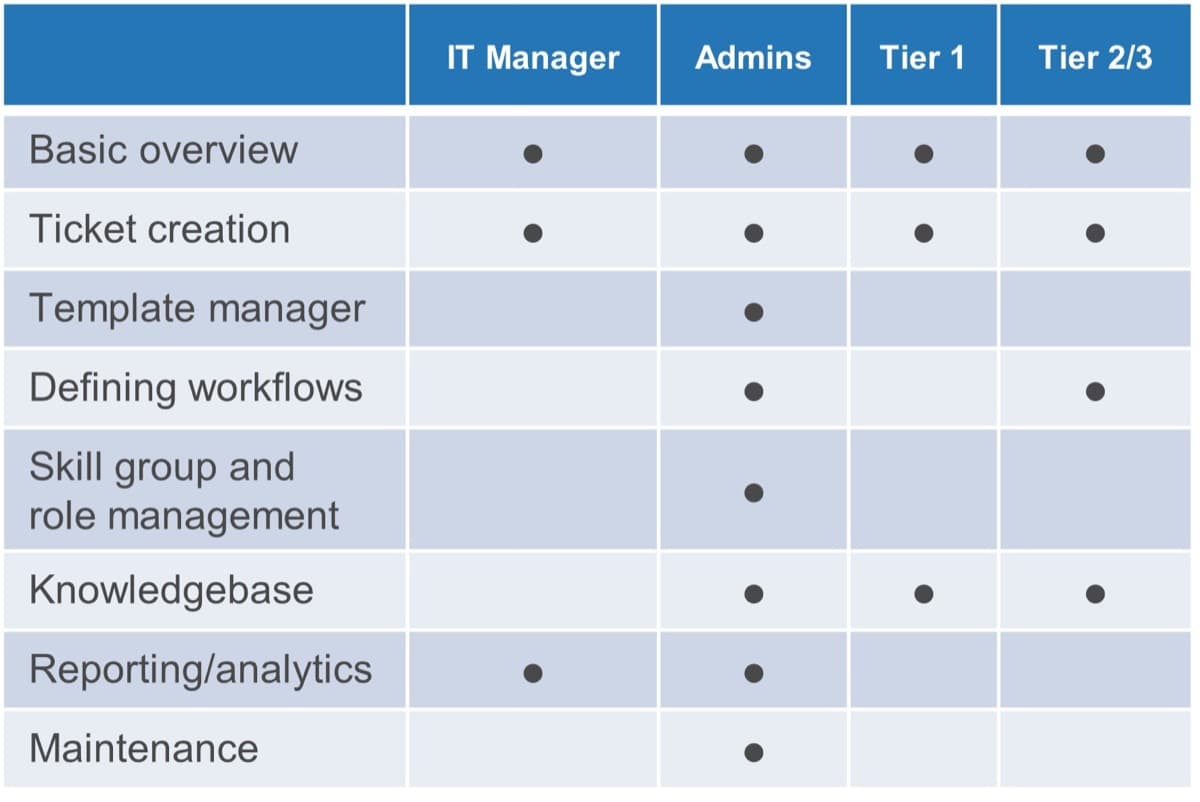
Use a table like this one to help identify which roles should be trained on which tasks within the ITSM tool.
The need for targeted training:
- IT personnel may challenge the need for training. They may feel they don’t require training on the use of tools or that they don’t have time to dedicate to training when there is so much work to be done.
- Providing targeted training focused on only the functions of the solution that each tier is responsible for can help to overcome that resistance.
- Targeted training may include basic training for level 1 technicians and more advanced in-depth training for administrators, power users, or level 2/3 technicians.
Info-Tech Insight:
Properly trained users promote adoption and improve results. Always keep training materials updated and available. New employees, new software integration, and internal promotions create opportunities for training employees to align the ITSM tool with their roles and responsibilities.
3.2.2 Provide training
Training must take place before deployment to ensure that both your service desk agents and end users will use the tool in the way it was intended and improve end-user satisfaction.
- Implementing a new ITSM tool will likely bring with it at least some degree of organizational and cultural change. It’s important to manage that change through proper training. Your training needs will vary depending on the maturity of the organization and the amount of cultural and process change being implemented.
- If this is your first ITSM solution with many new changes for staff to take on board, it will be important to dedicate training time not only before deployment but also several months after the initial installation, to allow staff to gain more experience with the new tool and processes and formulate questions they may not think to ask during implementation.
- A training plan should take into account not only training needs for the implementation project but also any ongoing training requirements that may be required. This may include:
- Training for new personnel.
- Training on any changes to the tool.
- Training on any new processes the tool will support.
- Better agent training will lead to better performance and improved end-user satisfaction.
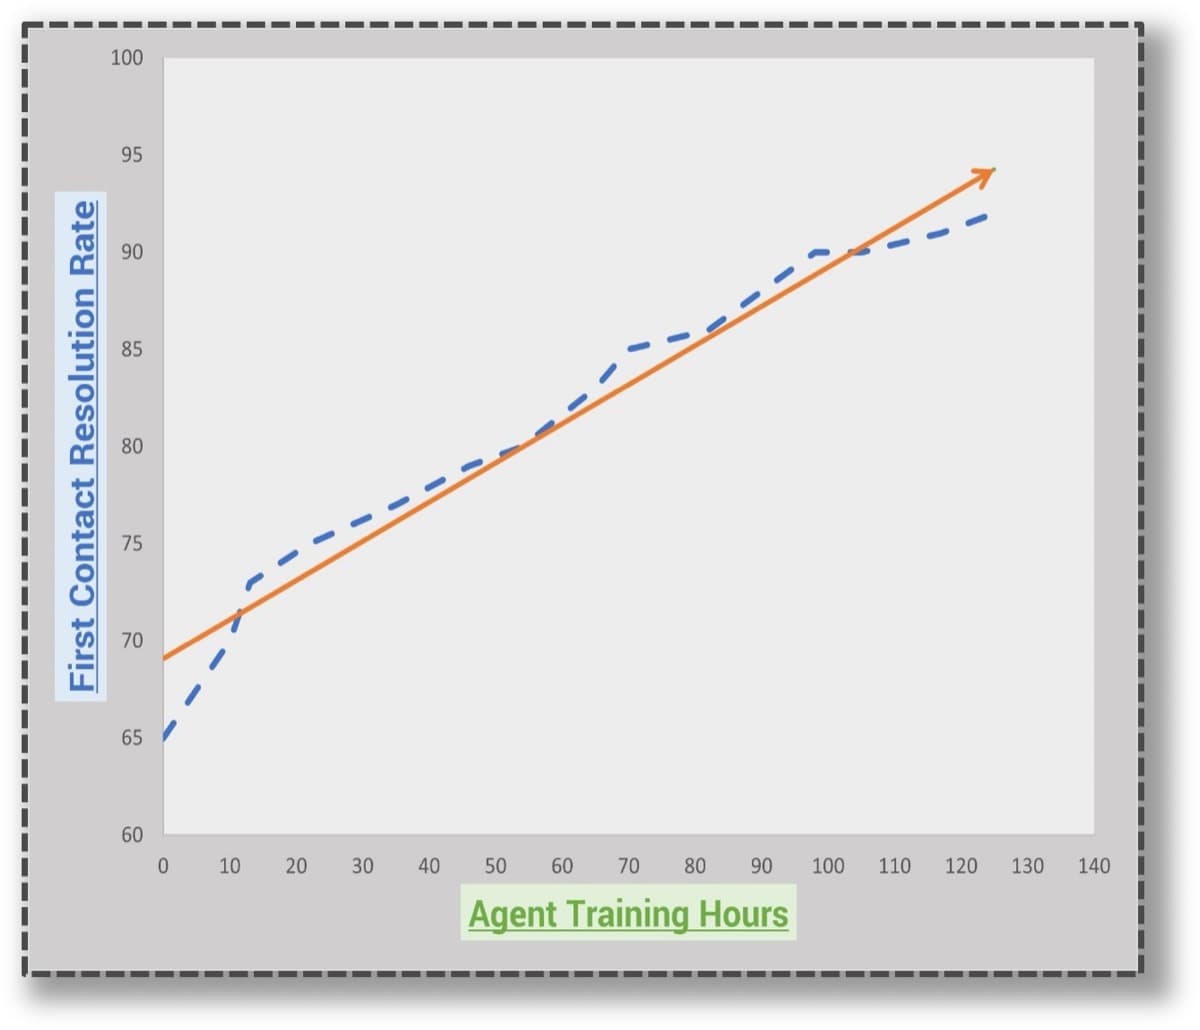
The blue graph line charts new-agent training hours against first contact resolution and the orange graph line charts the trendline for the dataset.
Source: MetricNet, 2012
3.2.3 Choose an appropriate training delivery method
Training should include use cases that focus on not only how the tool’s interface works but also how the tool should be used to support process activities.
- Training through use cases highlights how the tool will support the user in role-based tasks.
- If new processes are being introduced along with the tool, training should cover both in an integrated way.
- Team leadership and management commitment ensures that all agents take their training seriously and are prepared for all use cases by the deployment date.
Trainer-led sessions: |
Self-taught sessions: |
|---|---|
|
|
Info-Tech Insight:
Ensure that the training demonstrates not only how the tool should be used, but also the benefits it will provide your staff in terms of improved efficiency and productivity. Users who can clearly see the benefits the tool will provide for their daily work will accept the tool more readily and promote it across the organization.
Step 3.3
Plan how you will deploy, monitor, and maintain the solution
Activities
3.3.1 | Plan the transition from your old tool to ensure continual functionality |
3.3.2 | Choose a cut-over approach that works for you |
3.3.3 | Deploy the solution and any new processes simultaneously to ease the transition |
3.3.4 | Have a post-deployment support plan in place |
3.3.5 | Monitor success metrics defined in Phase 1 |
This step involves the following participants:
- IT Director
- Project Manager
- Service Desk Manager
Outcomes of this step
Deployment plan, including a plan for cut-over from the old tool (if applicable), release of the new tool, and post-deployment support and maintenance of the tool.
3.3.1 Plan the transition from your old tool to ensure continual functionality
If you will have a transitional period during which the current tool will be used alongside the new tool, develop a clear plan for the transition to ensure continued service for your end users.
- If there will be an interim period during which only some aspects of the new ITSM tool are functional, you will need to determine how the new system and old systems will work together for that period of time. This may require creating interfaces as well as providing user documentation and/or SOPs on how the business processes will operate during the interim period.
- Cut-over is the period during which the changeover to the new system occurs. Cut-over activities need to be tightly choreographed for a successful deployment. If improperly planned, chaos may erupt when unforeseen issues are encountered during deployment, the deployment may be jeopardized, and the organization may encounter costly interruptions to its daily operations.
- Many organizations may leave any open tickets in the old tool until they are closed, which requires that tool run alongside the new tool for a transitional period. In this case, it is necessary to create guidelines around how long the open tickets will remain in the old system and ensure there is clear communication around these processes.
Be prepared for the transition:
- Create a robust cut-over plan that includes when the old tool will be decommissioned, what activities are necessary during the cut-over, and what the contingency plan is in case of unforeseen issues.
- Plan for and perform mock cut-overs to establish the timeline and dependencies for all steps that need to be performed to successfully complete the changeover. Do this to avoid any surprises or delays during the true cut-over period.
- Establish cut-over logistics: Create a schedule for resources to work in shifts to avoid burn-out during cut-over, which can lead to lapses in judgment and easily avoidable mistakes. Allocate dedicated workspaces for cut-over activities, e.g. “war rooms” for the triage of issues.
3.3.2 Choose a cut-over approach that works for you
Approaches and insights from three case studies
Case Study #1 |
Case Study #2 |
Case Study #3 |
|---|---|---|
On day one we started recording all new incidents in the new tool, and everything that was open in the old tool remained open for about one month. At that point we transferred over some open incidents but closed old incidents with the view that if anyone really wanted something done that hadn’t been yet, they could re-submit a ticket. – Brett Andrews, Managing Director at BAPTISM Consultancy |
It made sense for us to start fresh with the new system. We left all of the old tickets in the old system and started the new system with ticket #1. We only had about a dozen open tickets in the old system so we left them there and ran the two tools side by side until those were closed. – CIO, Publishing |
It depends on the client and the size of their service desk as well as the complexity of their data and whether they need their old data for reporting. If there are only a dozen open tickets, they can manually move those over easily, and decide whether they want to migrate their historical data for reporting purposes. – Scott Walling, Co-Founder at Monitor 24-7 Inc. |
3.3.3 Deploy the solution and any new processes simultaneously to ease the transition
Follow a deployment plan for introducing new processes alongside the new tool to ensure changes to both process and technology are adopted simultaneously.
If you’re introducing new processes alongside the new tool, it’s important to maintain the link between process and tool. Typically, the processes and tool should be deployed simultaneously unless there is a strong reason not to do so.
Deployment can be done as a big-bang or phased approach. The decision to employ a phased deployment depends on the number and size of business units the tool will support, as well as the organization’s geography and infrastructure (deployment locations).
Before deployment, conduct readiness assessments to understand whether:
The people are ready to accept the new system (have received the proper training and communications and understand how their jobs will change when the switch is flipped).
The technology is ready (test results are favorable, workarounds and a plan for closure have been identified for any open defects, and the system is performing as expected).
The data is ready (data for final conversion has been cleansed, and all conversions have been rehearsed).
The post-deployment support model is ready (infrastructure and technical support is in place, sites are ready, knowledge transfer has been conducted with the support organization, and end users understand procedures for escalation of issues).
3.3.4 Have a post-deployment support plan in place
Ensure that strong internal support for the project and tool will continue after deployment.
The stabilization period after a new software deployment can last between three and nine months, during which there may be continued training needs and fine-tuning of processes. Internal support from project leaders within your organization will be critical to recover from any dip in operational efficiency and deliver the benefits of the tool.
Consider the following to prepare better for your support plan:
What are the roles and responsibilities for ongoing tool administration support?
What level of support will exist to assist service desk staff after deployment?
How much time will project team resources devote to tackling upcoming issues and assisting with ongoing support?
Who will be responsible for ongoing training needs and documentation?
If your organization is spread across multiple locations, what level of support/assistance will be available at each site?
How will new code releases or system upgrades be managed and communicated?
Info-Tech Insight:
Deployment is only the first step in the system lifecycle. Full benefit realization from the tool requires ongoing investment and learning to be sustained. Unless processes and training are updated on an ongoing basis, benefits gained will start to decrease over time. If your service desk efficiency stagnates at the level it was at prior to implementation, the tool has failed to serve its objective.
Establish ongoing tool maintenance, improvement structures, and processes
People, processes, and organizations change over time, and your ITSM tool will need to change to meet expectations.
Develop and execute a plan for the maintenance of the solution and its infrastructure components.
Include periodic reviews against business needs and operational requirements (e.g. patches, upgrades, and risk and security requirements). |
For maintenance updates, use the change management process and assess how an activity will impact solution design, functionality, and business processes. |
For major changes that result in significant change in current designs, functionality, and/or business processes, follow the development process used for new systems. |
Ensure that maintenance activities are periodically analyzed for abnormal trends indicating underlying quality or performance problems, cost/benefit of major upgrade, or replacement in lieu of maintenance. |
Assign responsibility for ongoing maintenance. Hold regular meetings for the following activities:
- Inspect data and reports.
- Assess whether you’re meeting SLAs.
- Predict any upcoming changes that may impact ticket volume (e.g. a new operating system or security patch).
- Create new ticket templates for recurring or upcoming issues.
- Create new knowledgebase articles.
- Determine whether ticket categories are being used correctly.
- Ask team if there are any problems with the tool.
3.3.5 Monitor success metrics defined in Project Charter
Revisit your goals for the solution and assess if they are being met by evaluating current metrics. If your goals have not yet been met, re-evaluate how to ensure the tool will deliver value.
Sample High-Level Goals:
- Improved service desk efficiency
- Improved end-user satisfaction
- Improved self-service options for end users
- Improved data and reporting capabilities
Sample Metric Descriptions |
Baseline Metric |
Goal |
Current Metric |
|---|---|---|---|
Increased ticket input through email versus phone |
50% of tickets submitted through phone |
10% of tickets submit through phone |
|
Reduced ticket volume (through improved self-serve capabilities) |
1,500 tickets per month | 1,200 tickets per month |
|
Improved first call resolution (through increased efficiency and automation) |
50% FCR |
60% FCR |
|
Improved ability to meet SLAs (through automated escalations and prioritization) |
5 minutes to log a ticket |
1 minute to log a ticket |
|
Improved time to produce reports |
3 business days |
1 business day |
|
Improved end-user satisfaction |
60% satisfied with services |
75% satisfied |
Related Info-Tech Research
Define change management workflows, key roles, and supporting elements such as request-for-change forms based on best practices.
Build core elements of service desk operations, including incident management and service request workflows, ticket categorization schemes, and ticket prioritization rules.
Optimize the Service Desk With a Shift-Left Strategy
Implement tools such as an improved knowledgebase and self-service portal to enable lower tier support staff and end users to resolve incidents or fulfill service requests.
Incident and Problem Management
Develop a critical incident management workflow and create standard operating procedures for problem management.
IT Service Management Selection Guide
Identify the best-of-breed solution to make the most of your investment and engage the right stakeholders to define success.
Analyze Your Service Desk Ticket Data
Develop a framework to track metrics, clean data, and put your data to use for pre-defined timelines.
Bibliography
Adiga, Siddanth. “10 Reasons Why ITSM Implementations Fail.” Could Strategy, 6 May 2015. Web.
Hastie, Shane, and Stéphane Wojewoda. “Standish Group 2015 Chaos Report.” InfoQ, 4 October 2015. Web.
“How to Manage Change in the Implementation of an ITSM Software.” C2, 20 April 2015. Web.
Lockwood, Meghan. “First Look: Annual ServiceNow Insight and Vision Executive Summary [eBook].” Acorio, 31 October 2019. Web.
Mainville, David. “7 Steps to a Successful ITSM Tool Implementation.” Navvia, 2012. Web.
Rae, Barclay. “Preparing for ITSM Tool Implementation.” Joe the IT Guy, 24 June 2015. Web.
Rae, Barclay. “Successful ITSM Tool Implementation.” BrightTALK, 9 May 2013. Webcast.
Rumburg, Jeffrey. “Metric of the Month: Agent Training Hours.” MetricNet, 2012. Web.