
Remote work calls for leveraging your Office 365 license to use Microsoft Teams – but IT is unsure about best practices for governance and permissions. Moreover, IT has few resources to help train end users with Teams best practices.
Our Advice
Critical Insight
Microsoft Teams is not a standalone app. Successful utilization of Teams occurs when conceived in the broader context of how it integrates with Office 365. Understanding how information flows between Teams, SharePoint Online, and OneDrive for Business, for instance, will aid governance with permissions, information storage, and file sharing.
Impact and Result
Use Info-Tech’s Microsoft Teams Cookbook to successfully implement and use Teams. This cookbook includes recipes for:
- IT best practices concerning governance of the creation process and Teams rollout.
- End-user best practices for Teams functionality and common use cases.
Microsoft Teams Cookbook Research & Tools
Start here – read the Executive Brief
Learn critical insights for an effective Teams rollout.Besides the small introduction, subscribers and consulting clients within this management domain have access to:
- Microsoft Teams Cookbook – Sections 1-2
1. Teams for IT
Understand best practices for governance of the Teams creation process and Teams rollout.
- Microsoft Teams Cookbook – Section 1: Teams for IT
2. Teams for end users
Get end users on board with this series of how-tos and common use cases for Teams.
- Microsoft Teams Cookbook – Section 2: Teams for End Users
Further reading
Microsoft Teams Cookbook
Recipes for best practices and use cases for Microsoft Teams.
Table of contents
Executive Brief
Section 1: Teams for IT
Section 2: Teams for End Users
Executive Summary
Situation
Remote work calls for leveraging your Office 365 license to utilize Teams – but IT is unsure about best practices for governance and permissions.
Without a framework or plan for governing the rollout of Teams, IT risks overlooking secure use of Teams, the phenomenon of “teams sprawl,” and not realizing how Teams integrates with Office 365 more broadly.
Complication
Teams needs to be rolled out quickly, but IT has few resources to help train end users with Teams best practices.
With teams, channels, chats, meetings, and live events to choose from, end users may get frustrated with lack of guidance on how to use Teams’ many capabilities.
Resolution
Use Info-Tech’s Microsoft Teams Cookbook to successfully implement and utilize Teams. This cookbook includes recipes for:
- IT best practices concerning governance of the creation process and Teams rollout.
- End-user best practices for Teams functionality and common use cases.
Key Insights
Teams is not a standalone app
Successful utilization of Teams occurs when conceived in the broader context of how it integrates with Office 365. Understanding how information flows between Teams, SharePoint Online, and OneDrive for Business, for instance, will aid governance with permissions, information storage, and file sharing.
IT should paint the first picture for team creation
No initial governance for team creation can lead to “teams sprawl.” While Teams was built to allow end users’ creativity to flow in creating teams and channels, this can create problems with a cluttered interface and keeping track of information. To prevent end-user dissatisfaction here, IT’s initial Teams rollout should offer a basic structure for end users to work with first, limiting early teams sprawl.
The Teams admin center can only take you so far with permissions
Knowing how Teams integrates with other Office 365 apps will help with rolling out sensitivity labels to protect important information being accidentally shared in Teams. Of course, technology only does so much – proper processes to train and hold people accountable for their actions with data sharing must be implemented, too.
Related Info-Tech Research
Establish a Communication and Collaboration System Strategy
Don’t waste your time deploying yet another collaboration tool that won’t get used.
Modernize Communication and Collaboration Infrastructure
Your legacy telephony infrastructure is dragging you down – modern communications and collaboration technology will dramatically improve productivity.
Migrate to Office 365 Now
One small step to cloud, one big leap to Office 365. The key is to look before you leap.
Section 1: Teams for IT
Governance best practices and use cases for IT
| Section 1 Teams for IT |
Section 2 Teams for end users |
From determining prerequisites to engaging end users.
IT fundamentals
- Creation process
- Teams rollout
Use cases
- Retain and search for legal/regulatory compliance
- Add an external user to a team
- Delete/archive a team
Overview: Creation process
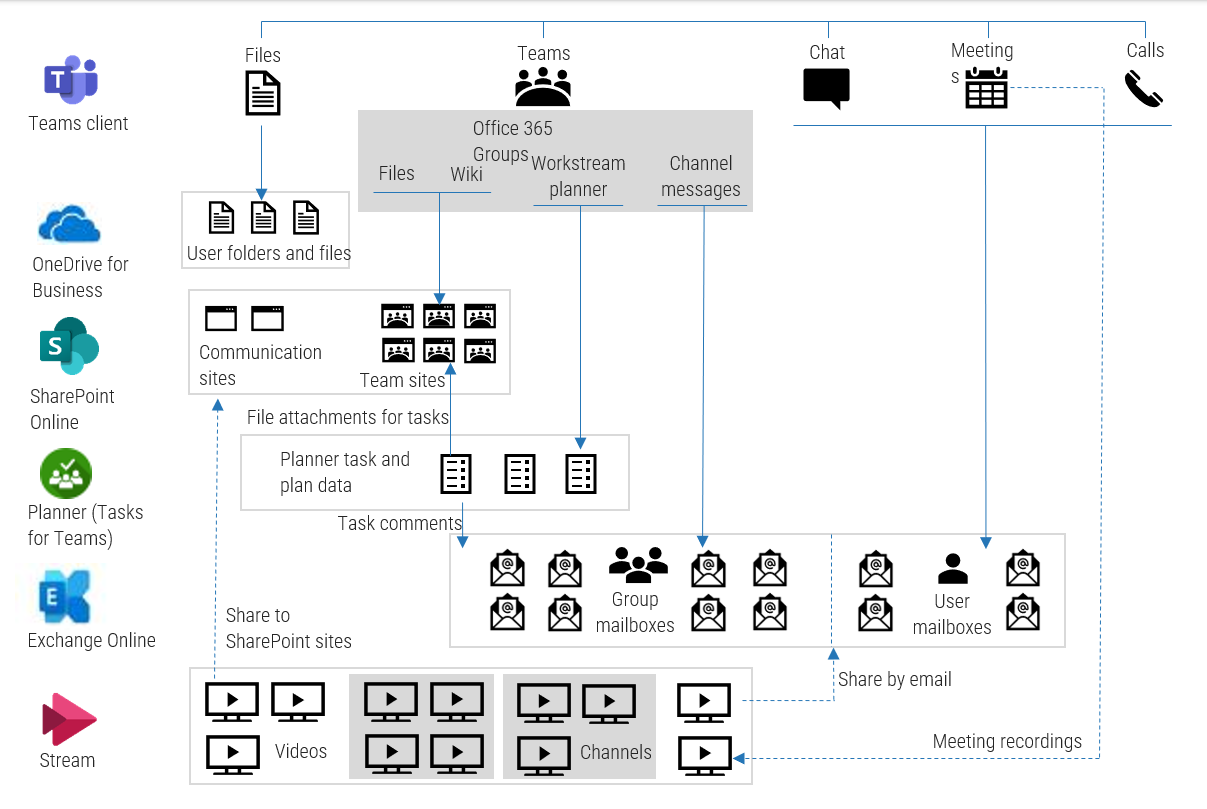
IT needs to be prepared to manage other dependent services when rolling out Teams. See the figure below for how Teams integrates with these other Office 365 applications.
Which Microsoft 365 license do I need to access Teams?
- Microsoft 365 Business Essentials
- Microsoft 365 Business Premium
- Office 365 Enterprise, E1, E3, or E5
- Office 365 Enterprise E4 (if purchased prior to its retirement)
Please note: To appeal to the majority of Info-Tech’s members, this blueprint refers to Teams in the context of Office 365 Enterprise licenses.
Assign admin roles
You will already have at least one global administrator from setting up Office 365.
Global administrators have almost unlimited access to settings and most of the data within the software, so Microsoft recommends having only two to four IT and business owners responsible for data and security.
Info-Tech Best Practice
Configure multifactor authentication for your dedicated Office 365 global administrator accounts and set up two-step verification.
Once you have organized your global administrators, you can designate your other administrators with “just-enough” access for managing Teams. There are four administrator roles:
| Teams Service Administrator | Manage the Teams service; manage and create Microsoft 365 groups. |
| Teams Communications Administrator | Manage calling and meetings features with Teams. |
| Teams Communications Support Engineer | Troubleshoot communications issues within Teams using the advanced troubleshooting toolset. |
| Teams Communications Support Specialist | Troubleshoot communications issues using Call Analytics. |
Prepare the network
There are three prerequisites before Teams can be rolled out:
- UDP ports 3478 through 3481 are opened.
- You have a verified domain for Office 365.
- Office 365 has been rolled out, including Exchange Online and SharePoint Online.
Microsoft then recommends the following checklist to optimize your Teams utilization:
- Optimize calls and performance using the Call Quality Dashboard.
- Assess network requirements in the Network Planner in the Teams admin center.
- Ensure all computers running Teams client can resolve external DNS queries.
- Check adequate public IP addresses are assigned to the NAT pools to prevent port exhaustion.
- Route to local or regional Microsoft data centers.
- Whitelist all Office 365 URLs to move through security layers, especially IDS/IPS.
- Split tunnel Teams traffic so it bypasses your organization’s VPN.
Info-Tech Best Practice
For online support and walkthroughs, utilize Advisor for Teams. This assistant can be found in the Teams admin center.
Team Creation
You can create and manage Teams through the Teams PowerShell module and the Teams admin center. Only the global administrator and Teams service administrator have full administrative capabilities in this center.
Governance over team creation intends to prevent “teams sprawl” – the phenomenon whereby end users create team upon team without guidance. This creates a disorganized interface, with issues over finding the correct team and sharing the right information.
Prevent teams sprawl by painting the first picture for end users:
- Decide what kind of team grouping would best fit your organization: by department or by project.
- Start with a small number of teams before letting end users’ creativity take over. This will prevent initial death by notifications and support adoption.
- Add people or groups to these teams. Assign multiple owners for each team in case people move around at the start of rollout or someone leaves the organization.
- Each team has a general channel that cannot be removed. Use it for sharing an overview of the team’s goals, onboarding, and announcements.
Info-Tech Best Practice
For smaller organizations that are project-driven, organize teams by projects. For larger organizations with established, siloed departments, organize by department; projects within departments can become channels.
Integrations with SharePoint Online
Teams does not integrate with SharePoint Server.
Governance of Teams is important because of how tightly it integrates with other Office 365 apps, including SharePoint Online.
A poor rollout of Teams will have ramifications in SharePoint. A good rollout will optimize these apps for the organization.
Teams and SharePoint integrate in the following ways:
- Each team created in Teams automatically generates a SharePoint team site behind it. All documents and chat shared through a team are stored in that team’s SharePoint document library.
- As such, all files shared through Teams are subject to SharePoint permissions.
- Existing SharePoint folders can be tied to a team without needing to create a new one.
- If governance over resource sharing in Teams is poor, information can get lost, duplicated, or cluttered throughout both Teams and SharePoint.
Info-Tech Best Practice
End users should be encouraged to integrate their teams and channels with existing SharePoint folders and, where no folder exists, to create one in SharePoint first before then attaching a team to it.
Permissions
Within the Teams admin center, the global or Teams service administrator can manage Teams policies.
Typical Teams policies requiring governance include:
- The extent end users can discover or create private teams or channels
- Messaging policies
- Third-party app use
Chosen policies can be either applied globally or assigned to specific users.
Info-Tech Best Practice
If organizations need to share sensitive information within the bounds of a certain group, private channels help protect this data. However, inviting users into that channel will enable them to see all shared history.
External and guest access
Within the security and compliance center, the global or Teams service administrator can set external and guest access.
External access (federation) – turned on by default.
- Lets you find, call, and chat with users in other domains. External users will have no access to the organization’s teams or team resources.
Guest access – turned off by default.
- Lets you add individual users with their own email address. You do this when you want external users to access teams and team resources. Approved guests will be added to the organization’s active directory.
If guest access is enabled, it is subject to Azure AD and Office 365 licensing and service limits. Guests will have no access to the following, which cannot be changed:
- OneDrive for Business
- An organization’s calendar/meetings
- PSTN
- Organization’s hierarchical chart
- The ability to create, revise, or browse a team
- Upload files to one-on-one chat
Info-Tech Best Practice
Within the security and compliance center, you can allow users to add sensitivity labels to their teams that can prevent external and guest access.
Expiration and archiving
To reduce the number of unused teams and channels, or delete information permanently, the global or Teams service administrator can implement an Office 365 group expiration and archiving policy through the Teams admin center.
If a team has an expiration policy applied to it, the team owner will receive a notification for team renewal 30 days, 15 days, and 1 day before the expiry date. They can renew their team at any point within this time.
- To prevent accidental deletion, auto-renewal is enabled for a team. If the team owner is unable to manually respond, any team that has one channel visit from a team member before expiry is automatically renewed.
- A deleted Office 365 group is retained for 30 days and can be restored at any point within this time.
Alternatively, teams and their channels (including private) can be archived. This will mean that all activity for the team ceases. However, you can still add, remove, and update roles of the members.
Retention and data loss prevention
Retention policies can be created and managed in the Microsoft 365 Compliance Center or the security and compliance center PowerShell cmdlets. This can be applied globally or to specific users.
By default, information shared through Teams is retained forever.
However, setting up retention policies ensures data is retained for a specified time regardless of what happens to that data within Teams (e.g. user deletes).
Info-Tech Best Practice
To prevent external or guest users accessing and deleting sensitive data, Teams is able to block this content when shared by internal users. Ensure this is configured appropriately in your organization:
- For guest access in teams and channels
- For external access in meetings and chat
Please note the following limitations of Teams’ retention and data loss prevention:
- Organization-wide retention policies will need to be manually inputted into Teams. This is because Teams requires a retention policy that is independent of other workloads.
- As of May 2020, retention policies apply to all information in Teams except private channel messages. Files shared in private channels, though, are subject to retention policies.
- Teams does not support advanced retention settings, such as a policy that pertains to specific keywords or sensitive information.
- It will take three to seven days to permanently delete expired messages.
Teams telephony
Teams has built-in functionality to call any team member within the organization through VoIP.
However, Teams does not automatically connect to the PSTN, meaning that calling or receiving calls from external users is not immediately possible.
Bridging VoIP calls with the PSTN through Teams is available as an add-on that can be attached to an E3 license or as part of an E5 license.
There are two options to enable this capability:
- Enable Phone System. This allows for call control and PBX capabilities in Office 365.
- Use direct routing. You can use an existing PSTN connection via a Session Border Controller that links with Teams (Amaxra).
Steps to implement Teams telephony:
- Ensure Phone System and required (non-Microsoft-related) services are available in your country or region.
- Purchase and assign Phone System and Calling Plan licenses. If Calling Plans are not available in your country or region, Microsoft recommends using Direct Routing.
- Get phone numbers and/or service numbers. There are three ways to do this:
- Get new numbers through the Teams admin center.
- If you cannot get new numbers through the Teams admin center, you can request new numbers from Microsoft directly.
- Port or transfer existing numbers. To do this, you need to send Microsoft a letter of authorization, giving them permission to request and transfer existing numbers on your behalf.
- To enable service numbers, including toll-free numbers, Microsoft recommends setting up Communications Credits for your Calling Plans and Audio Conferencing.
Overview: Teams rollout
- From Skype (and Slack) to Teams
- Gain stakeholder purchase
- Employ a phased deployment
- Engage end users
Skype for Business is being retired; Microsoft offers a range of transitions to Teams.
Combine the best transition mode with Info-Tech’s adoption best practices to successfully onboard and socialize Teams.
From Skype to Teams
Skype for Business Online will be retired on July 31, 2021. Choose from the options below to see which transition mode is right for your organization.
Skype for Business On-Premises will be retired in 2024. To upgrade to Teams, first configure hybrid connectivity to Skype for Business Online.
Islands mode (default)
- Skype for Business and Teams coexist while Teams is rolled out.
- Recommended for phased rollouts or when Teams is ready to use for chat, calling, and meetings.
- Interoperability is limited. Teams and Skype for Business only transfer information if an internal Teams user sends communications to an external Skype for Business user.
Teams only mode (final)
- All capabilities are enabled in Teams and Skype for Business is disabled.
- Recommended when end users are ready to switch fully to Teams.
- End users may retain Skype for Business to join meetings with non-upgraded or external parties. However, this communication is only initiated from the Skype for Business external user.
Collaboration first mode
- Skype for Business and Teams coexist, but only Teams’ collaboration capabilities are enabled. Teams communications capabilities are turned off.
- Recommended to leverage Skype for Business communications yet utilize Teams for collaboration.
Meetings first mode
- Skype for Business and Teams coexist, but only Teams’ meetings capabilities are enabled.
- Recommended for organizations that want to leverage their Skype for Business On-Premises’ Enterprise Voice capability but want to benefit from Teams’ meetings through VoIP.
From Slack to Teams
The more that’s left behind in Slack, the easier the transition. As a prerequisite, pull together the following information:
- Usage statistics of Slack workspaces and channels
- What apps end users utilize in Slack
- What message history you want to export
- A list of users whose Slack accounts can map on to required Microsoft accounts
Test content migration
Your Slack service plan will determine what you can and can’t migrate. By default, public channels content can be exported. However, private channels may not be exportable, and a third-party app is needed to migrate Direct Messages.
Files migration
Once you have set up your teams and channels in Teams, you can programmatically copy files from Slack into the target Teams channel.
Apps migration
Once you have a list of apps and their configurations used in Slack’s workspaces, you can search in Teams’ app store to see if they’re available for Teams.
User identity migration
Slack user identities may not map onto a Microsoft account. This will cause migration issues, such as problems with exporting text content posted by that user.
| Follow the migration steps to the right.
Importantly, determine which Slack workspaces and channels should become teams and channels within Teams. Usage statistics from Slack can help pinpoint which workspaces and channels are redundant. This will help IT paint an ordered first picture for new Teams end users. |
|
Info-Tech Best Practice
Avoid data-handling violations. Determine what privacy and compliance regulations (if any) apply to the handling, storage, and processing of data during this migration.
Gain stakeholder purchase
Change management is a challenging aspect of implementing a new collaboration tool. Creating a communication and adoption plan is crucial to achieving universal buy-in for Teams.
To start, define SMART objectives and create a goals cascade.
| Specific | Measurable | Actionable | Realistic | Time Bound |
| Make sure the objective is clear and detailed. | Objectives are `measurable` if there are specific metrics assigned to measure success. Metrics should be objective. | Objectives become actionable when specific initiatives designed to achieve the objective are identified. | Objectives must be achievable given your current resources or known available resources. | An objective without a timeline can be put off indefinitely. Furthermore, measuring success is challenging without a timeline. |
| Who, what, where, why? | How will you measure the extent to which the goal is met? | What is the action-oriented verb? | Is this within my capabilities? | By when: deadline, frequency? |
Sample list of stakeholder-specific benefits from improving collaboration
| Stakeholder | Driver | Benefits |
| Senior Leadership | Resource optimization | Increased transparency into IT operational costs. Better ability to forecast hardware, resourcing costs. |
| All employees | Increasing productivity | Apps deployed faster. Issues fixed faster. Easier access to files. Able to work more easily offsite. |
| LBU-HR, legal, finance | Mitigating risk | Better able to verify compliance with external regulations. Better understanding of IT risks. |
| Service desk | Resource optimization | Able to resolve issues faster. Fewer issues stemming from updates. |
| Tier 2 | Increasing productivity | Less time spent on routine maintenance. |
Use these activities to define what pain points stakeholders face and how Teams can directly mitigate those pain points.
(Source: Rationalize Your Collaboration Tools (coming soon), Activities: 3.1C – 3.1D)Employ a phased deployment
Info-Tech Best Practice
Deploy Teams over a series of phases. As such, if you are already using Skype for Business, choose one of the coexistence phases to start.
- Identify and pilot Teams with early adopters that will become your champions. These champions should be formally trained, be encouraged to help and train their colleagues, and be positively reinforced for their efforts.
- Iron out bugs identified with the pilot group and train middle management. Enterprise collaboration tool adoption is strongly correlated with leadership adoption.
- Top-level management
Control and direct overall organization. - Middle management
Execute top-level management’s plans in accordance with organization’s norms. - First-level management
Execute day-to-day activities.
- Top-level management
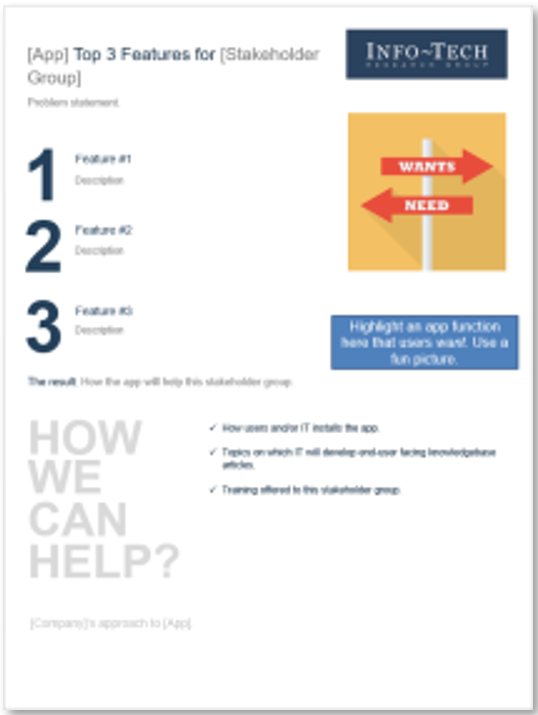
- Use Info-Tech’s one-pager marketing template to advertise the new tool to stakeholders. Highlight how the new tool addresses specific pain points. Address questions stemming from fear and uncertainty to avoid employees’ embarrassment or their rejection of the tool.
- Extend the pilot to other departments and continue this process for the whole organization.
(Source: Rationalize Your Collaboration Tools (coming soon), Tools:GANTT Chart and Marketing Materials, Activities: 3.2A – 3.2B)
Info-Tech Insight
Be in control of setting and maintaining expectations. Aligning expectations with reality and the needs of employees will lower onboarding resistance.
Engage end users
Short-term best practices
Launch day:
- Hold a “lunch and learn” targeted training session to walk end users through common use cases.
- Open a booth or virtual session (through Teams!) and have tool representatives available to answer questions.
- Create a game to get users exploring the new tool – from scavenger hunts to bingo.
Launch week:
- Offer incentives for using the tool and helping others, including small gift cards.
- Publicize achievements if departments hit adoption milestones.
Long-term best practices
- Make available additional training past launch week. End users should keep learning new features to improve familiarity.
- Distribute frequent training clips, slowly exposing end users to more complex ways of utilizing Teams.
- Continue to positively reinforce and recognize those who use Teams well. This could be celebrating those that help others use the tool, how active certain users are, and attendance at learning events.
Info-Tech Best Practice
Microsoft has a range of training support that can be utilized. From instructor-led training to “Coffee in the Cloud” sessions, leverage all the support you can.
Use case #1: Retain and search data for legal/regulatory compliance
Scenario:
Your organization requires you to retain data and documents for a certain period of time; however, after this period, your organization wishes to delete or archive the data instead of maintaining it indefinitely. Within the timeframe of the retention policy, the admin may be asked to retrieve information that has been requested through a legal channel.
Purpose:
- Maintain compliance with the legal and regulatory standards to which the organization is subject.
Jobs:
- Ensure the data is retained for the approved time period.
- Ensure the policy applies to all relevant data and users.
Solution: Retention Policies
- Ensure that your organization has an Office 365 E3 or higher license.
- Set the desired retention policy through the Security & Compliance Center or PowerShell by deciding which teams, channels, chats, and users the policies will apply to and what will happen once the retention period ends.
- Ensure that matching retention policies are applied to SharePoint and OneDrive, since this is where files shared in Teams are stored.
- Be aware that Teams retention policies cannot be applied to messages in private channels.
Solution: e-Discovery
- If legally necessary, place users or Teams on legal hold in order to retain data that would be otherwise deleted by your organization’s retention policies.
- Perform e-discovery on Teams messages, files, and summaries of meetings and calls through the Security & Compliance Center.
- See Microsoft’s chart on the next slide for what is e-discoverable.
Content subject to e-discovery
| Content type | eDiscoverable | Notes |
| Teams chat messages | Yes | Chat messages from chats where guest users are the only participants in a 1:1 or 1:N chat are not e-discoverable. |
| Audio recordings | No | |
| Private channel messages | Yes | |
| Emojis, GIFs, stickers | Yes | |
| Code snippets | No | |
| Chat links | Yes | |
| Reactions (likes, hearts, etc) | No | |
| Edited messages | Yes | If the user is on hold, previous versions of edited messages are preserved. |
| Inline images | Yes | |
| Tables | Yes | |
| Subject | Yes | |
| Quotes | Yes | Quoted content is searchable. However, search results don’t indicate that the content was quoted. |
| Name of channel | No |
E-discovery does not capture audio messages and read receipts in MS Teams.
Since files shared in private channels are stored separately from the rest of a team, follow Microsoft’s directions for how to include private channels in e-discovery. (Source: “Conduct an eDiscovery investigation of content in Microsoft Teams,” Microsoft, 2020.)
Use case #2: Add external person to a team
Scenario:
A team in your organization needs to work in an ongoing way with someone external to the company. This user needs access to the relevant team’s work environment, but they should not be privy to the goings-on in the other parts of the organization.
Jobs:
This external person needs to be able to:
- Attend meetings
- Join calls
- Chat with individual team members
- View and collaborate on the team’s files
Solution:
- If necessary, set a data loss prevention policy to prevent your users from sharing certain types of information or files with external users present in your organization’s Teams chats and public channels.
- Ensure that your Microsoft license includes DLP protection. However:
- DLP cannot be applied to private channel messages.
- DLP cannot block messages from external Skype for Business users nor external users who are not in “Teams only” mode.
- Ensure that you have a team set up for the project that you wish the external user to join. The external user will be able to see all the channels in this team, unless you create a private channel they are restricted from.
- Complete Microsoft’s “Guest Access Checklist” to enable guest access in Teams, if it isn’t already enabled.
- As admin, give the external user guest access through the Teams admin center or Azure AD B2B collaboration. (If given permission, team owners can also add guests through the Teams client).
- Decide whether to set a policy to monitor and audit external user activity.
Use case #3: Delete/archive a team
Scenario:
In order to avoid teams sprawl, organizations may want IT to periodically delete or archive unused teams within the Teams client in order to improve the user interface.
Alternately, if you are using a project-based approach to organizing Teams, you may wish to formalize a process to archive a team once the project is complete.
Delete:
- Determine if the team owner anticipates the team will need to be restored one day.
- Ensure that deletion does not contradict the organization’s retention policy.
- If not, proceed with deletion. Find the team in the Teams admin center and delete.
- Restore a deleted team within 30 days of its initial deletion through PowerShell.
Archive:
- Determine if the team owner anticipates the team will need to be restored one day.
- Find the relevant team in the Teams admin center and change its status to “Archived.”
- Restore the archived team if the workspace becomes relevant once again.
Info-Tech Best Practice
Remind end users that they can hide teams or channels they do not wish to see in their Teams interface. Knowing a team can be hidden may impact a team owner’s decision to delete it.
Section 2: Teams for End Users
Best practices for utilizing teams, channels, chat, meetings, and live events
| Section 1 Teams for IT |
Section 2 Teams for end users |
From Teams how-tos to common use cases for end users.
End user basics
- Teams, channels, and chat
- Meetings and live events
Common use cases: Workspaces
- WS#1: Departments
- WS#2: A cross-functional committee
- WS#3: An innovation day event
- WS#4: A non-work-related social event
- WS#5: A project team with a defined end time
Common use cases: Meetings
- M#1: Job interview with an external candidate
- M#2: Quarterly board meeting
- M#3: Weekly recurring team meeting
- M#4: Morning stand-up/scrum
- M#5: Phone call between two people
Overview: Teams, channels, and chat
Teams
- Team: A workspace for a group of collaborative individuals.
- Public channel: A focused area where all members of a team can meet, communicate, and share ideas and content.
- Private channel: Like a public channel but restricted to a subset of team members, defined by channel owner.
Chat
- Chat: Two or more users collected into a common conversation thread.
For any Microsoft Teams newcomer, the differences between teams, channels, and chat can be confusing.
Use Microsoft’s figure (left) to see how these three mediums differ in their role and function.
Best practices: Workspaces 1/2
| Team A workspace for a group of collaborative individuals. |
Public Channel A focused area where all members of a team can meet, communicate, and share ideas and content. |
Private Channel Like a public channel but restricted to a subset of team members, defined by channel owner. |
Group Chat Two or more users collected into a common conversation thread. |
|
| Limits and Administrative Control | ||||
| Who can create? | Default setting: All users in an organization can create a team
Maximum 500,000 teams per tenant |
Any member of a team can create a public channel within the team
Maximum 200 public channels per team |
Any member of a team can create a private channel and define its members
Maximum 30 private channels per team |
Anyone |
| Who can add members? | Team owner(s); max 5,000 members per team | N/A | Channel owner(s) can add up to 250 members | Anyone can bring new members into the chat (and decide if they can see the previous history) up to 100 members |
| Who can delete? | Team owner/admin can delete | Any team member | Channel owner(s) | Anyone can leave a chat but cannot delete chat, but they are never effectively deleted |
| Social Context | ||||
| Who can see it? | Public teams are indexed and searchable
Private teams are not indexed and are visible only to joined members |
All members of the team can see all public channels. Channels may be hidden from view for the purposes of cleaning up the UI. | Individuals will only see private channels for which they have membership | Only participants in the group chat can see the group chat |
| Who can see the content? | Team members can see any content that is not otherwise part of a private channel | All team members | All members of the private channel | Only members of the group chat |
When does a Group Chat become a Channel?
- When it’s appropriate for the conversation to have a gallery – an audience of members who may not be actively participating in the discussion.
- When control over who joins the conversation needs to be centrally governed and not left up to anyone in the discussion.
- When the discussion will persist over a longer time period.
- When the number of participants approaches 100.
When does a Channel become a Team?
- When a team approaches 30 private channels, many of those private channels are likely candidates to become their own team.
- When the channel membership needs to extend beyond the boundary of the team membership.
Best practices: Workspaces 2/2
| Team A workspace for a group of collaborative individuals. |
Public Channel A focused area where all members of a team can meet, communicate, and share ideas and content. |
Private Channel Like a public channel but restricted to a subset of team members, defined by channel owner. |
Group Chat Two or more users collected into a common conversation thread. |
|
| Data and Applications | ||||
| Where does the content live? | SharePoint: Every team resides in its own SharePoint site | SharePoint: Each team (public and private) has its own folder off the root of the SharePoint site’s repository | SharePoint: Each team (public and private) has its own folder off the root of the SharePoint site’s repository | OneDrive: Files that are shared in a chat are stored in the OneDrive folder of the original poster and shared to the other members |
| How does the data persist or be retained? | If a team expires/is deleted, its corresponding SharePoint site and those artifacts are also deleted | Available for 21 days after deletion. Any member of the team can delete a public channel. | The team owner and private channel owner can delete/restore a private channel | Chats are never effectively deleted. They can be hidden to clean up the user interface. |
| Video | N/A | Yes, select “Meet now” in channel below text entry box | Yes, select “Meet now” in channel below text entry box | Yes |
| Phone calls | N/A | Yes, select “Meet now” in channel below text entry box | Yes, select “Meet now” in channel below text entry box | Yes |
| Shared computer audio/screen | N/A | Yes, select “Meet now” in channel below text entry box | Yes, select “Meet now” in channel below text entry box | Yes |
| File-sharing | Within channels | Yes. Frequently used/collaborated files can be turned into discrete tab. | Yes. Frequently used/collaborated files can be turned into discrete tab. | Yes |
| Wikis | Within channels | Yes | Yes | No |
| Whiteboarding | No | No | No | No |
When does a Team become a Channel?
- When a team’s purpose for existing can logically be subsumed by another team that has a larger scope.
When does a Channel become a Group Chat?
- When a conversation within a channel between select users does not pertain to that channel’s scope (or any other existing channel), they should move the conversation to a group chat.
- However, this is until that group chat desires to form a channel of its own.
Create a new team
Team owner: The person who creates the team. It is possible for the team owner to then invite other members of the team to become co-owners to distribute administrative responsibilities.
Team members: People who have accepted their invitation to be a part of the team.
NB: Your organization can control who has permission to set up a team. If you can’t set a up a team, contact your IT department.
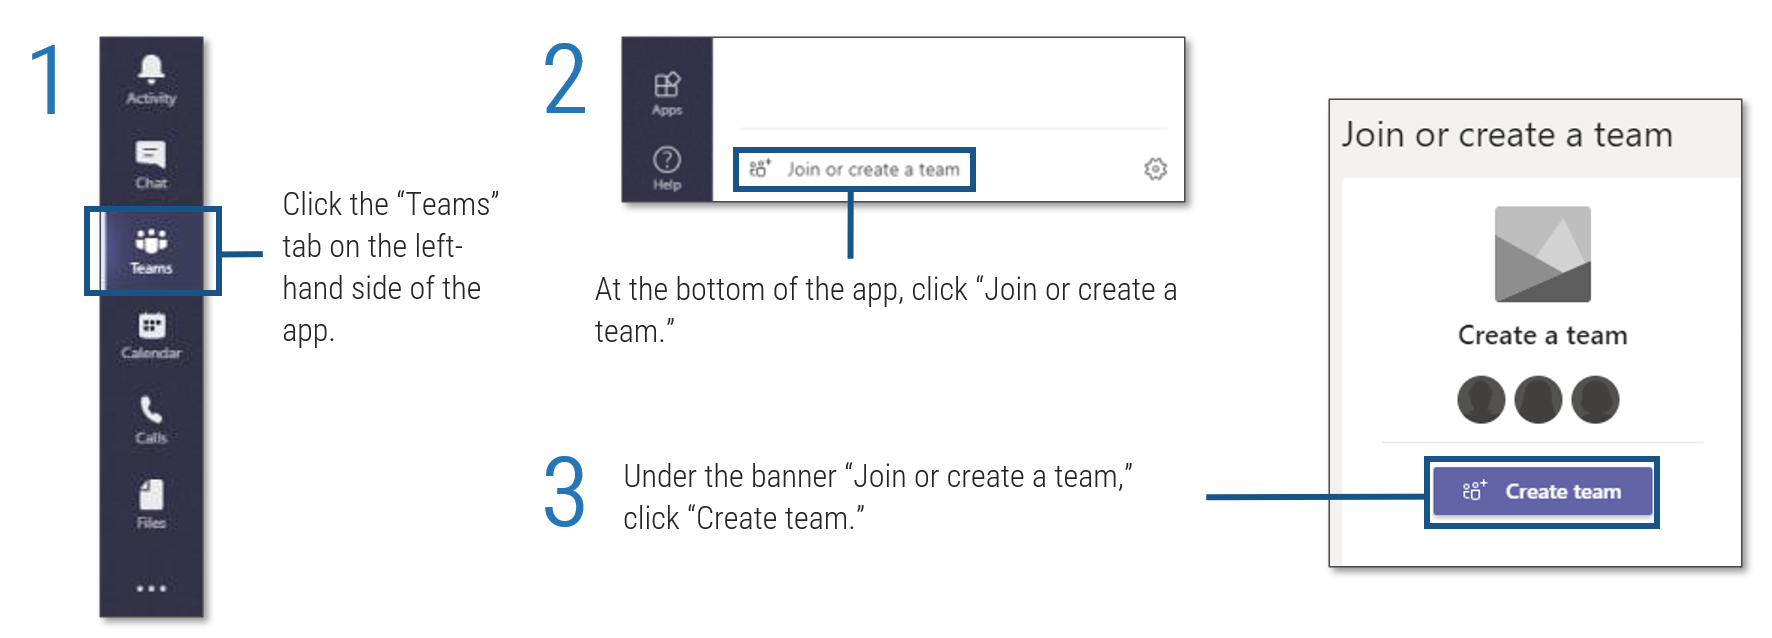 tab on the left-hand side of the app'. Step 2: 'At the bottom of the app, click
 Create a new team
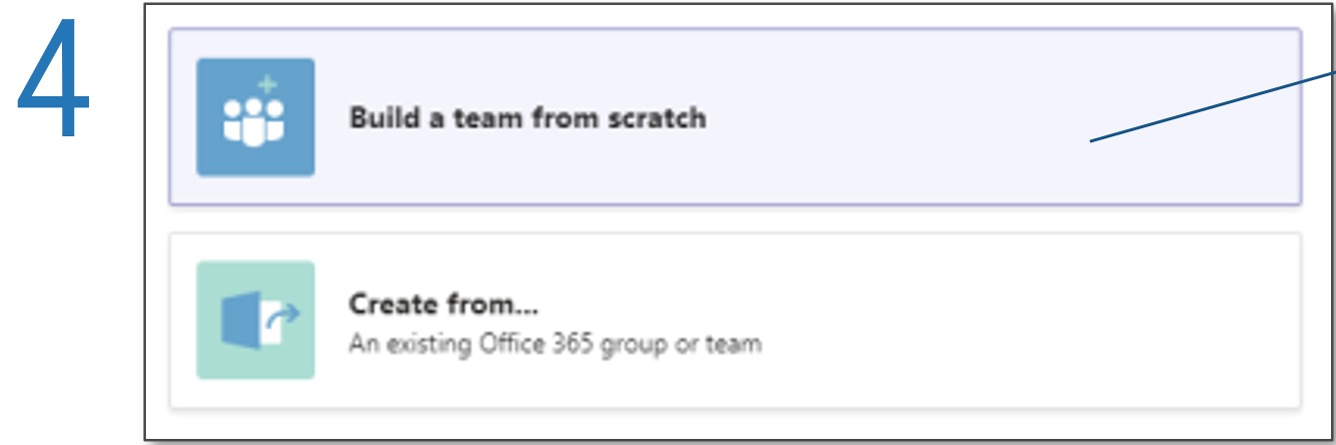
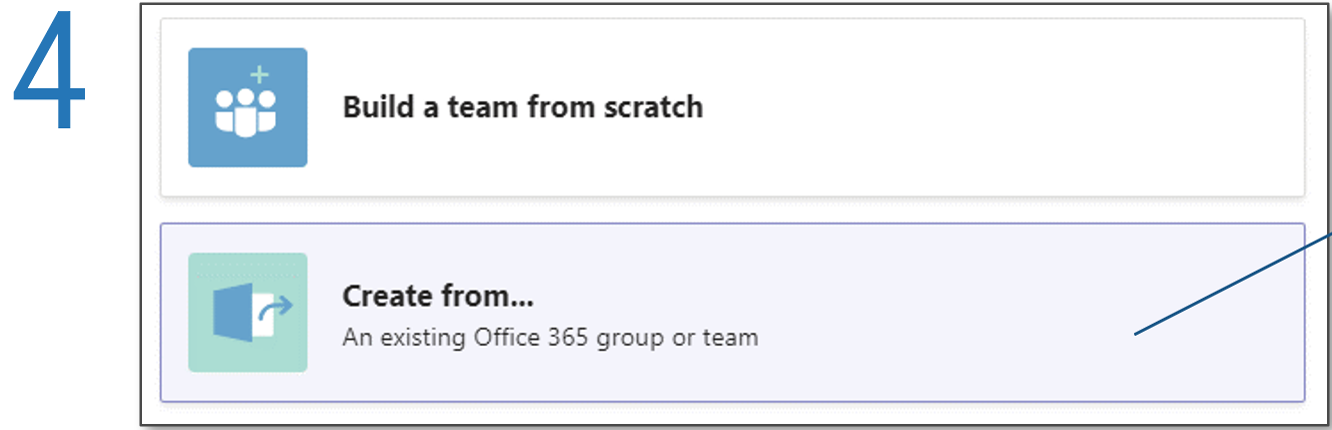
Decide from these two options:
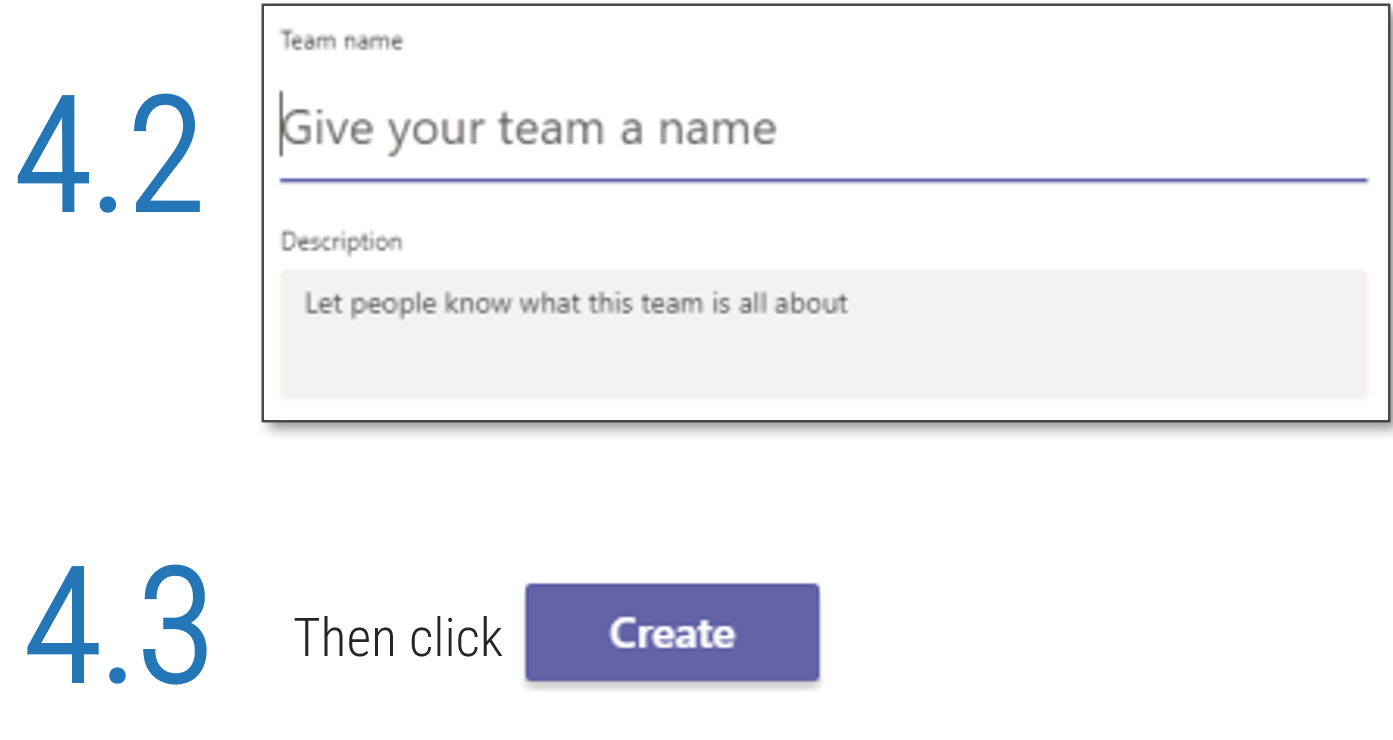
- Building a team from scratch, which will create a new group with no prior history imported (steps 4.1–4.3).
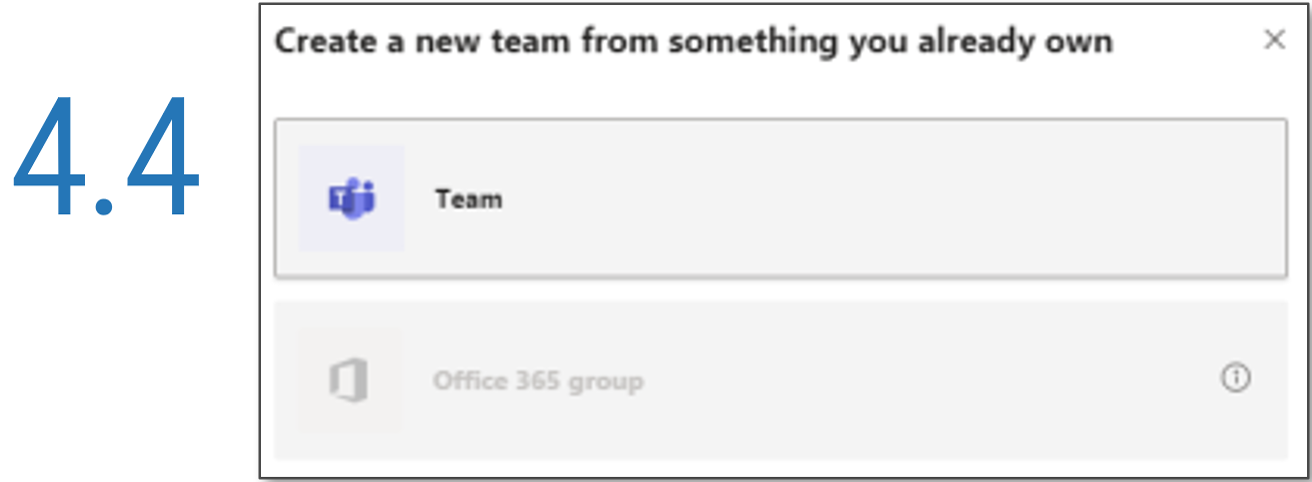
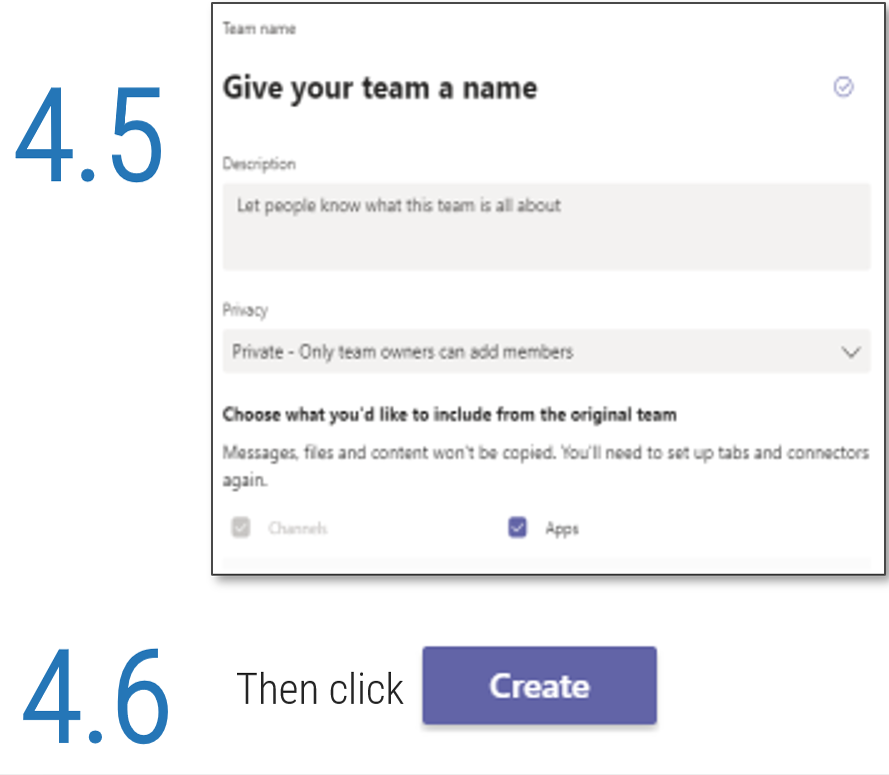
- Creating a team from an existing group in Office 365, including an already existing team (steps 4.4–4.6).
NB: You cannot create a team from an existing group if:
- That group has 5,000 members or more.
- That group is in Yammer.
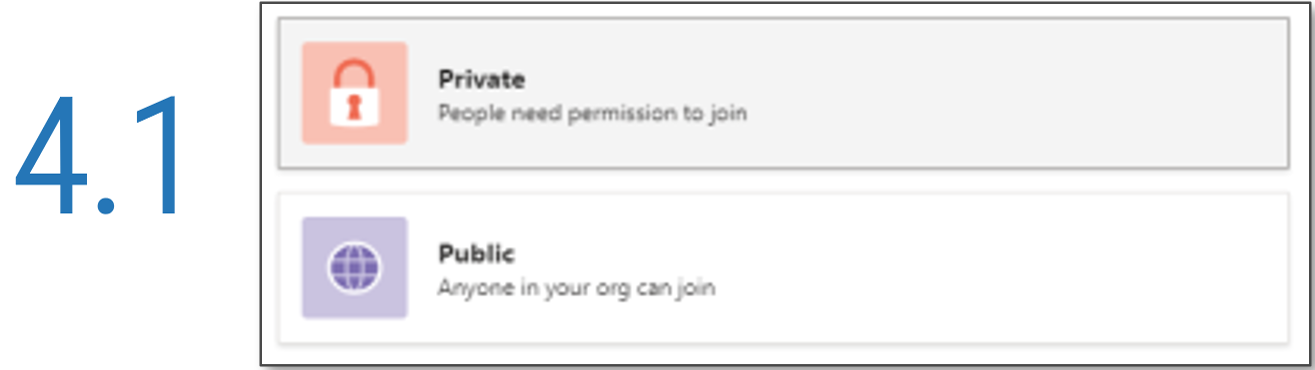
Decide if you want you new team from scratch to be private or public. If you set up a private team, any internal or external user you invite into the team will have access to all team history and files shared.
 '.">
'.">
Create a new team
Decide from these two options:
- Building a team from scratch, which will create a new group with no prior history imported (steps 4.1–4.3).
- Creating a team from an existing group in Office 365, including an already existing team (steps 4.4–4.6).
NB: You cannot create a team from an existing group if:
- That group has 5,000 members or more.
- That group is in Yammer.
Configure your new team settings, including privacy, apps, tabs, and members.
 '.">
'.">
Add team members |
Remove team members |
||
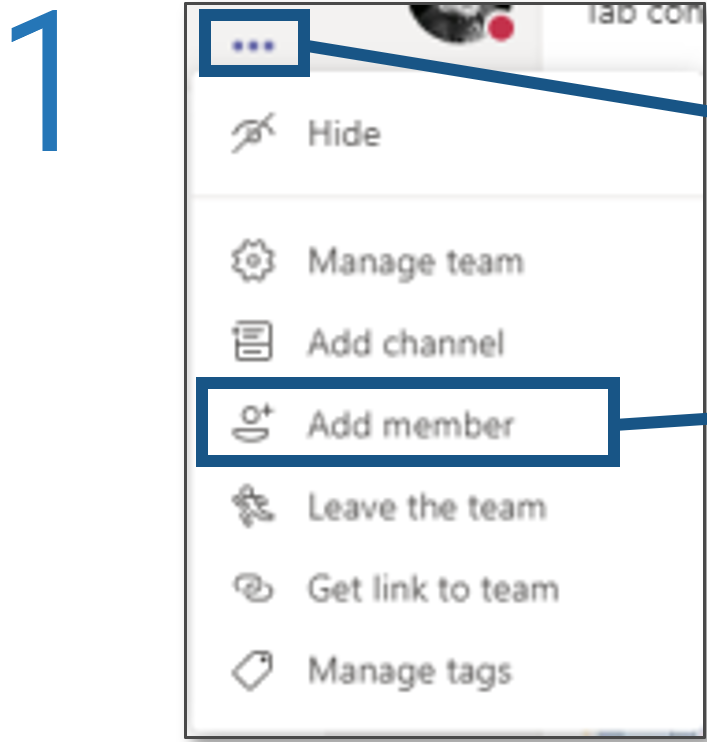 |
To add a team member, on the right-hand side of the team name, click “More options.” Then, from the drop-down menu, click “Add member.” |
 |
Only team owners can remove a team member. To do so, on the right-hand side of the team name, click “More options.” Then, from the drop-down menu, click “Manage team.” |

If you’re a team owner, you can then type a name or an email address to add another member to the team. If you’re a team member, typing a name or an email address will send a request to the team owner to consider adding the member. |
 Under the “Members” tab, you’ll see a list of the members in the team. Click the “X” at the far right of the member’s name to remove them. Team owners can only be removed if they change their role to team member first. |
||
Create a new channel
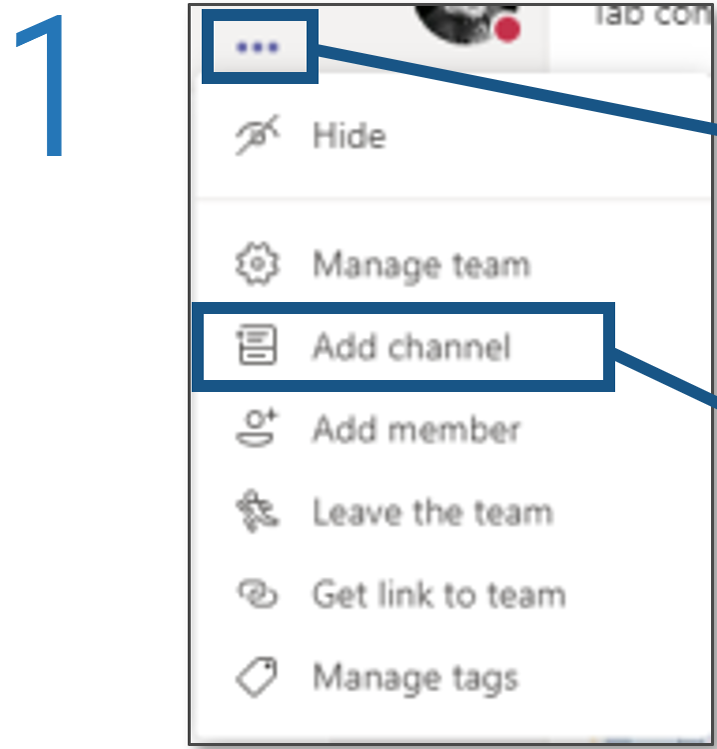 |
On the right-hand side of the team name, click “More options.” Then, from the drop-down menu, click “Add channel.” |
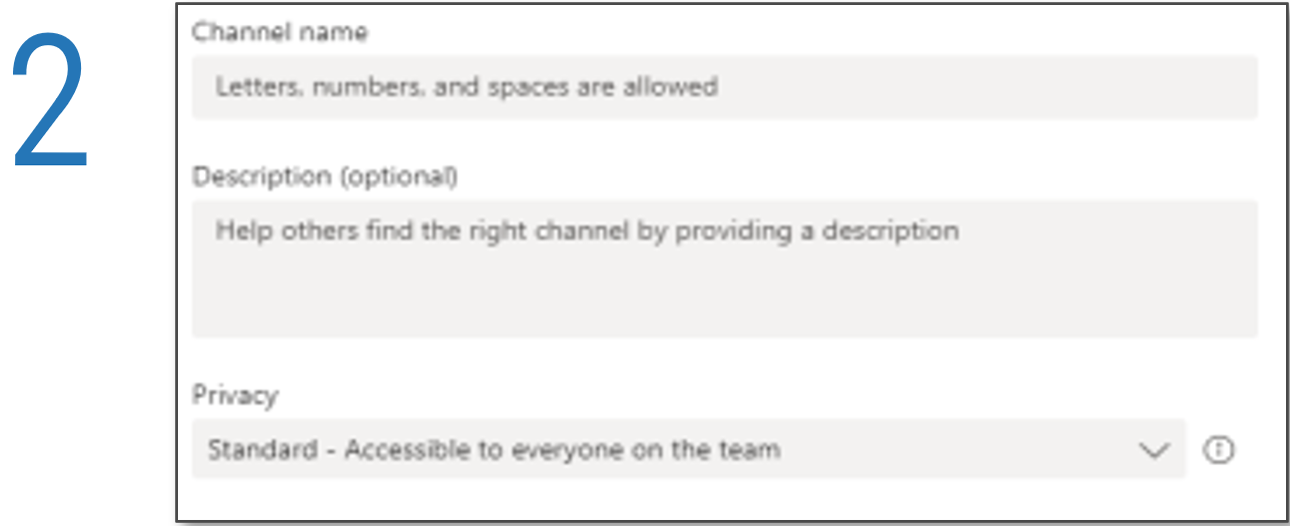
Name your channel, give a description, and set your channel’s privacy. |
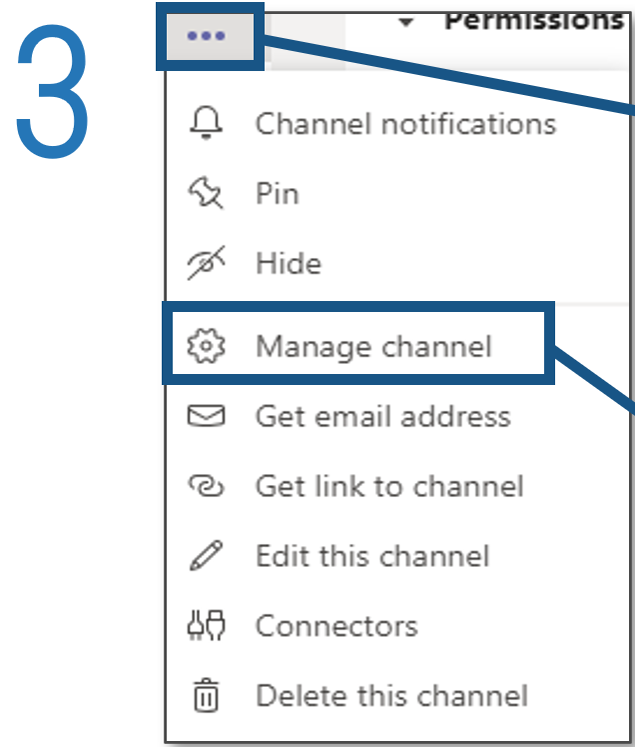 |
To manage subsequent permissions, on the right-hand side of the channel name, click “More options.” Then, from the drop-down menu, click “Manage channel.” |
Adding and removing members from channels:Only members in a team can see that team’s channels. Setting channel privacy as “standard” means that the channel can be accessed by anyone in a team. Unless privacy settings for a channel are set as “private” (from which the channel creator can choose who can be in that channel), there is no current way to remove members from channels. It will be up to the end user to decide which channels they want to hide. |
Link team/channel to SharePoint folder
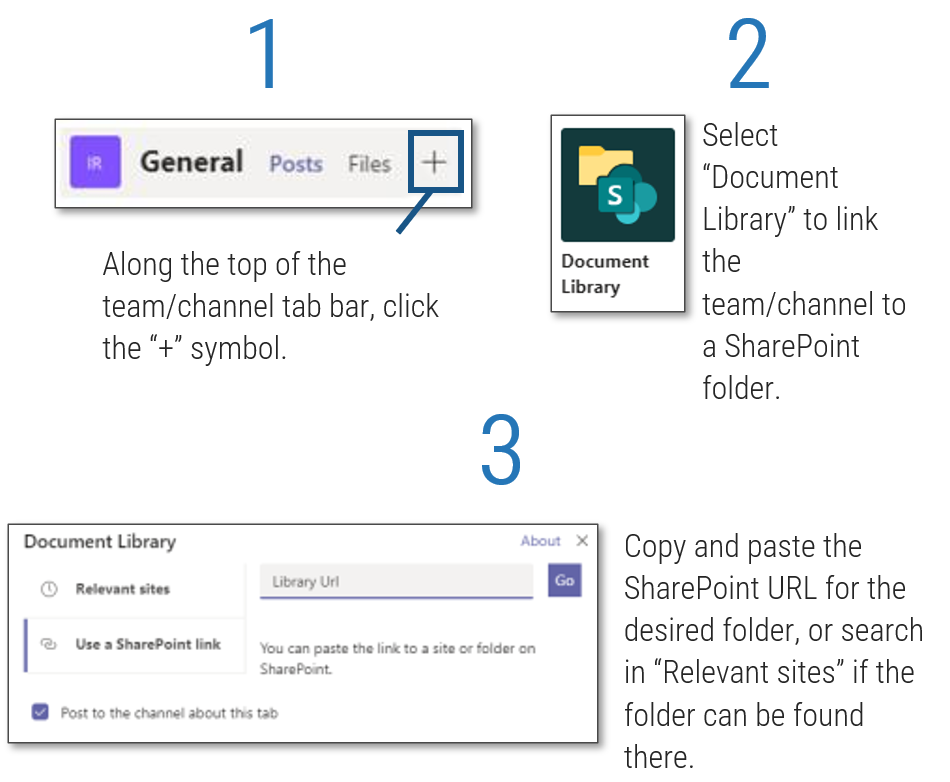 |
Need to find the SharePoint URL?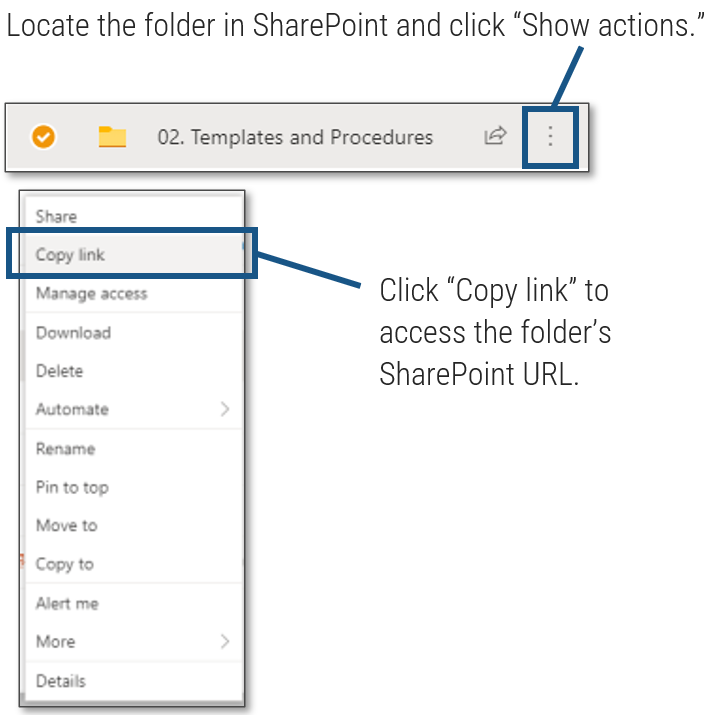 ', 'Click ', 'Click |
Hide/unhide teams |
Hide/unhide channels |
||
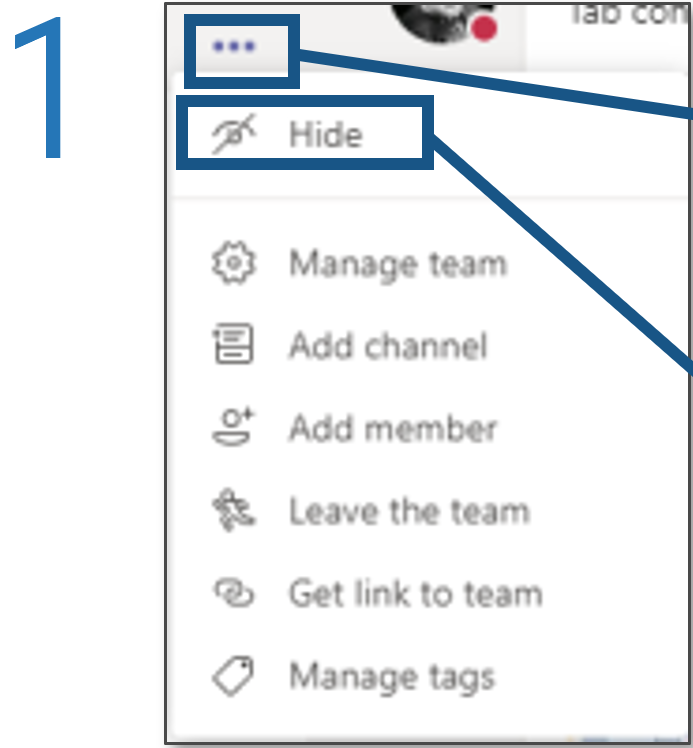 |
To hide a team, on the right-hand side of the team name, click “More options.” Then, from the drop-down menu, click “Hide.” Hidden teams are moved to the “hidden teams” menu at the bottom of your team list. |
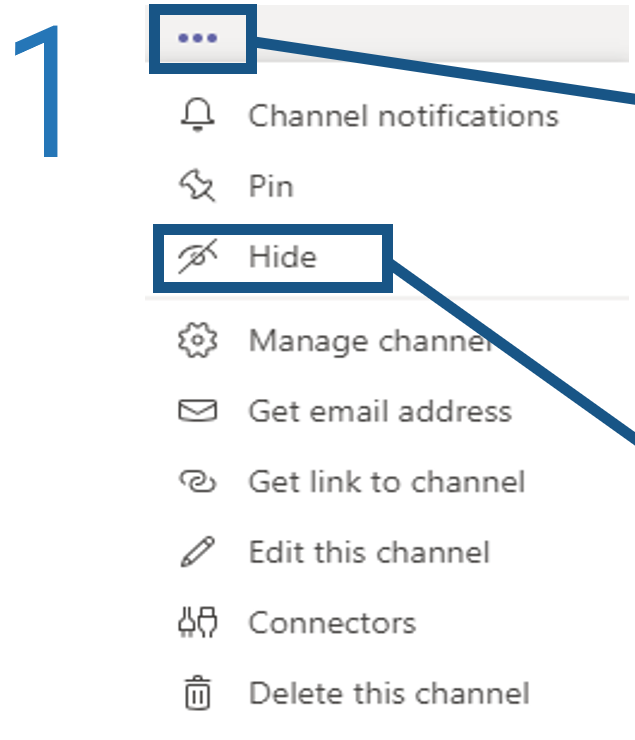 |
To hide a channel, on the right-hand side of the channel name, click “More options.” Then, from the drop-down menu, click “Hide.” Hidden channels are moved to the “hidden channels” menu at the bottom of your channel list in that team. |
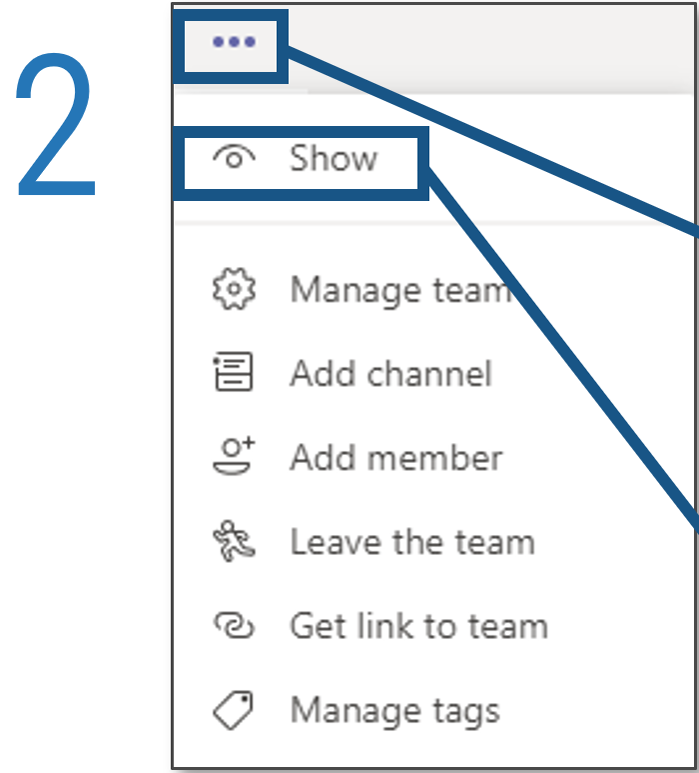 |

To unhide a team, click on the “hidden teams” menu. On the right-hand side of the team name, click “More options.” Then, from the drop-down menu, click “Show.” |
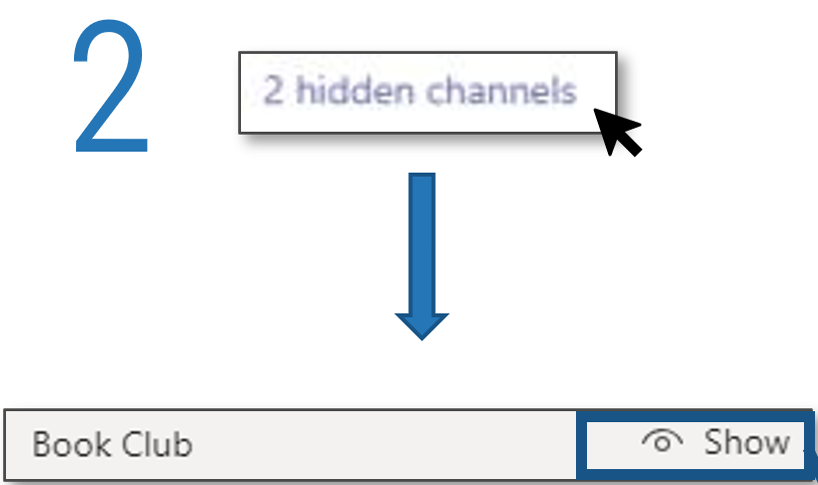 |
To unhide a channel, click on the “hidden channels” menu at the bottom of the team. This will produce a drop-down menu of all hidden channels in that team. Hover over the channel you want to unhide and click “Show.” |
Find/join teams |
Leave teams |
||||
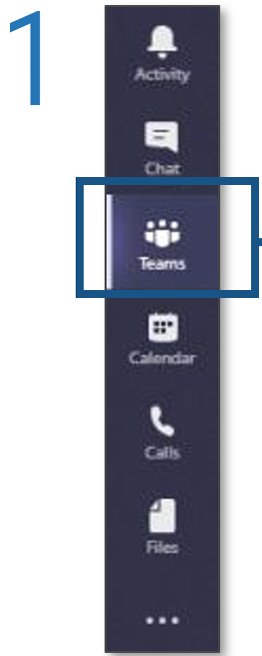 |
Click the “Teams” tab on the left-hand side of the app. | 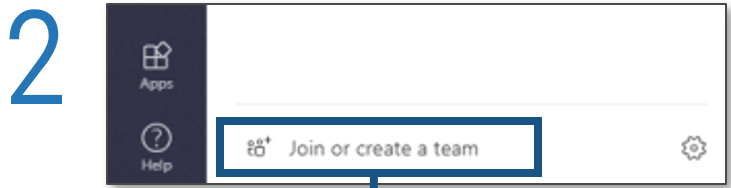 At the bottom of the app, click “Join or create a team.” Teams will then suggest a range of teams that you might be looking for. You can join public teams immediately. You will have to request approval to join a private team. |
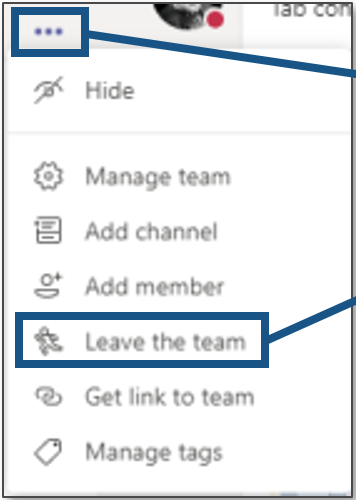 |
To leave a team, on the right-hand side of the team name, click “More options.” Then, from the drop-down menu, click “Leave the team.” |
|
| NB: If the owner of a private team has switched off discoverability, you will have to contact that owner to join that team. | 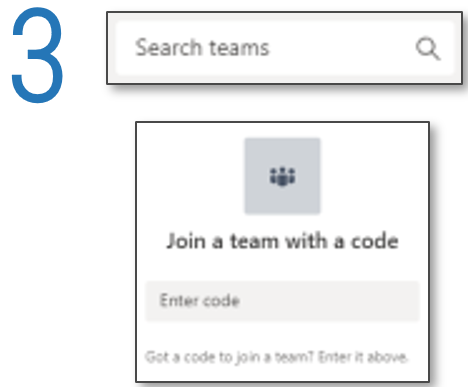 |
If you can’t immediately see the team, you have two options: either search for the team or enter that team’s code under the banner “Join a team with a code.” | Can I find a channel?
No. To join a channel, you need to first join the team that channel belongs to. Can I leave a channel?No. The most you can do is hide the channel. By default, if you join a team you will have access to all the channels within that team (unless a channel is private, in which case you’ll have to request access to that channel). |
||
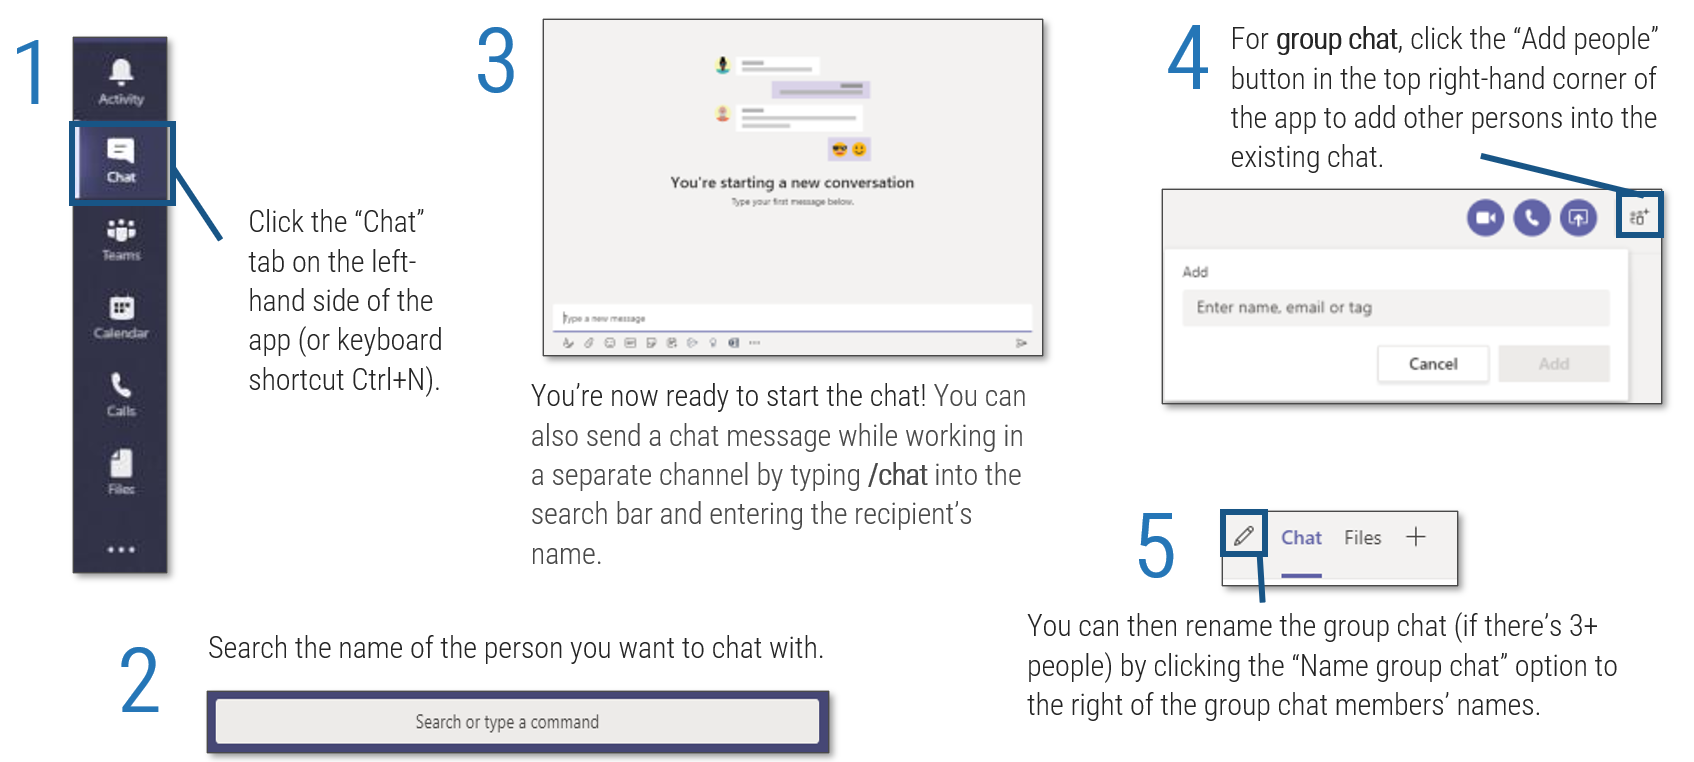
Create a chat
Hide a chat |
Unhide a chat |
|
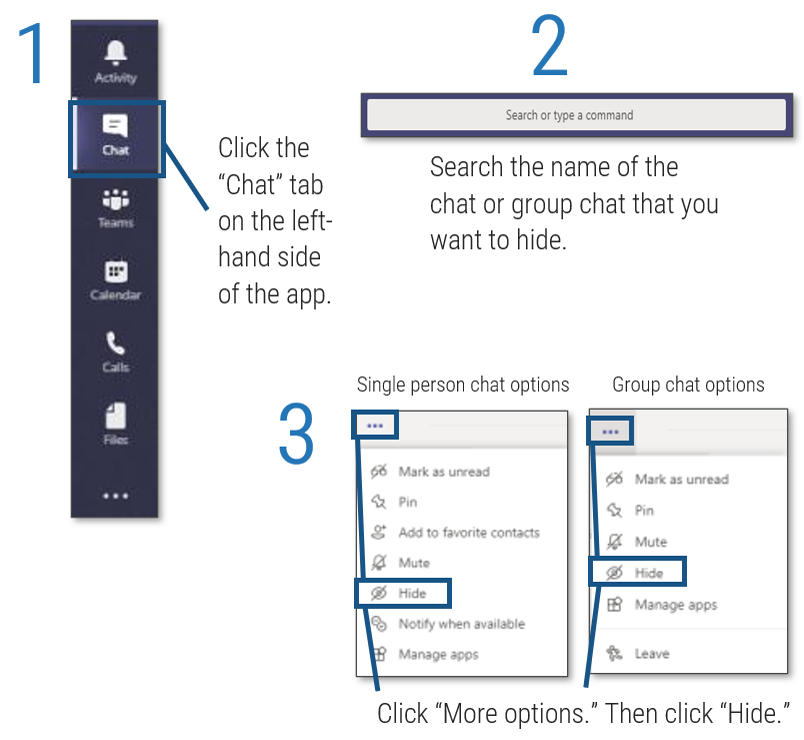 |
To unhide a chat, search for the hidden person or name of the group chat in the search bar. Click “More options.” Then click “Unhide.” | 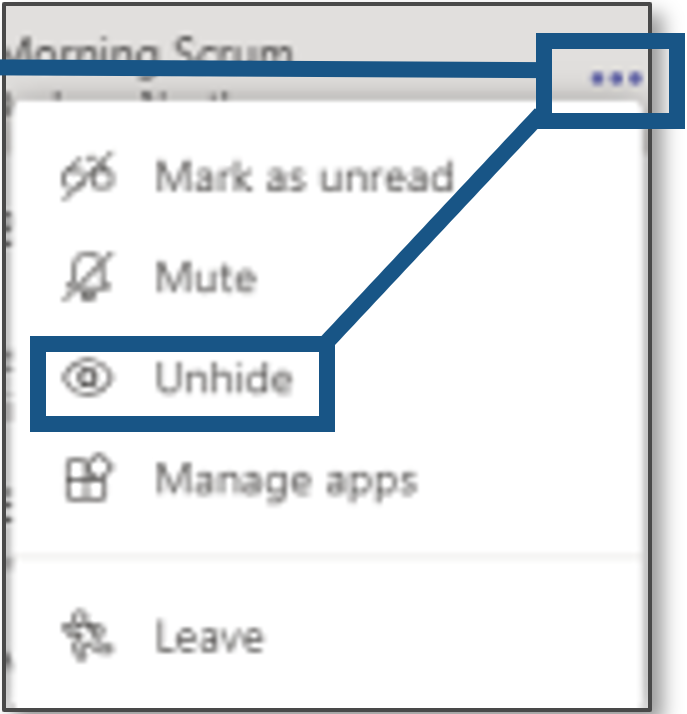 |
Leave a chat |
||
| You can only leave group chats. To do so, click “More options.” Then click “Leave.” | 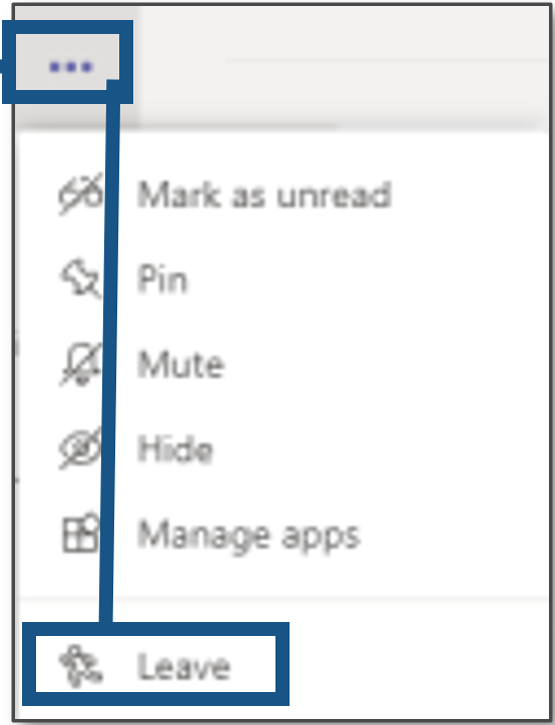 |
|
Overview: Meetings and live events
Teams Meetings: Real-time communication and collaboration between a group, limited to 250 people.
Teams Live Events: designed for presentations and webinars to a large audience of up to 10,000 people, in which attendees watch rather than interact.
Office 365 and Microsoft 365 Licenses |
||||||
| I want to: | F1 | F3 | E1 | E3 | E5 | Audio conferencing add-on |
| Join a Teams meeting | No license required. Any email address can participate in a Teams meeting. | |||||
| Attend a Teams meeting with a dial-in phone number | No license required. Any phone number can dial into a Teams meeting. (Meeting organizers need to have an Audio Conferencing add-on license to send an invite that includes dial-in conferencing.) | |||||
| Attend a Teams live event | No license required. Any phone number can dial into a Teams live event. | |||||
| Create a Teams meeting for up to 250 attendees | One of these licensing plans | |||||
| Create a Teams meeting for up to 250 attendees with a dial-in phone number | One of these licensing plans + Audio Conferencing (Meeting organizers need to have an Audio Conferencing add-on license to send an invite that includes dial-in conferencing.) | |||||
| Create a Teams live event for up to 10,000 attendees | One of these licensing plans | |||||
| Dial out from a Teams meeting to add someone at their Call me at number | One of these licensing plans + Audio Conferencing (Meeting dial out to a Call me at number requires organizers to have an E5 or Audio Conference add-in license. A dial plan may also be needed.) | |||||
Depending on the use case, end users will have to determine whether they need to hold a meeting or a live event.
Use Microsoft’s table (left) to see what license your organization needs to perform meetings and live events.
(Source: “Admin quick start – Meetings and live events in Microsoft Teams,” Microsoft, 2020.)Best practices: Meetings
| Ad Hoc Call Direct audio/video call |
Scheduled Meeting | Live Event | |
| Limits and Administrative Control | |||
| Who can create? | Anyone | Anyone | Anyone, unless altered by admin (permission to create MS Stream events also required if external production tools are used). |
| Who can add members? | Anyone in the session. | The meeting organizer can add new attendees to the meeting. | The event creator (the “organizer”) sets attendee permissions and assigns event group roles (“producer” and “presenter”). |
| Can external stakeholders attend? | Yes, through email invite. However, collaboration tools are restricted. | Yes, through email invite. However, collaboration tools are restricted. | Public events: yes, through shared invite link.
Org-wide event: yes, if guest/external access granted. |
| Who can delete? | Anyone can leave the session. There is no artifact to delete. | The meeting organizer | Any attendee can leave the session.
The organizer can cancel the event. |
| Maximum attendees | 100 | 250 | 10,000 attendees and 10 active presenters/producers (250 presenters and producers can be present at the event). |
| Social Context | |||
| How does the request come in? | Unscheduled.
Notification of an incoming audio or video call. |
Scheduled.
Meeting invite, populated in the calendar, at a scheduled time. |
Meeting only auto-populated in event group’s calendars. Organizer must circulate event invite link to attendees – for instance, by pasting link into an Outlook meeting invite. |
| Available Functionality | |||
| Screen-sharing | Yes | Yes | Producers and Presenters (through Teams, no third-party app). |
| Whiteboard | No | Yes | Yes |
| OneNote (for minutes) | Yes (from a member’s OneDrive) | Yes, part of the meeting construct. | No. A Meeting Notes tab is available instead. |
| Dedicated chat space | Yes. Derived from a group chat. | Meeting has its own chat room. | The organizer can set up a moderated Q&A (not chat) when creating the event. Only Presenters and Producers can chat. |
| Recording | Yes | Yes | Yes. Event can last up to 4 hours. |
When should an Ad Hoc Call become a Scheduled Meeting?
- When the participants need time to prepare content for the call.
- When an answer is not required immediately.
- When bringing a group of people together requires logistical organizing.
When should a Scheduled Meeting become an Ad Hoc Call?
- When the participants can meet on short notice.
- When a topic under discussion requires creating alignment quickly.
When should a Live Event be created?
- When the expected attendance exceeds 250 people.
- If the event does not require collaboration and is mostly a presenter conveying information.
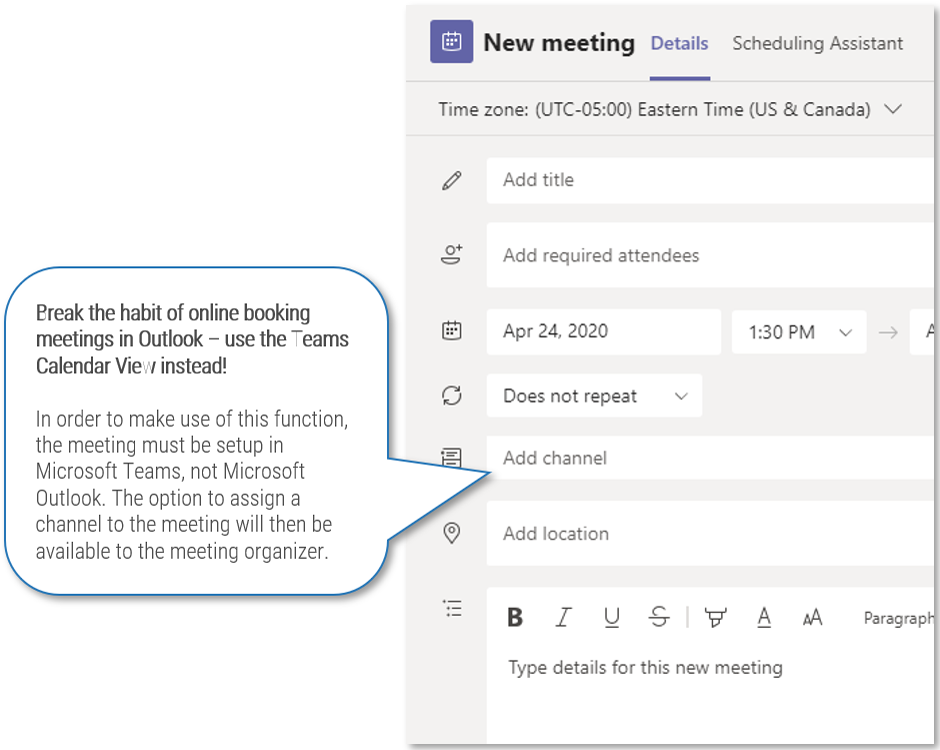
Create a scheduled meeting
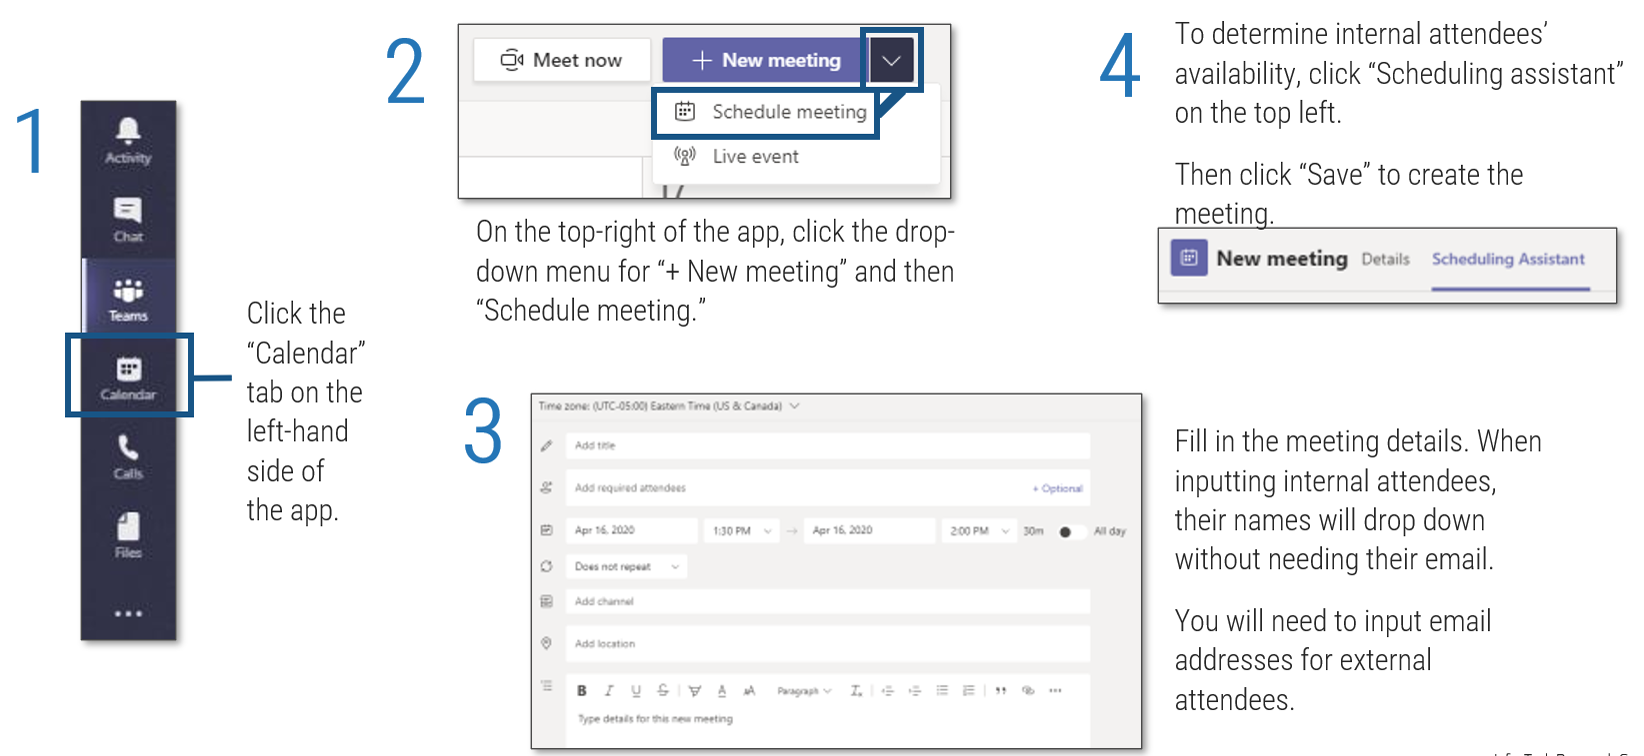
Create an ad hoc meeting
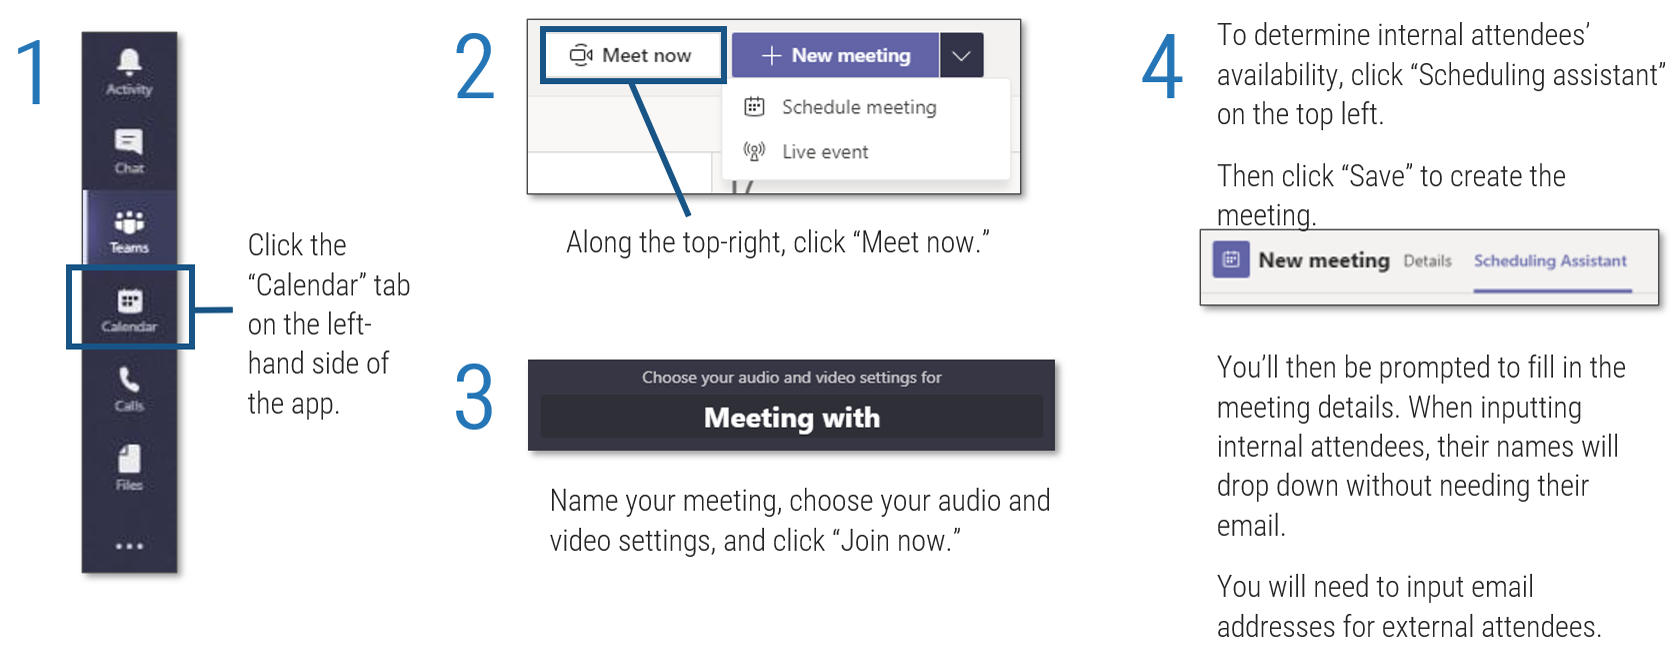
Tip: Use existing channels to host the chatrooms for your online meetings
When you host a meeting online with Microsoft Teams, there will always be a chatroom associated with the meeting. While this is a great place for meeting participants to interact, there is one particular downside.
Problem: The never-ending chat. Often the activity in these chatrooms can persist long after the meeting. The chatroom itself becomes, unofficially, a channel. When end users can’t keep up with the deluge of communication, the tools have failed them.
Solution: Adding an existing channel to the meeting. This ensures that discussion activity is already hosted in the appropriate venue for the group, during and after the meeting. Furthermore, it provides non-attendees with a means to catch up on the discussion they have missed.
In section two of this cookbook, we will often refer to this tactic.
Don’t have a channel for the chat session of your online meeting? Perhaps you should!
If your meeting is with a group of individuals that will be collaborating frequently, they may need a workspace that persists beyond the meeting.
Guests can still attend the meeting, but they can’t chat!
If there are attendees in your meeting that do not have access to the channel you select to host the chat, they will not see the chat discussion nor have any ability to use this function.
This may be appropriate in some cases – for example, a vendor providing a briefing as part of a regular team meeting.
However, if there are attendees outside the channel membership that need to see the meeting chat, consider another channel or simply default to not assigning one.
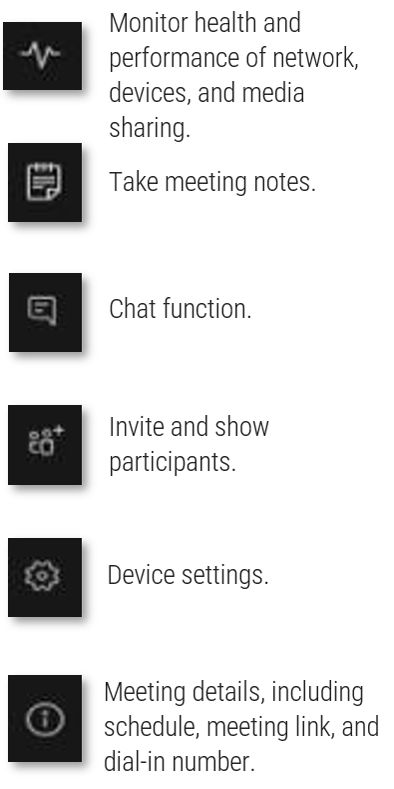
Meeting settings explained
Show device settings. For settings concerning audio, video, and whether viewing is private.
Show meeting notes. Use to take notes throughout the meeting. The notes will stay attached to this event.
Show meeting details. Find meeting information for: a dial-in number, conference ID, and link to join.
Enter full screen.
Show background effects. Choose from a range of video backgrounds to hide/blur your location.
Turn on the captions (preview). Turn on live speech-to-text captions.
Keypad. For dialing a number within the meeting (when enabled as an add-on with E3 or as part of E5).
Start recording. Recorded and saved using Microsoft Stream.
End meeting.
Turn off incoming video. To save network bandwidth, you can decline receiving attendee’s video.
Click “More options” to access the meetings settings.
Screen share. In the tool tray, select “Share” to share your screen. Select particular applications if you only want to share certain information; otherwise, you can share your whole desktop.
System audio share. To share your device’s audio while screen sharing, checkbox the “Include system audio” option upon clicking “Share.”
If you didn’t click that option at the start but now want to share audio during screen share, click the “Include systems audio” option in the tool tray along the top of the screen.
Give/take control of screen share. To give control, click “Give control” in the tool tray along the top of the screen when sharing content. Choose from the drop-down who you would like to give control to. In the same spot, click “Take back control” when required.
To request control, click “Request control” in the same space when viewing someone sharing their content. Click “Release control” once finished.
Start whiteboarding
- You’ll first need to enable Microsoft Whiteboard in the Microsoft 365 admin center. Ask your relevant admin to do so if Whiteboard is not already enabled.
- Once enabled, click “Share” in a meeting. This feature only appears if you have 3+ participants in the meeting.
- Under the “Whiteboard” section in the bottom right, click “Microsoft Whiteboard.”
- Click the pen icons to the right of the screen to begin sketching.
NB: Anonymous, federated, or guest users are currently not supported to start, view, or ink a whiteboard in a Teams meeting.
Will the whiteboard session be recorded if the meeting is being recorded?
No. However, the final whiteboard will be available to all meeting attendees after the meeting, under “Board Gallery” in the Microsoft Whiteboard app. Attendees can then continue to work on the whiteboard after the meeting has ended.
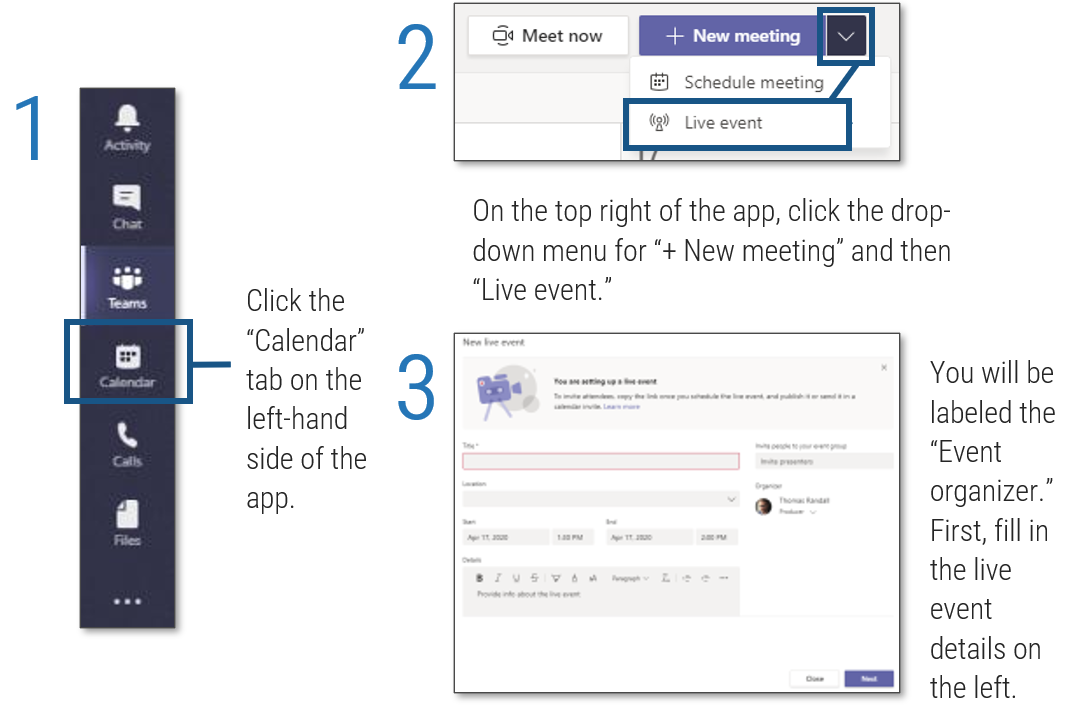
Create a live event
 |
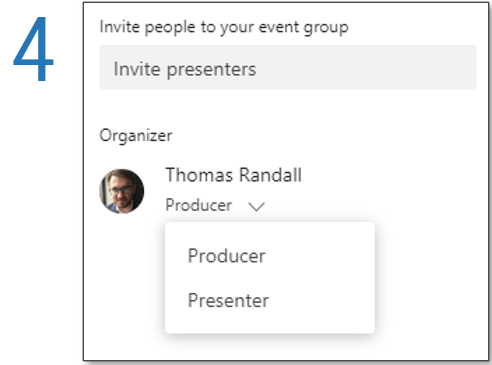
As the organizer, you can invite other people to the event who will be the “producers” or “presenters.” Producers: Control the live event stream, including being able to start and stop the event, share their own and others’ video, share desktop or window, and select layout. Presenters: Present audio, video, or a screen. |
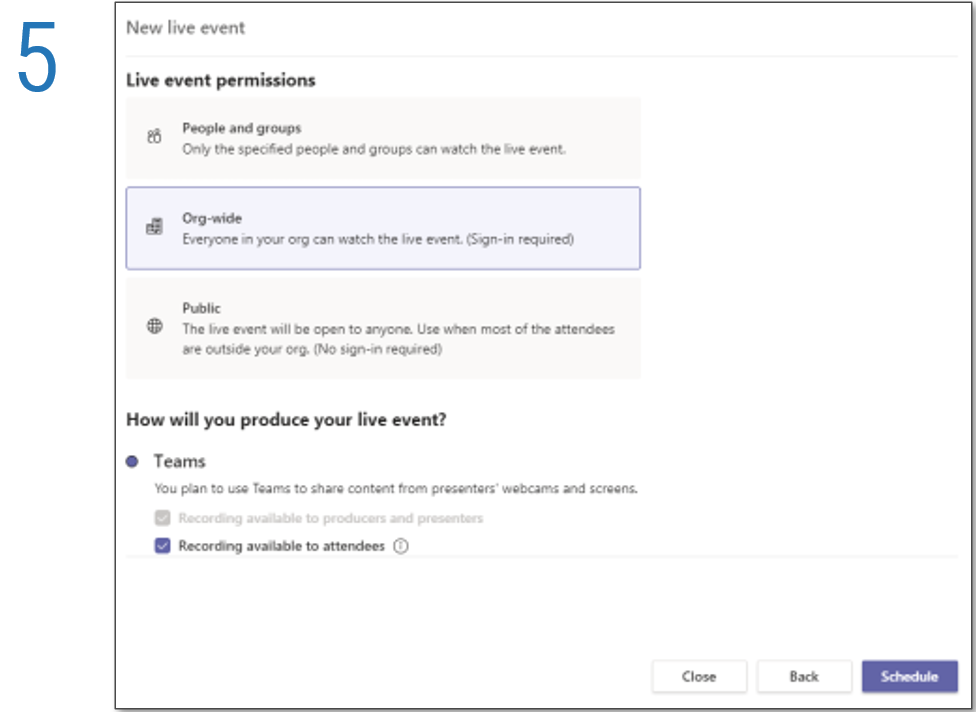 |
Select who your audience will be for your live event from three options: specified people and groups, the organization, or the public with no sign-in required. Edit the setting for whether you want recording to be available for attendees. Then click “Schedule” to finish. |
Live event settings explained
When you join the live event as a producer/presenter, nothing will be immediately broadcast. You’ll be in a pre-live state. Decide what content to share and in what order. Along the bottom of the screen, you can share your video and audio, share your screen, and mute incoming attendees. Once your content is ready to share along the bottom of the screen, add it to the screen on the left, in order of viewing. This is your queue – your “Pre-live” state. Then, click “Send now.” This content will now move to the right-hand screen, ready for broadcasting. Once you’re ready to broadcast, click “Start.” Your state will change from “Pre-live” to “Live.” Along the top right of the app will be a tools bar. |
 |
Workspace #1: Departments
Scenario: Most of your organization’s communication and collaboration occurs within its pre-existing departmental divisions.
Conventional communication channels:
- Oral communication: Employees work in proximity to each other and communicate in person, by phone, in department meetings
- Email: Department-wide announcements
- Memos: Typically posted/circulated in mailboxes
Solution: Determine the best way to organize your organization’s departments in Teams based on its size and your requirements to keep information private between departments.
Option A:
- Create a team for the organization/division.
- Create channels for each department. Remember that all members of a team can view all public channels created in that team and the default General channel.
- Create private channels if you wish to have a channel that only select members of that team can see. Remember that private channels have some limitations in functionality.
Option B:
- Create a new team for each department.
- Create channels within this team for projects or topics that are recurring workflows for the department members. Only department members can view the content of these channels.
Option C:
- Post departmental memos and announcements in the General channel.
- Use “Meet now” in channels for ad hoc meetings. For regular department meetings, create a recurring Teams calendar event for the specific department channel (Option A) or the General channel (Option B). Remember that all members of a team can join a public channel meeting.
Workspace #2: A cross-functional committee
Scenario: Your organization has struck a committee composed of members from different departments. The rest of the organization should not have access to the work done in the committee.
Purpose: To analyze a particular organizational challenge and produce a plan or report; to confidentially develop or carry out a series of processes that affect the whole organization.
Jobs: Committee members must be able to:
- Attend private meetings.
- Share files confidentially.
Solution:
Ingredients:
- Private team
Construction:
- Create a new private team for the cross-functional committee.
- Add only committee members to the team.
- Create channels based on the topics likely to be the focal point of the committee work.
- Decide how you will use the mandatory General channel. If the committee is small and the work limited in scope, this channel may be the main communication space. If the committee is larger or the work more complex, use the General channel for announcements and move discussions to new topic-related channels.
- Schedule recurring committee meetings in the Teams calendar. Add the relevant channel to the meeting invite to keep the meeting chat attached to this team and channel (as meeting organizer, put your name in the meeting invite notes, as the channel will show as the organizer in the Outlook invite).
- Remember that all members of this team will have access to these meetings and be able to view that they are occurring.
Workspace #3: An innovation day event
Scenario: The organization holds a yearly innovation day event in which employees form small groups and work on a defined, short-term problem or project.
Purpose: To develop innovative solutions and ideas.
Jobs:
- Convene small groups.
- Work toward time-sensitive goals.
- Communicate synchronously.
- Share files.
Solution:
Ingredients:
- Public team
- Channel tabs
- Whiteboard
- Planner
Construction:
- Create a team for the innovation day event.
- Add channels for each project working group.
- Communicate to participants the schedule for the day and their assigned channel.
- Use the General channel for announcements and instructions throughout the day. Ensure someone moderates the General channel for participants’ questions.
- Pre-populate the channel tabs with files the participants need to work with. To add a scrum board, refer to M#4 (Morning stand-up/Scrum) in this slide deck.
- For breakouts, instruct participants to use the “meet now” feature in their channel and how to use the Whiteboard during these meetings.
- Arrange to have your IT admin archive the team after a certain point so the material is still viewable but not editable.
Workspace #4: A non-work-related social event
Scenario: Employees within the organization wish to organize social events around shared interests: board game clubs, book clubs, TV show discussion groups, trivia nights, etc.
Purpose: To encourage cohesion among coworkers and boost morale.
Jobs:
- Schedule the event.
- Invite participants.
- Prepare the activity.
- Host and moderate the discussion.
Solution:
Ingredients:
- Public team
- Private channels
- Screen-sharing
Construction:
- Create a public team for the social event so that interested people can find and join it.
- Example: Trivia Night
- Schedule the event in the Teams calendar.
- Publish the link to the Trivia Night team where other employees will see it.
- Create private channels for each trivia team so they cannot see the other competitors’ discussions. Add yourself to each private channel so you can see their answers.
- As the host, begin a meeting in the General channel. Pose the trivia questions live or present the questions on PowerPoint via screen-sharing.
- Ask each team to post its answers to its private channel.
- To avoid teams sprawl, ask your IT admin to set a deletion policy for the team, as long as this request does not contradict your organization’s policies on data retention. If the team becomes moribund, it can be set to auto-delete after a certain period of time.
Workspace #5: A project team with a defined end time
Scenario: Within a department/workplace team, employees are assigned to projects with defined end times, after which they will be assigned to a new project.
Purpose: To complete project-based work that fulfills business needs.
Jobs:
- Oral communication with team members.
- Synchronous and asynchronous work on project files.
- The ability to attend scheduled meetings and ad hoc meetings.
- The ability to access shared resources related to the project.
Solution:
If your working group already has its own team within Teams:
- Create a new public or private channel for the project. Remember that some functionality is not available in private channels (such as Microsoft Planner).
- Use the channel for the project team’s meetings (scheduled in Teams calendar or through Meet Now).
- Add a tab that links to the team’s project folder in SharePoint.
If your workplace team does not already have its own team in Teams:
- Determine if there is a natural fit for this project as a new channel in an existing team. Remember that all team members will be able to see the channel if it is public and that all relevant project members need to belong to the Team to participate in the channel.
- If necessary, create a new team for the project. Add the project members.
- Create channels based on the type of work that comprises the project.
- Use the channel for the project team’s meetings (scheduled in Teams calendar or through Meet Now)
- Add a tab to link to the team’s project folder in SharePoint.
Info-tech Best Practice
Hide the channel after the project concludes to de-clutter your Teams user interface.
Meeting #1: Job interview with external candidate
Scenario: The organization must interview a slate of candidates to fill an open position.
Purpose:
- Select the most qualified candidate for the job.
Jobs:
- Create a meeting, ensuring the candidate and other attendees know when and where the meeting will happen.
- Ensure the meeting is secure to protect confidential information.
- Ensure the meeting is accessible, allowing the candidate to present themselves through audio and/or visual means.
- Create a professional environment for the meeting to take place.
- Engender a space for the candidate to share their CV, research, or other relevant file.
- The interview must be transcribed and recorded.
Solution:
Ingredients:
- Private Teams meeting
- Screen-sharing
- Microsoft Stream
Construction:
- Create a Teams meeting, inviting the candidate with their email, alongside other internal attendees. The Teams meeting invite will auto-generate a link to the meeting itself.
- The host can control who joins the meeting through settings for the “lobby.”
- Through the Teams meeting, the attendees will be able to use the voice and video chat functionality.
- All attendees can opt to blur their backgrounds to maintain a professional online presence.
- The candidate can share their screen, either specific applications or their whole desktop, during the Teams meeting.
- A Teams meeting can be recorded and transcribed through Stream. After the meeting, the transcript can be searched, edited, and shared
NB: The external candidate does not need the Teams application. Through the meeting invite, the external candidate will join via a web browser.
Meeting #2: Quarterly board meeting
Scenario: Every quarter, the organization holds its regular board meeting.
Purpose: To discuss agenda items and determine the company’s future direction.
Jobs:
-
During meeting:
- Attendance and minutes must be taken.
- Votes must be recorded.
- In-camera sessions must occur.
- External experts must be included. After meeting:
- Follow-up items must be assigned.
- Reports must be submitted.
Solution:
Ingredients:
- Teams calendar invite
- Planner; Forms
- Private channel
- Microsoft Stream
Construction:
- Guest Invite: Invites can be sent to any non-domain-joined email address to join a private, invitation-only channel within the team controlled by the board chair.
- SharePoint & Flow: Documents are emailed to the Team addresses, which kicks off an MS Flow routine to collect review notes.
- Planner: Any board member can assign tasks to any employee.
- Forms/Add-On: Chair puts down the form of the question and individual votes are tracked.
- Teams cloud meeting recording: Recording available through Stream. Manual edits can be made to VTT caption file. Greater than acceptable transcription error rate.
- Meeting Log: Real-time attendance is viewable but a point-in-time record needs admin access.
NB: The external guests do not need the Teams application. Through the meeting invite, the guests will join via a web browser.
Meeting #3: Weekly team meeting
Scenario: A team meets for a weekly recurring meeting. The meeting is facilitated by the team lead (or manager) who addresses through agenda items and invites participation from the attendees.
Purpose: The purpose of the meeting is to:
- Share information verbally
- Present content visually
- Achieve consensus
- Build team morale
Jobs: The facilitator must:
- Determine participants
- Book room
- Book meeting in calendar
Solution:
Ingredients:
- Meeting Place: A channel in Microsoft Teams (must be public) where all members of the meeting make up the entirety of the audience.
- Calendar Recurrence: A meeting is booked through Teams and appears in all participants’ Outlook calendar.
- Collaboration Space: Participants join the meeting through video or audio and can share screens and contribute text, images, and links to the meeting chat.
Construction:
- Ensure your team already has a channel created for it. If not, create one in the appropriate team.
- Create the meeting using the calendar view within Microsoft Teams:
- Set the meeting’s name, attendees, time, and recurrence.
- Add the team channel that serves as the most appropriate workplace for the meeting. (Any discussion in the meeting chat will be posted to this channel.)
NB: Create the meeting in the Teams calendar, not Outlook, or you will not be able to add the Teams channel. As meeting organizer, put your name in the meeting invite notes, as the channel will show as the organizer in the Outlook invite.
Meeting #4: Morning stand-up/scrum
Scenario: Each morning, at 9am, members of the team meet online.
Purpose: After some pleasantries, the team discusses what tasks they each plan to complete in the day.
Jobs: The team leader (or scrum master) must:
- Place all tasks on a scrum board, each represented by a sticky note denoting the task name and owner.
- Move the sticky notes through the columns, adjusting assignments as needed.
- Sort tasks into the following columns: “Not Started,” “In Progress,” and “Done.”
Solution:
Ingredients:
- Meeting Place: A channel in Microsoft Teams (must be public) where all members of the meeting make up the entirety of the audience.
- Scrum Board: A tab within that channel where a persistent scrum board has been created and is visible to all team members.
Meeting Place Construction:
- Create the meeting using the calendar view in Teams.
- Set the meeting’s name, attendees, time, and work-week daily recurrence (see left).
- Add the channel that is the most appropriate workplace for the meeting. Any meeting chat will be posted to this channel rather than a separate chat.
Scrum Board Construction:
- Add a tab to the channel using Microsoft Planner as the app. (You can use other task management apps such as Trello, but the identity integration of first-party Office 365 tools may be less hassle.)
- Create a new (or import an existing) Plan to the channel. This will be used as the focal point.
Meeting #5: Weekly team meeting
Scenario: An audio-only conversation that could be a regularly scheduled event but is more often conducted on an ad-hoc basis.
Purpose: To quickly share information, achieve consensus, or clarify misunderstandings.
Jobs:
- Dial recipient
- See missed calls
- Leave/check voicemail
- Create speed-dial list
- Conference call
Solution:
Ingredients:
- Audio call begun through Teams chat.
Construction:
- Voice over IP calls between users in the same MS Teams tenant can begin in multiple ways:
- A call can be initiated through any appearance of a user’s profile picture: hover over user’s profile photo in the Chat list and select the phone icon.
- Enter your last chat with a user and click phone icon in upper-right corner.
- Go to the Calls section and type the name in the “Make a call” text entry form.
- Voicemail: Voicemail, missed calls, and call history are available in the Calls section.
- Speed dial: Speed dial lists can be created in the Calls section.
- Conference call: Other users can be added to an ongoing call.
NB: Microsoft Teams can be configured to provide an organization’s telephony for external calls, but this requires an E5 license. Additional audio-conferencing licenses are required to call in to a Teams meeting over a phone.
Bibliography 1/4
Section 1: Teams for IT › Creation Process
Overview: Creation process
- “How do I get access to Microsoft Teams?” Microsoft, n.d., support.office.com/en-us/article/how-do-i-get-access-to-microsoft-teams-fc7f1634-abd3-4f26-a597-9df16e4ca65b. Accessed 11 May 2020.
- “Logical architecture for Microsoft Teams and related services.” Microsoft, 6 Mar. 2020, docs.microsoft.com/en-us/microsoftteams/teams-architecture-solutions-posters. Accessed 9 May 2020.
- “Plan for governance in Teams.” Microsoft, 10 Aug. 2018, docs.microsoft.com/en-us/MicrosoftTeams/plan-teams-governance. Accessed 30 Apr. 2020.
Assign admin roles
- “Use Microsoft Teams administrator roles to manage Teams.” Microsoft, 19 Sep. 2018, docs.microsoft.com/en-us/microsoftteams/using-admin-roles. Accessed 9 May 2020.
Prepare the network
- “Prepare your organization's network for Microsoft Teams.” Microsoft, 28 Apr. 2020, docs.microsoft.com/en-us/microsoftteams/prepare-network. Accessed 9 May 2020.
Team creation
- “Best practices for organizing teams in Microsoft Teams.” Microsoft, 13 Apr. 2020, docs.microsoft.com/en-us/microsoftteams/best-practices-organizing. Accessed 9 May 2020.
- “Create your first teams and channels in Microsoft Teams.” Microsoft, 27 Apr. 2020, docs.microsoft.com/en-us/microsoftteams/get-started-with-teams-create-your-first-teams-and-channels. Accessed 9 May 2020.
Integrations with SharePoint Online
- “Configure Teams with three tiers of protection.” Microsoft, 7 May 2020, docs.microsoft.com/en-us/microsoft-365/solutions/configure-teams-three-tiers-protection?view=o365-worldwide. Accessed 9 May 2020.
- “File collaboration in SharePoint with Microsoft 365.” Microsoft, 21 Apr. 2020, docs.microsoft.com/en-us/sharepoint/deploy-file-collaboration. Accessed 9 May 2020.
Permissions
- “Manage app permission policies in Microsoft Teams.” Microsoft, 21 Apr. 2020, docs.microsoft.com/en-us/microsoftteams/teams-app-permission-policies. Accessed 9 May 2020.
- “Manage messaging policies in Teams.” Microsoft, 27 Apr. 2020, docs.microsoft.com/en-us/MicrosoftTeams/messaging-policies-in-teams. Accessed 30 Apr. 2020.
- “Sensitivity labels for Microsoft Teams.” Microsoft, 22 Apr. 2020, docs.microsoft.com/en-us/MicrosoftTeams/sensitivity-labels. Accessed 9 May 2020.
Bibliography 2/4
Section 1: Teams for IT › Creation Process (cont'd.)
External and guest access
- “Add a guest to Teams.” Microsoft, 22 Apr. 2020, docs.microsoft.com/en-us/microsoftteams/add-guests. Accessed 30 Apr. 2020.
- “Communicate with users from other organizations in Microsoft Teams.” Microsoft, 22 Apr. 2020, docs.microsoft.com/en-us/MicrosoftTeams/communicate-with-users-from-other-organizations. Accessed 30 Apr. 2020.
- “Guest access in Microsoft Teams.” Microsoft, 22 Apr. 2020, docs.microsoft.com/en-us/microsoftteams/guest-access. Accessed 9 May 2020.
- “Manage external access in Microsoft Teams.” Microsoft, 22 Apr. 2020, docs.microsoft.com/en-us/microsoftteams/manage-external-access. Accessed 9 May 2020.
- “Microsoft Teams guest access checklist.” Microsoft, 27 Apr. 2020, docs.microsoft.com/en-us/microsoftteams/guest-access-checklist. Accessed 30 Apr. 2020.
- “Turn on or turn off guest access to Microsoft Teams.” Microsoft, 27 Apr. 2020, docs.microsoft.com/en-us/microsoftteams/set-up-guests. Accessed 9 May 2020.
- “What the guest experience is like.” Microsoft, 27 Apr. 2020, docs.microsoft.com/en-us/MicrosoftTeams/guest-experience. Accessed 4 May 2020.
Expiration and archiving
- “Archive or delete a team in Microsoft Teams.” Microsoft, 27 Apr. 2020, docs.microsoft.com/en-us/microsoftteams/archive-or-delete-a-team?view=o365-worldwide. Accessed 29 Apr. 2020.
- “Microsoft 365 group expiration policy.” Microsoft, 6 May 2020, docs.microsoft.com/en-us/microsoft-365/admin/create-groups/office-365-groups-expiration-policy?view=o365-worldwide. Accessed 9 May 2020.
- “Team expiration and renewal in Microsoft Teams.” Microsoft, 6 Feb. 2020, docs.microsoft.com/en-us/microsoftteams/team-expiration-renewal. Accessed 9 May 2020.
Retention and data loss prevention
- “Data loss prevention and Microsoft Teams.” Microsoft, 21 Apr. 2020, docs.microsoft.com/en-us/microsoft-365/compliance/dlp-microsoft-teams?view=o365-worldwide. Accessed 9 May 2020.
- “Retention policies in Microsoft Teams.” Microsoft, 5 May 2020, docs.microsoft.com/en-us/microsoftteams/retention-policies. Accessed 9 May 2020.
Teams telephony
- “Here's what you get with Phone System in Office 365.” Microsoft, 26 Feb. 2020, docs.microsoft.com/en-us/microsoftteams/here-s-what-you-get-with-phone-system. Accessed 9 May 2020.
- O’Donnell, J.P. “The killer feature in Microsoft Teams your business should be using.” Amaxra, n.d., www.amaxra.com/blog/the-killer-feature-in-microsoft-teams-your-business-should-be-using. Accessed 4 May 2020.
- “Set up Phone System in your organization.” Microsoft, 27 Apr. 2020, docs.microsoft.com/en-us/MicrosoftTeams/deploy-audio-conferencing-teams-landing-page. Accessed 4 May. 2020.
- “What is Phone System in Office 365?” Microsoft, 29 Apr. 2020, docs.microsoft.com/en-us/microsoftteams/what-is-phone-system-in-office-365. Accessed 9 May 2020.
Bibliography 3/4
Section 1: Teams for IT › Teams Rollout
From Skype to Teams
- “FAQ — Upgrading from Skype for Business to Microsoft Teams.” Microsoft, 27 Apr. 2020, docs.microsoft.com/en-us/microsoftteams/faq-journey. Accessed 9 May 2020.
- “Teams and Skype interoperability.” Microsoft, 21 Apr. 2020, docs.microsoft.com/en-us/microsoftteams/teams-skype-interop. Accessed 9 May 2020.
- “Understand Microsoft Teams and Skype for Business coexistence and interoperability.” Microsoft, 3 Apr. 2020, docs.microsoft.com/en-us/microsoftteams/teams-and-skypeforbusiness-coexistence-and-interoperability. Accessed 9 May 2020.
From Slack to Teams
- “Migrate from Slack to Microsoft Teams.” Microsoft, 14 Apr. 2020, docs.microsoft.com/en-us/microsoftteams/migrate-slack-to-teams. Accessed 9 May 2020.
Teams adoption
- “365 adoption guide” Microsoft, 22 Jan. 2020, query.prod.cms.rt.microsoft.com/cms/api/am/binary/RWqTOD. Accessed 9 May 2020.
Section 1: Teams for IT › Use Cases
- Acharya, Ansuman. “Microsoft Teams launches eDiscovery for calling and meetings.” Microsoft Tech Community, 2 Jul. 2018, techcommunity.microsoft.com/t5/microsoft-teams-blog/microsoft-teams-launches-ediscovery-for-calling-and-meetings/ba-p/210947. Accessed 30 Apr. 2020.
- “Conduct an eDiscovery investigation of content in Microsoft Teams.” Microsoft, 27 Apr. 2020, docs.microsoft.com/en-us/microsoftteams/ediscovery-investigation?view=o365-worldwide#overview, Accessed 29 Apr. 2020.
- “Teams cloud meeting recording: Compliance and eDiscovery for meeting recordings.” Microsoft, 27 Apr. 2020, docs.microsoft.com/en-us/MicrosoftTeams/cloud-recording#compliance-and-ediscovery-for-meeting-recordings. Accessed 29 Apr. 2020.
Bibliography 4/4
Section 2: Teams for End Users › Teams, Channels, Chat
- “Limits and specifications for Microsoft Teams.” Microsoft, 29 Apr. 2020, docs.microsoft.com/en-us/MicrosoftTeams/limits-specifications-teams. Accessed 4 May 2020.
- “Location of data in Microsoft Teams.” Microsoft, 27 Apr. 2020, docs.microsoft.com/en-us/MicrosoftTeams/location-of-data-in-teams. Accessed 4 May 2020.
- “Manage the Whiteboard in Microsoft Teams.” Microsoft, 1 Oct. 2019, docs.microsoft.com/en-us/microsoftteams/manage-whiteboard. Accessed 9 May 2020.
- [Microsoft Teams admin documentation.] Microsoft, n.d., docs.microsoft.com/en-us/MicrosoftTeams/teams-overview. Accessed 29 Apr. 2020.
- “Overview of teams and channels in Microsoft Teams.” Microsoft, 9 Mar. 2020, docs.microsoft.com/en-us/MicrosoftTeams/teams-channels-overview. Accessed 4 May 2020.
- “Private channels in Microsoft Teams.” Microsoft, 24 Feb. 2020, docs.microsoft.com/en-us/MicrosoftTeams/private-channels. Accessed 30 Apr. 2020.
Section 2: Teams for End Users › Meetings and Live Events
- “Admin quick start – Meetings and live events in Microsoft Teams.” Microsoft, 7 Apr. 2020, docs.microsoft.com/en-us/microsoftteams/quick-start-meetings-live-events. Accessed 21 Apr. 2020.
- “Get started with Microsoft Teams live events.” Microsoft, n.d., support.office.com/en-us/article/get-started-with-microsoft-teams-live-events-d077fec2-a058-483e-9ab5-1494afda578a#bkmk_roles. Accessed 29 Apr. 2020.
- “Schedule a Teams live event.” Microsoft, n.d., support.microsoft.com/en-us/office/schedule-a-teams-live-event-7a9ce97c-e1cd-470f-acaf-e6dfc179a0e2. Accessed 29 Apr. 2020.
- “Search the audit log for events in Microsoft Teams.” Microsoft, 12 Mar. 2018, docs.microsoft.com/en-us/microsoftteams/audit-log-events?view=o365-worldwide. Accessed 30 Apr. 2020.
Section 2: Teams for End Users › Use Cases
- “Understand calling in Microsoft Teams.” Microsoft, n.d., docs.microsoft.com/en-us/microsoftteams/tutorial-calling-in-teams. Accessed 9 May 2020.